
If you've set up Appium before, you know the steps: install the server, install a driver, wire up capabilities, point a client library at the server URL and then - if a single capability isn't misconfigured — you get a session. That's several things to get right before you write your first assertion.
Maestro takes the opposite stance. A test is a short YAML file, there's no driver to configure and your first passing flow is genuinely a few minutes away. In this article you'll install Maestro, run a real test against a real app on Android first, then iOS, and learn the handful of commands you'll use in almost every flow.
We'll use the WebdriverIO Native Demo App as our test target — the same app that powers the Framework Series and the one we'll carry through the rest of this Maestro mini-series — so the examples are concrete, not abstract.
What is Maestro?
Maestro is a mobile (and web) UI testing tool built around one idea: tests should be simple enough to read at a glance. Instead of writing code against a WebDriver client you describe interactions as a list of commands in a YAML file - launchApp, tapOn, inputText, assertVisible - and Maestro interprets and runs them.
Its headline feature is built-in tolerance for flakiness. Maestro automatically waits for elements to appear and retries when the UI is still settling, so you rarely reach for the manual sleep() calls that show up throughout so many Appium suites.
💡 Maestro covers Android, iOS, React Native, Flutter, and hybrid/web-view apps. In this series we focus on native Android and iOS, but the flow syntax is identical across platforms - that's the point of it.
Three ways to work with Maestro
Maestro isn't one single tool — it's three, and it's worth knowing the difference before you install anything:
- Maestro CLI - the command-line tool that runs your flows locally from your terminal. This is what this article and the rest of this series uses.
- Maestro Studio - a desktop app for inspecting elements on a connected device and building, running and debugging flows visually. It's a separate download from the CLI (we'll use it later in this article).
- Maestro Cloud - mobile.dev's hosted service for running flows in the cloud and wiring them into CI without managing your own device farm. We'll cover it briefly in the third article of this series.
👍 For learning the fundamentals, the CLI is the right starting point - no account required to install it or run flows locally and every flow you write for it works unchanged if you move to Cloud later.
We'll cover when Maestro is the right choice and when it isn't in the comparison article that closes this series. For now, let's get it running.
Prerequisites
Maestro sits on top of the same device tooling you already use for mobile testing. Before installing it, make sure you have:
- Java 17 or higher — Maestro's CLI requires it. Check with
java -version. - Android: Android SDK platform-tools (so
adbis on yourPATH) and a running emulator or a connected device. If you followed our Appium Android setup guide, you already have this. - iOS (macOS only): Xcode with Command Line Tools (
xcode-select --install) and an iOS Simulator runtime (the iOS version your simulator will run). Covered in our Appium iOS setup guide.
Step 1 - Install Maestro
If you followed our Appium setup guides, you already have Homebrew installed — use it:
brew tap mobile-dev-inc/tap
brew trust --formula mobile-dev-inc/tap/maestro
brew install mobile-dev-inc/tap/maestro
No Homebrew? Run the official install script instead — it drops Maestro into ~/.maestro/bin and adds it to your PATH:
curl -fsSL "https://get.maestro.mobile.dev" | bashRestart your terminal (or source your shell profile) so the change takes effect, then verify:
maestro --version✅ If successful, the terminal prints the installed version number (e.g.2.x.x). If you getcommand not foundafter a brew install, re-runbrew install mobile-dev-inc/tap/maestroand check the output for errors.
Step 2 - Get the demo app onto a device
We're testing the WebdriverIO Native Demo App. Grab the build for your platform from the native-demo-app releases page.
- Android: the
.apk. Its app id (package name) iscom.wdiodemoapp. - iOS: the simulator
.app(inside the.zip). Its bundle id isorg.wdiodemoapp.
Android
Boot an emulator (or plug in a device) — our Appium Inspector guide shows how - then confirm it's visible to your tooling:
adb devices✅ You should see your device/emulator listed as device.Now go to the folder where you downloaded the APK and install it:
cd ~/Downloads
adb install android.wdio.native.app.v2.2.0.apk
💡 The version number in the filename may differ depending on the release you downloaded - use the exact name of your file.
iOS
🚨 Maestro's CLI supports iOS Simulator builds (.app) only — real-device.ipabuilds aren't supported. Use the simulator build for this article.
Unzip the download to get the .app. Boot a simulator from Xcode (or open -a Simulator). Prefer the terminal? List the available simulators, boot one by its UDID, then open the Simulator app to see it:
xcrun simctl list devices available
xcrun simctl boot <UDID>
open -a Simulator
Then confirm it's running:
xcrun simctl list devices booted✅ You should see your simulator listed asBooted. Our Appium Inspector guide also usesxcrun simctl list devicesto find your simulators.
Now install the app on the booted simulator:
xcrun simctl install booted ~/Downloads/<your-app>.app💡 You can also drag-and-drop the .app onto the running simulator window to install it.Step 3 - Write your first flow
A Maestro flow is a YAML file with two parts, split by a - - - separator: a header that says which app the flow runs against, and an ordered list of commands to run on it.
First, create a folder for your flows and move into it. Every maestro test command in this article runs from here:
mkdir ~/maestro-demo
cd ~/maestro-demo
Start with the smallest possible passing test - launch the app and confirm a known element is on screen. Save this as first_flow.yaml:
appId: com.wdiodemoapp
---
- launchApp:
    clearState: true
- assertVisible: "Login"
What each line does:
appId— which app this flow targets. Swap this fororg.wdiodemoappwhen running on iOS (we'll parametrize this in Running the same flow on iOS below).launchAppwithclearState: true— start the app from a clean slate, so previous runs don't leak state into this one. On Android, this clears the app's data (shared preferences, databases, accounts) the same wayadb shell pm cleardoes, without uninstalling it. On iOS, Maestro reinstalls the app entirely, which gives you the same fresh state.assertVisible: "Login"— confirm the Login tab is on screen. If it's not there within Maestro's wait window the flow fails.
💡 This clearState habit maps directly to a core framework principle we cover in Why Most Mobile Test Automation Frameworks Fail: a test must not depend on the state left behind by another. Maestro makes the clean-slate the easy default.Step 4 - Run it
With a device booted and the app installed, run:
maestro test first_flow.yamlMaestro launches the app, executes each command in order and prints a live checkmarked report of every step.
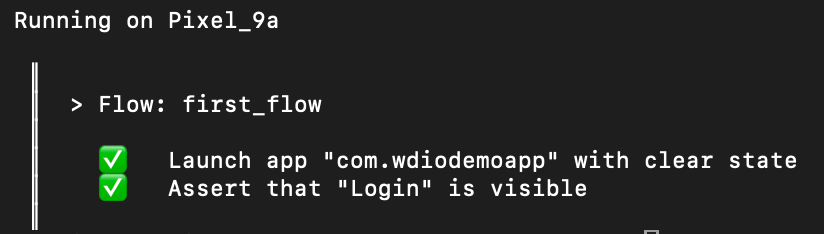
✅ A green run means your environment is wired correctly end-to-end: Maestro found the device, drove the app, and the assertion held. That's your first passing Maestro test.
💡 Two things you may notice. You may seeWARNING: sun.misc.Unsafe…lines when Maestro starts - they come from a library Maestro bundles, not from your flow and they're harmless. And if more than one device or simulator is connected, Maestro asks which to use; with only one connected, it uses that one without asking — so check theRunning on …line at the top of the output, and pass--platform ios(or--platform android) or--device <id>to be explicit.
👍 Iterating on a flow? Add -c (--continuous) to re-run it automatically every time you save the file. There's no compile step to wait through, unlike an Appium/Java suite where editing a test means Maven or Gradle has to rebuild before it runs again - Maestro just re-parses the YAML and re-runs it the moment you save:
maestro test -c first_flow.yamlEach save re-runs the whole flow from the top - not just the line you changed - but for a short flow like this one, that's still a matter of seconds. This is where Maestro's YAML-only approach pays off during authoring: you tweak a line, save, and see the result almost immediately.
Step 5 - A real interaction: log in
Asserting one element proves your environment is wired correctly, but it doesn't exercise any real behavior. Let's drive an actual user journey: the demo app's Login tab has an email field, a password field and a login button. Save this as login.yaml:
appId: com.wdiodemoapp
---
- launchApp:
    clearState: true
- tapOn: "Login"
- tapOn: "Email"
- inputText: "test@mobile-automation.io"
- tapOn: "Password"
- inputText: "Password1234"
- hideKeyboard
- tapOn: "button-LOGIN"
- assertVisible: "You are logged in!"
Notice we never wrote a single locator strategy or XPath. Maestro matches on visible text by default — tapOn: "Login" finds the element showing that text, and the input fields are matched by their placeholder text. This is what makes Maestro flows so quick to write.
⚠️ Watch out: text matching ignores case. On the Login screen, three elements match "Login": the bottom tab, the form's Login/Sign up toggle, and the submit button. Maestro will tap whichever one it finds first and report success, even if it's the wrong one. To target only the submit button, the flow taps "button-LOGIN" instead — its accessibility label, which no other element on the screen has.Run it the same way:
maestro test login.yaml💡 Confirm the exact labels for your build. The demo app is updated over time, so the email/password placeholders, the button's accessibility label (button-LOGIN), and the success message (You are logged in!) may differ slightly in your version. Don't guess - use Maestro Studio (next) to read the exact on-screen text, then adjust the flow. Getting in the habit of verifying rather than assuming is the difference between a flow that passes once and one that keeps passing.
Maestro Studio: stop guessing at elements
When a tapOn or assertVisible can't find what you expect, you need to see the screen the way Maestro sees it. That's what Maestro Studio is for.
Studio is a desktop app, separate from the CLI you installed in Step 1. Download the installer for your OS from the Maestro Studio guide - on macOS, open the .dmg and drag Studio into your Applications folder. Studio asks you to sign in with an account the first time you open it - the CLI doesn't. Then:
- Launch Studio and click New workspace. Pick your
maestro-demofolder. - Click Select device and choose your running emulator or simulator.
- Right-click any element on the device screen to add the matching command to your test - then copy it into your flow.
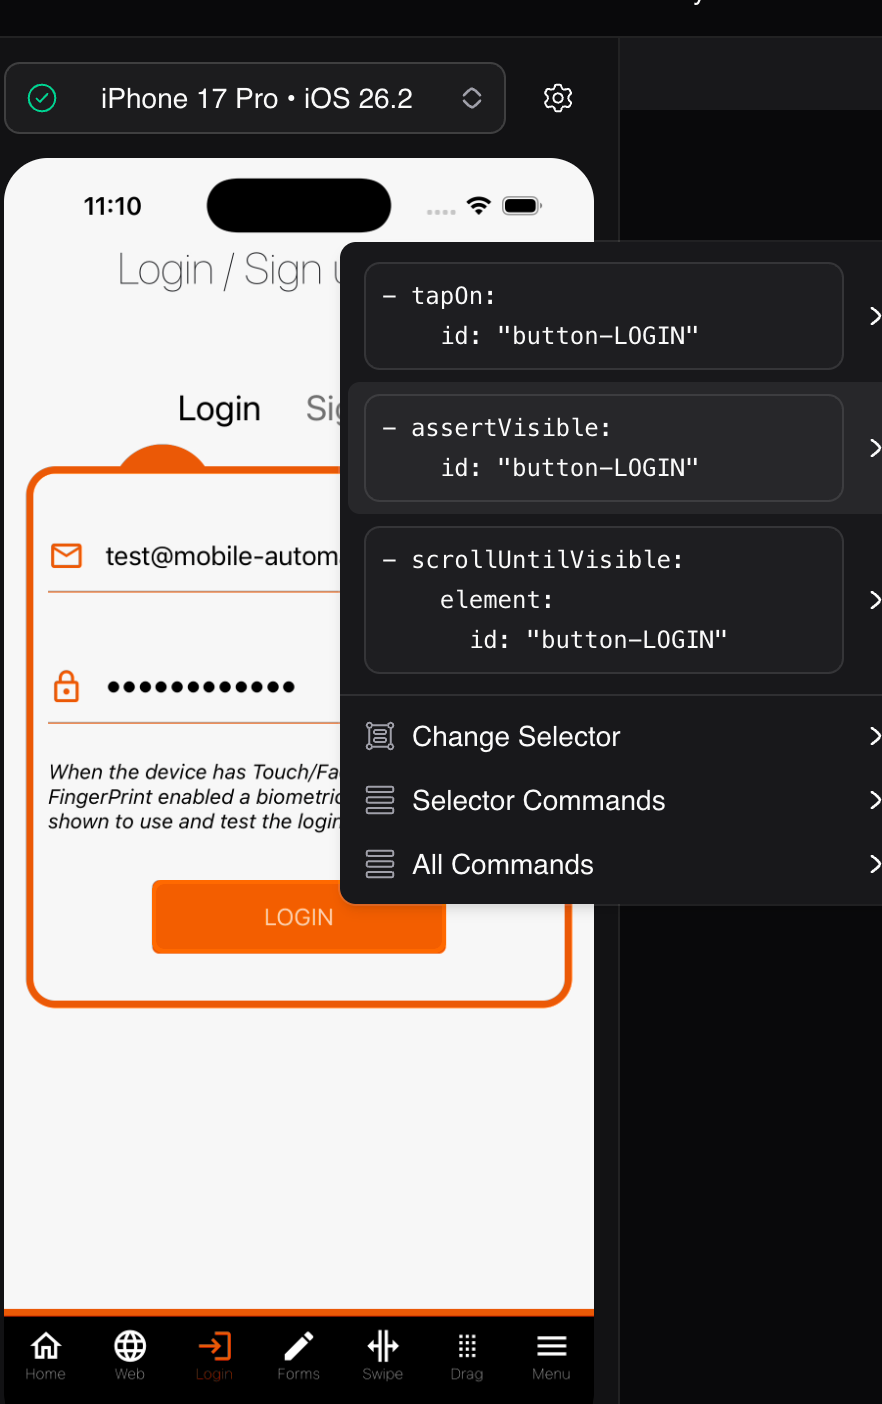
💡 Studio picks the selector for the platform of the device you've selected. For the same LOGIN button it generatedtapOn: "button-LOGIN"(text) on Android andtapOn:withid: "button-LOGIN"on iOS - so the same button can need a different selector on each platform.
Prefer the terminal? maestro hierarchy prints the elements on whatever screen is currently open on the device — navigate to the Login screen first, so you can read exact text and ids without leaving the command line. The full output is a very long JSON tree, so add --compact to get one line per element and filter it with grep. If you have more than one device running, add --platform android (or --platform ios) — right after maestro, before hierarchy — or the command stops with a "Multiple devices connected" error:
maestro --platform android hierarchy --compact | grep -i login⚠️ Watch out:--platformhas to come beforehierarchy. Put it after the pipe (`|`) instead, and it gets passed togrep, notmaestro—grepwill then error withunrecognized option.
💡 If you've used our Appium Inspector guide, Maestro Studio fills the same role: it's how you discover what's on screen instead of guessing. Reach for it whenever a selector doesn't match.
Running the same flow on iOS
Almost everything above runs unchanged on an iOS simulator. Two things differ: the appId, and how the LOGIN button is targeted. Rather than maintain two copies of every flow, parametrize the appId and handle the button with a platform condition. Take the login flow from Step 5 and change it:
appId: ${APP_ID}
---
- launchApp:
    clearState: true
- tapOn: "Login"
- tapOn: "Email"
- inputText: "test@mobile-automation.io"
- tapOn: "Password"
- inputText: "Password1234"
- hideKeyboard
- runFlow:
    when:
      platform: Android
    commands:
      - tapOn: "button-LOGIN"
- runFlow:
    when:
      platform: iOS
    commands:
      - tapOn:
          id: "button-LOGIN"
- assertVisible: "You are logged in!"
The app exposes the login button's label button-LOGIN differently on each platform. On Android, Maestro matches it as text. On iOS it's an accessibility identifier, so it needs the id selector. A when: platform: condition lets one file hold both — each step runs only on its own platform, and Maestro skips the other. We cover conditions properly in the next article.
Then pass the id at run time:
# Android
maestro --platform android test -e APP_ID=com.wdiodemoapp login.yaml
# iOS
maestro --platform ios test -e APP_ID=org.wdiodemoapp login.yaml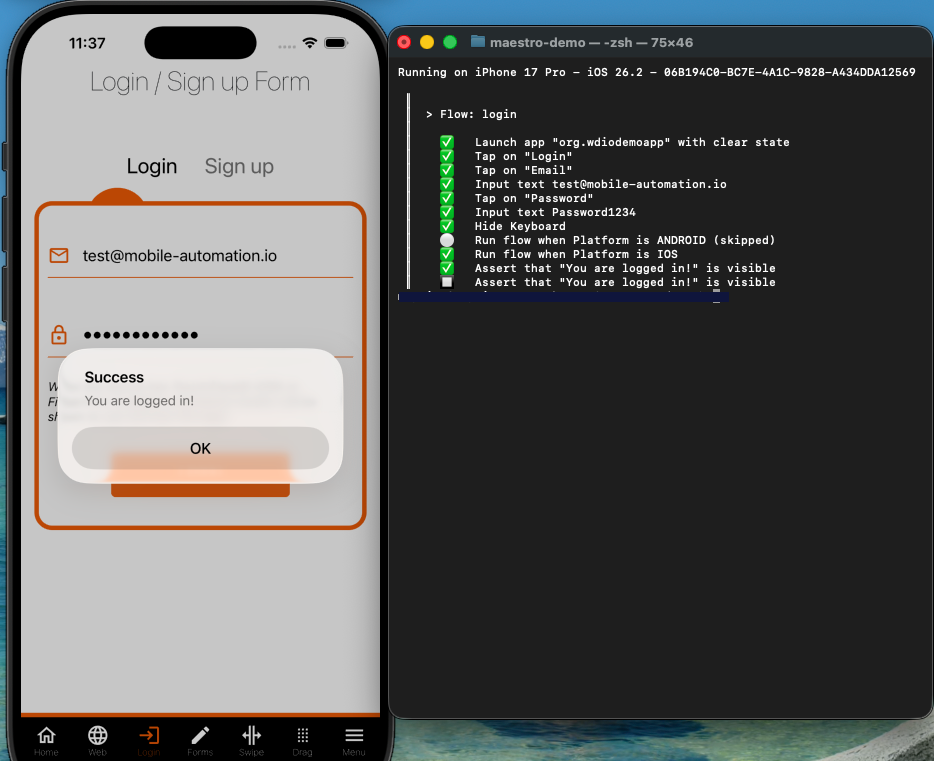
✅ One file, two platforms — typing into fields, submitting, and asserting the result run from the same flow, with only the LOGIN button needing a platform-specific step. That's the cross-platform payoff Maestro gives you almost for free, because the demo app exposes the same visible text on both. We'll lean on this much harder in the rest of the series.
Command quick reference
| Command | What it does | Example |
|---|---|---|
launchApp |
Starts the app (use clearState: true for a clean slate) |
- launchApp: clearState: true |
tapOn |
Taps an element by visible text… | - tapOn: "Login" |
tapOn: { id } |
…or by id (Android resource ID, iOS accessibility identifier) | - tapOn: id: "login_button" |
inputText |
Types into the focused field | - inputText: "hello" |
assertVisible |
Fails the flow if the element isn't on screen | - assertVisible: "You are logged in!" |
hideKeyboard |
Dismisses the on-screen keyboard | - hideKeyboard |
This is a starting handful, not the full list — see the complete commands reference for everything Maestro supports.
💡 Prefer matching by visible text when you're starting out - it's the most readable. Switch to id matching when the content is dynamic, the element is an icon with no text or the app is localized. We dig into selector trade-offs in the next article.What's Next?
You've installed Maestro, run flows on both Android and iOS, walked through a real login journey and met Maestro Studio - the core loop for writing and running any flow.
Next in the series, Maestro Beyond the Basics, we go past single flows: reusable subflows so you stop repeating yourself, conditionals for screens that don't always look the same, and running your flows in CI so they execute on every change instead of only when you remember.
Then we close the series with the honest verdict - Maestro vs Appium - now that you've actually felt what Maestro is like to use.


Discussion