
Maestro in GitHub Actions ran your flows on GitHub's machines, on an emulator and a simulator you booted yourself. It works but it has limits: one device per job, a slow iOS run and device setup you have to maintain. Maestro Cloud removes all three. You upload the app and your flows and Maestro provides the devices. As you'll see that doesn't always make your suite faster.
This is the first of four parts on Maestro Cloud. In this one, you'll run the same flows folder on Maestro's hosted devices from your terminal. By the end, you'll know how to:
- Create a Cloud account and find the API key and project ID the CLI needs
- Check that your app build will run on Cloud's devices
- Run flows with
maestro cloudand read the results in the Maestro Console - Fix a flow that passes locally but fails on Cloud using a real iOS keyboard failure as the example
- Run flows in parallel across several devices and measure what that actually saves
💡 Disclosure: Maestro gave me one month of free Maestro Cloud access (2 Android devices, 1 iOS device) so I could test Cloud on both platforms, including parallel runs on Android. They had no input on this article and everything here including the limitations and whether Cloud is worth the price is my own assessment. Thanks to the Maestro team for making the testing possible.
What Is Maestro Cloud?
Maestro Cloud is Maestro's hosted service for running flows. Instead of booting an emulator or simulator yourself, you upload the app and your flows and Maestro runs them on its own devices, in parallel. Every test starts on a brand-new device so nothing left over from one test (a logged-in user, saved data, an open screen) can affect the next.
You don't need to install anything new. The same maestro command you've used since Article 1 runs flows on Cloud: just swap maestro test for maestro cloud. Your flow files stay exactly the same.
⚠️ Important: Maestro Cloud runs your tests on Android emulators and iOS simulators not real phones. For iOS, Cloud only accepts a version of your app built for simulators which can't run on a real iPhone. If your team needs to test on real devices, Cloud doesn't cover that. You'll need a third-party device farm.
What You Pay For
Cloud is priced by how many tests can run at the same time: $250 a month for each Android or iOS device, according to Maestro's pricing page. The setup used in this series (2 Android devices and 1 iOS device) would cost $750 a month or about $637.50 if you pay yearly.
That cost grows with every device you add, so instead of relying on Maestro's claims this series tests what you actually get for it. Part 4 compares the plans in detail and gives the verdict on whether it's worth it.
Before You Start
You need four things:
- A Maestro account. Sign up on the Maestro sign-up page.
- A Cloud plan. Cloud isn't included in Maestro's free plan. To try it, start the 7-day free trial from the Upgrade Plan screen in the Dashboard. The trial gives you 1 Android and 1 iOS device enough to follow Parts 1 and 2. You won't be able to run flows in parallel though, which needs at least 2 devices on the same platform.
- The Maestro CLI installed as in Article 1.
- Your app, built in a format Cloud accepts. Not every build works. The next section shows which ones do.
💡 Tip: the trial lasts 7 days from when you start it. Get your flows passing locally first, so you spend the 7 days testing on Cloud not fixing your setup.
What Cloud Needs From Your App
Cloud can't run every build of your app. Here's what it accepts.
| Platform | ✅ Works on Cloud | ❌ Doesn't work |
|---|---|---|
| Android | An .apk built for ARM or for several processor types |
An .aab bundle or an .apk built only for x86 |
| iOS | A simulator build (a .app folder) |
A build for real iPhones |
Android: check the processor type. Cloud's emulators use ARM processors like real phones. If your APK was built only for x86 (common for CI emulators), it won't launch on Cloud.
To see which processor types an APK supports, list the folders under lib/ inside it:
unzip -l app.apk | grep "lib/" | awk '{print $4}' | cut -d/ -f2 | sort -uIf you see only x86 or x86_64, ask your developers for an ARM build (arm64-v8a) or one that supports several types. If you see nothing at all your app has no native code and runs on any processor, so you're fine.
💡 Note: the demo APK used in this series supports every processor type, so it runs on Cloud without changes.
iOS: use the simulator build. The demo app release you downloaded in Article 1 (ios.simulator.wdio.native.app.v2.2.0.zip) is already a simulator build. You can upload the .zip as it is, without unzipping it.
💡 Note: Maestro's docs only mention.appfiles but uploading the zipped.appworked in our tests (October 2026). If it ever fails unzip the file and uploadwdiodemoapp.appinstead.
Get Your API Key and Project ID
The CLI needs two values to know which account and project to upload to:
- API key — in the Dashboard's settings sidebar under Api Key (the sidebar also lists General, Team, your Projects, Your Plan and Upgrade Plan).
- Project ID: your account comes with a project called Project 1. To find its ID, open the Maestro Console and look at your browser's address bar for the part that starts with
proj_. That's your project ID.
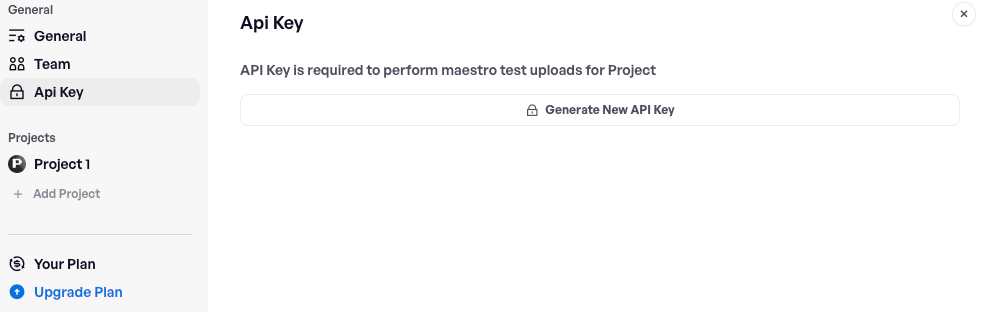
⚠️ Warning: treat the API key like a password. Never commit it and never paste it into a screenshot. In CI store it as a repository secret.
You don't have to type the API key in every command. Your terminal saves every command you run in a history file, so a key typed there stays on your computer in plain text. Use one of these instead:
# Option 1 (recommended): log in once, and the CLI remembers you
maestro login

# Option 2: set the key for the current terminal window only
export MAESTRO_CLOUD_API_KEY=<your-api-key>
Once you've done either the CLI uses your key automatically, so the commands below don't include it.
Run Your Flows From the CLI
Run the demo app's smoke flow on Cloud. From the folder that contains your flows/ folder and the app files:
🤖 Android:
maestro cloud \
  --project-id <your-project-id> \
  --app-file app.apk \
  --flows flows/ \
  -e APP_ID=com.wdiodemoapp \
  --include-tags=smoke
🍎 iOS:
maestro cloud \
  --project-id <your-project-id> \
  --app-file ios.simulator.wdio.native.app.v2.2.0.zip \
  --flows flows/ \
  -e APP_ID=org.wdiodemoapp \
  --include-tags=smoke
Here's what each part does:
--project-id: which Cloud project the run belongs to--app-file: the app to upload and install on Cloud's devices--flows: the sameflows/folder you've used since Article 2-e APP_ID=…and--include-tags: the same values you pass tomaestro testlocally
Your flow files stay exactly the same; only the command changes. If the run shows up in the Console, even as a failed run, your account and setup are working.
⚠️ Watch out: on iOS, this run fails on Cloud, even though the same flow passes on your machine. Your setup is fine. The problem is the iPhone model Cloud uses by default and the section "When a Flow Passes Locally but Fails on Cloud" below shows why it happens and how to fix it.
💡 Note: maestro cloud uses the same config.yaml as maestro test, so the setup from Maestro Beyond the Basics, Part 2 (which flows to run, and their tags) works on Cloud without changes. If your config.yaml isn't in the flows/ folder, point to it with --config <path>.
Here's what the Android smoke run printed (Maestro CLI 2.11.0; IDs shortened):
Evaluating flow(s)...
Using project: Project 1 (proj_...)

Uploading Flow(s)...
....................

  Maestro cloud device specs:
  * Maestro_ANDROID_pixel_6_android-33 - en_US

  To change OS version use this option: --device-os=<version>
  To change devices use this option: --device-model=<device_model>
  To change device locale use this option: --device-locale=<device_locale>
  To create a similar device locally, run: `maestro start-device --platform=android --device-model=pixel_6 --device-os=android-33 --device-locale=en_US`

Visit Maestro Cloud for more details about this upload:
https://app.maestro.dev/project/proj_.../upload/mupload_...

App binary id: e3047360...

Waiting for runs to be completed...
[Passed] successful_login (1m 3s)

1/1 Flow Passed
Three lines in that output are worth a closer look:
Maestro cloud device specs: you didn't choose a device, so Cloud used its default: a Pixel 6 on Android 13, in US English. Part 2 of this Maestro Cloud series shows how to pick a different phone, Android version or language.maestro start-device …: this creates the same device on your own machine. Use it when a flow fails on Cloud but passes locally, so you can reproduce the problem.App binary id: Cloud keeps a copy of your uploaded app. With this ID, your next runs can reuse it instead of uploading the app again (Part 2 shows how).
Cloud reported 1 minute 3 seconds for the smoke flow. From pressing Enter to seeing the result, the whole run took 91 seconds, with the extra time going to uploading the app and flows. (Most of that minute isn't your test either. The section "What a '1-Minute' Flow Really Is" below explains where the time goes.)
Read the Results in the Console
To see the details, open the https://app.maestro.dev/... link in the CLI output above or open the Maestro Console and click the upload's name. For each flow, the Console shows the step list with times and a video of the run. Download artifacts gives you more:
- A screenshot after every step named after the step
- Maestro's log and the full device log (on Android, the logcat)
- A
commands.jsonfile with every step's status and duration
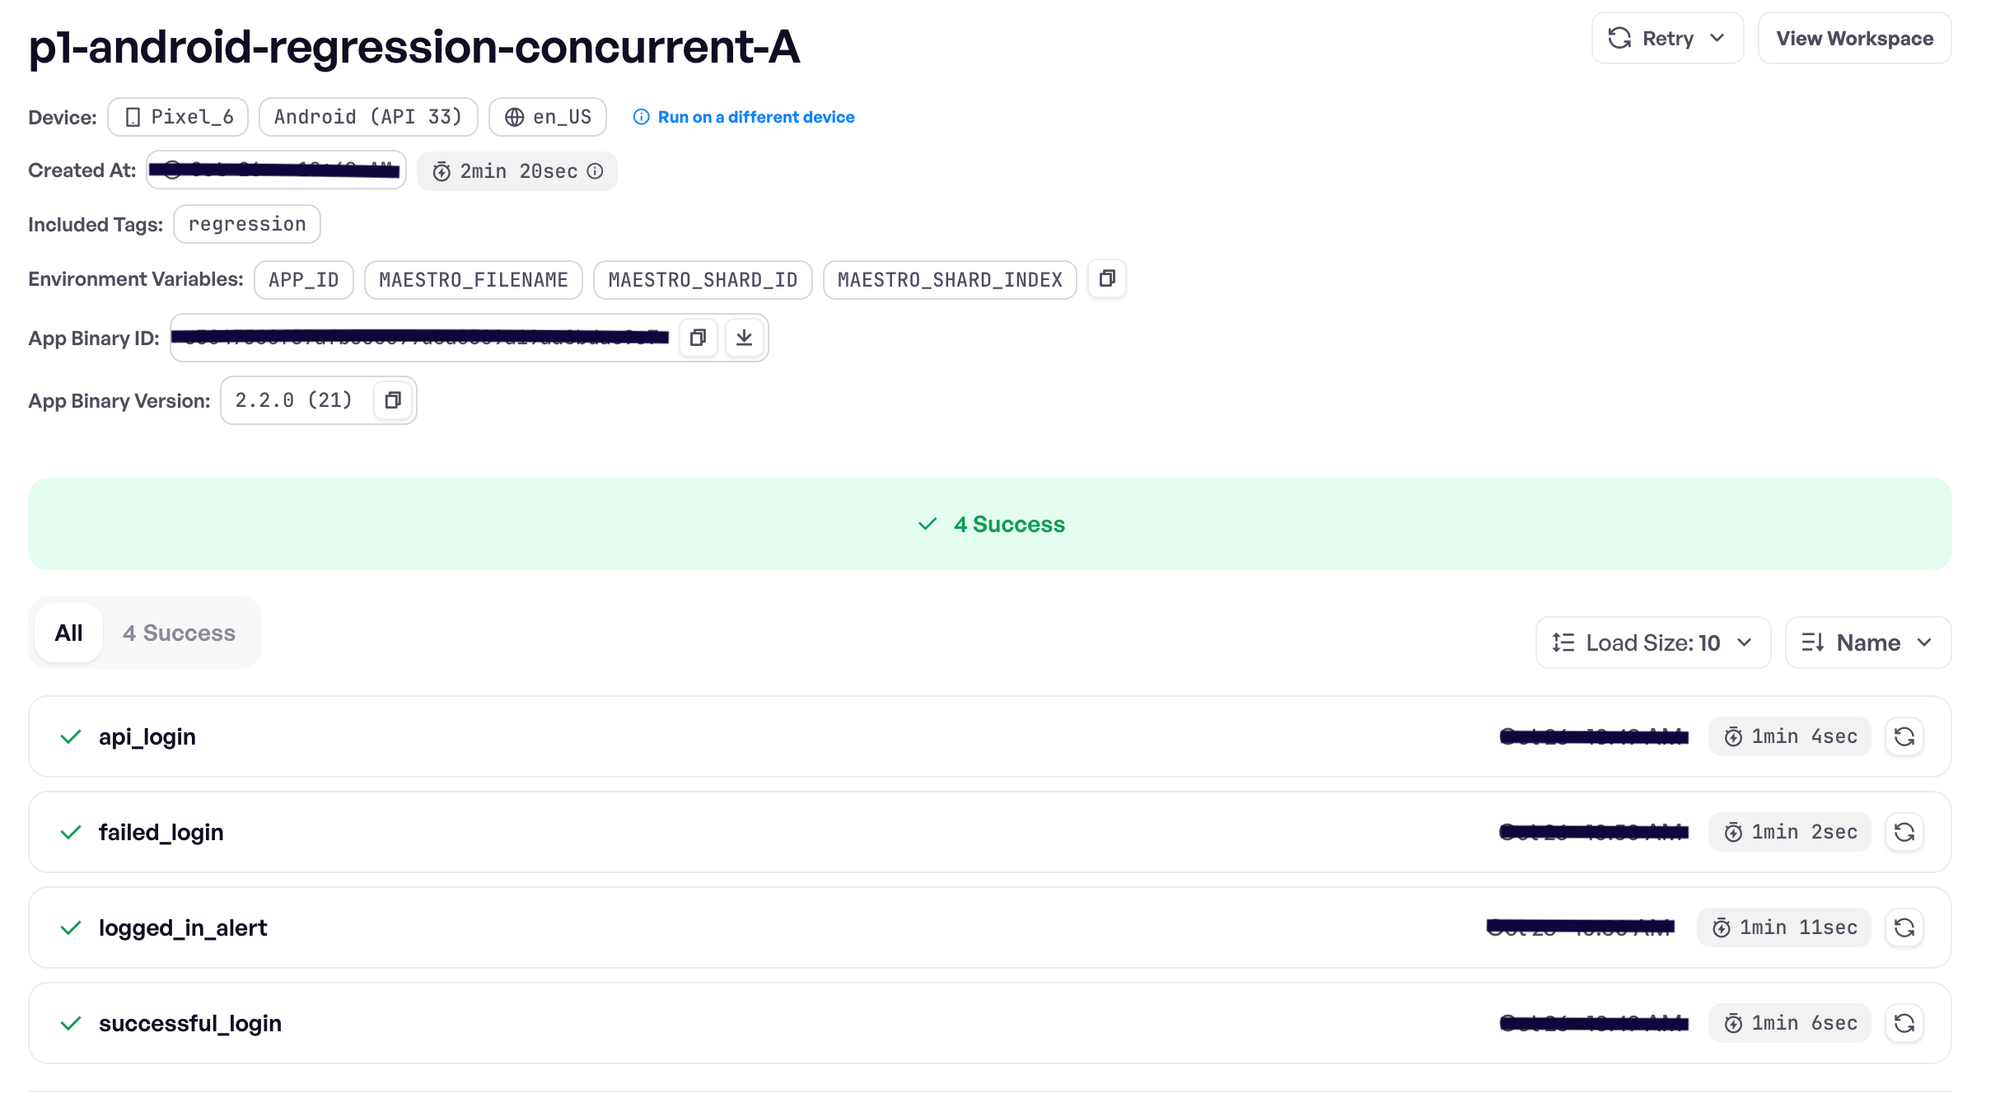
⚠️ Watch out: the step list hides your password (it shows PASSWORD) but anyone with access to your Cloud project can still find it in three places:
- View Workspace: shows your flow files including any password written in them
- Environment Variables: hover over a variable's name to see its value
- Download artifacts: the files list everything your flow typed
So only use test accounts, never your own login or a customer's.
Want the results in a file as well for your CI tool or to share with someone? Add --format to choose the report type and --output to name the file:
maestro cloud --project-id <your-project-id> --app-file app.apk --flows flows/ \
  -e APP_ID=com.wdiodemoapp --include-tags=smoke \
--format JUNIT --output report.xml| Format | What you get | Who it's for |
|---|---|---|
JUNIT |
An XML file with each flow's result and duration | CI tools that show test results (GitHub, Jenkins, GitLab) |
HTML |
A one-page summary: pass/fail counts, each flow's status and duration | Sharing results with someone who doesn't use the Console |
HTML-DETAILED |
The same page, meant to add each flow's steps | In our tests on Cloud, it showed no steps for a passing flow, so it looked the same as HTML |
Every format includes a link from each flow back to its run in the Console, where the video and logs are.
When a Flow Passes Locally but Fails on Cloud
Here's what happened when we ran the iOS smoke test from the previous section:
Maestro cloud device specs:
* Maestro_IOS_iPhone-11_17 - en_US
...
[Failed] successful_login (47s) (Couldn't hide the keyboard. This can happen if the app uses a custom input or doesn't expose a standard dismiss action.)

1/1 Flow Failed
The same flow passed on an iPhone 17 simulator in the CI run from Maestro in GitHub Actions. On Cloud, it failed at the hideKeyboard step of common/login.yaml.
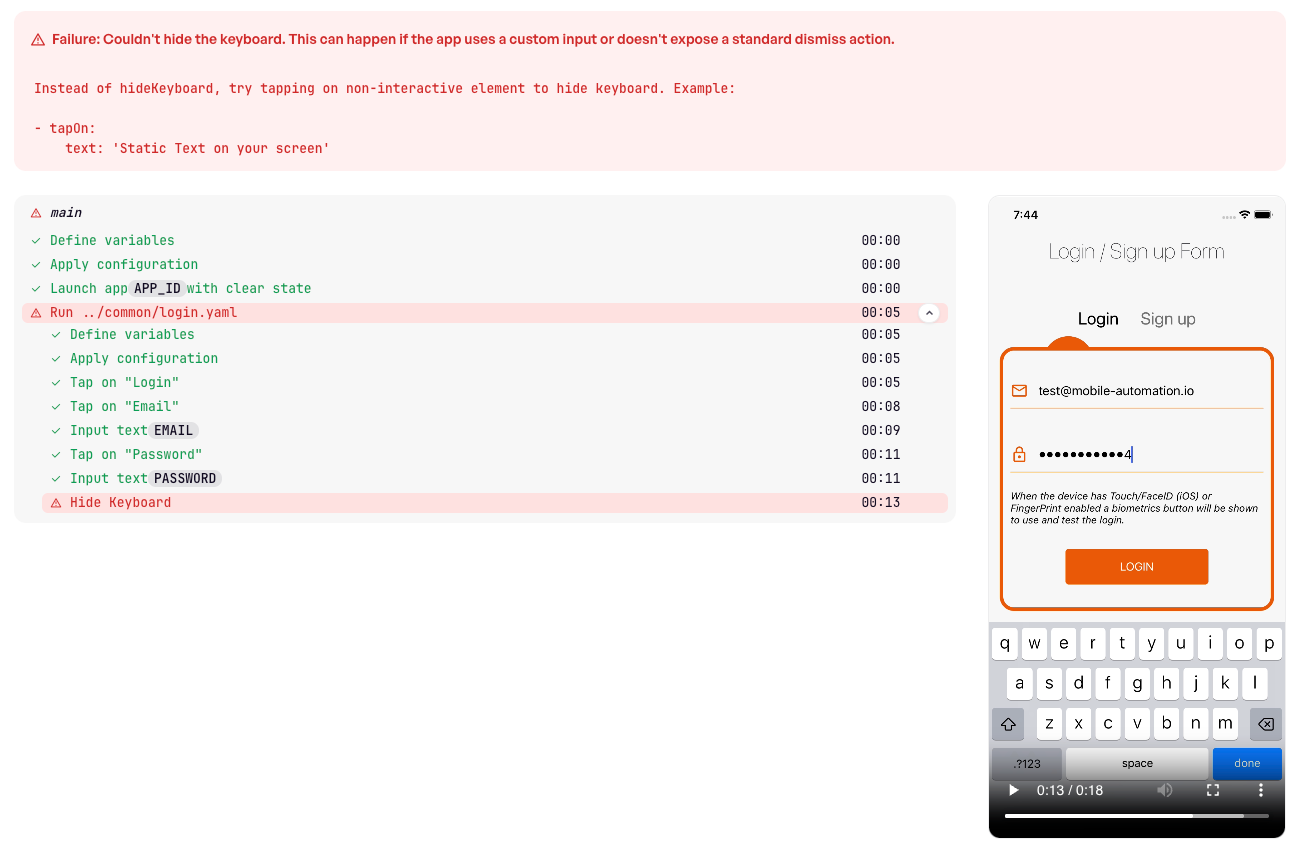
✅ Why it matters: In Maestro in GitHub Actions, you had to download a log and a screenshot to see why a test failed. Here, you open the run in the Console. The failing step sits right next to the video, and you can see the keyboard still open.
Finding the Cause
The first thing to notice is the device. With no device flags, Cloud ran iOS on an iPhone 11 with iOS 17.5. So we ran the same flow on other iPhones, one at a time using the device flags that Part 2 covers:
| Device | iOS | Result |
|---|---|---|
| iPhone 11 (Cloud's default) | 17.5 | ❌ Couldn't hide the keyboard (2 runs out of 2) |
| iPhone 11 | 26.2 | ❌ Couldn't hide the keyboard |
| iPhone SE (3rd generation) | 26.2 | ❌ Couldn't hide the keyboard |
| iPhone 15 | 17.5 | ✅ Passed |
| iPhone 16 | 26.2 | ✅ Passed |
| iPhone 17 | 26.2 | ✅ Passed (2 runs out of 2) |
The iPhone 15 passed on iOS 17.5 and the iPhone 11 failed on iOS 26.2, so the iOS version isn't the cause. The phone model is.
Maestro's [hideKeyboard docs] explain why. iPhones have no Back button to close the keyboard. Instead, Maestro makes "small, quick swipes in the middle of the screen", which usually makes the keyboard close itself. The docs warn that this "can occasionally be affected by specific app layouts or keyboard types." On the iPhone 11 and the SE the swipes didn't close the keyboard.
🚨 Warning: The docs add one more detail. When the keyboard doesn't close,hideKeyboardnow fails the test, but only on Maestro Cloud for now, not yet in the CLI or Maestro Studio. Locally, a failed swipe isn't reported and the flow carries on. So Cloud didn't break your flow: it reported a problem the CLI doesn't check for. If your iOS flows usehideKeyboard, don't treat a local pass as proof they'll pass on Cloud.
Fixing It
Maestro's docs recommend tapping a non-interactive element such as a header, instead of calling hideKeyboard. We tried that and two other fixes on the three phones that had failed or passed:
| Fix on iOS | iPhone 11 | iPhone SE | iPhone 17 |
|---|---|---|---|
| Tap the "Login / Sign up Form" header | ✅ | ❌ header scrolled off screen | not tried |
Tap near the top of the screen (point: "50%,12%") |
✅ | ✅ | ✅ |
| Don't close the keyboard; tap LOGIN directly | ✅ | ✅ | ✅ |
Why the header tap failed on the SE: the SE has a small screen. When the keyboard opens, the form scrolls up and the header moves off screen, so there's nothing left to tap.
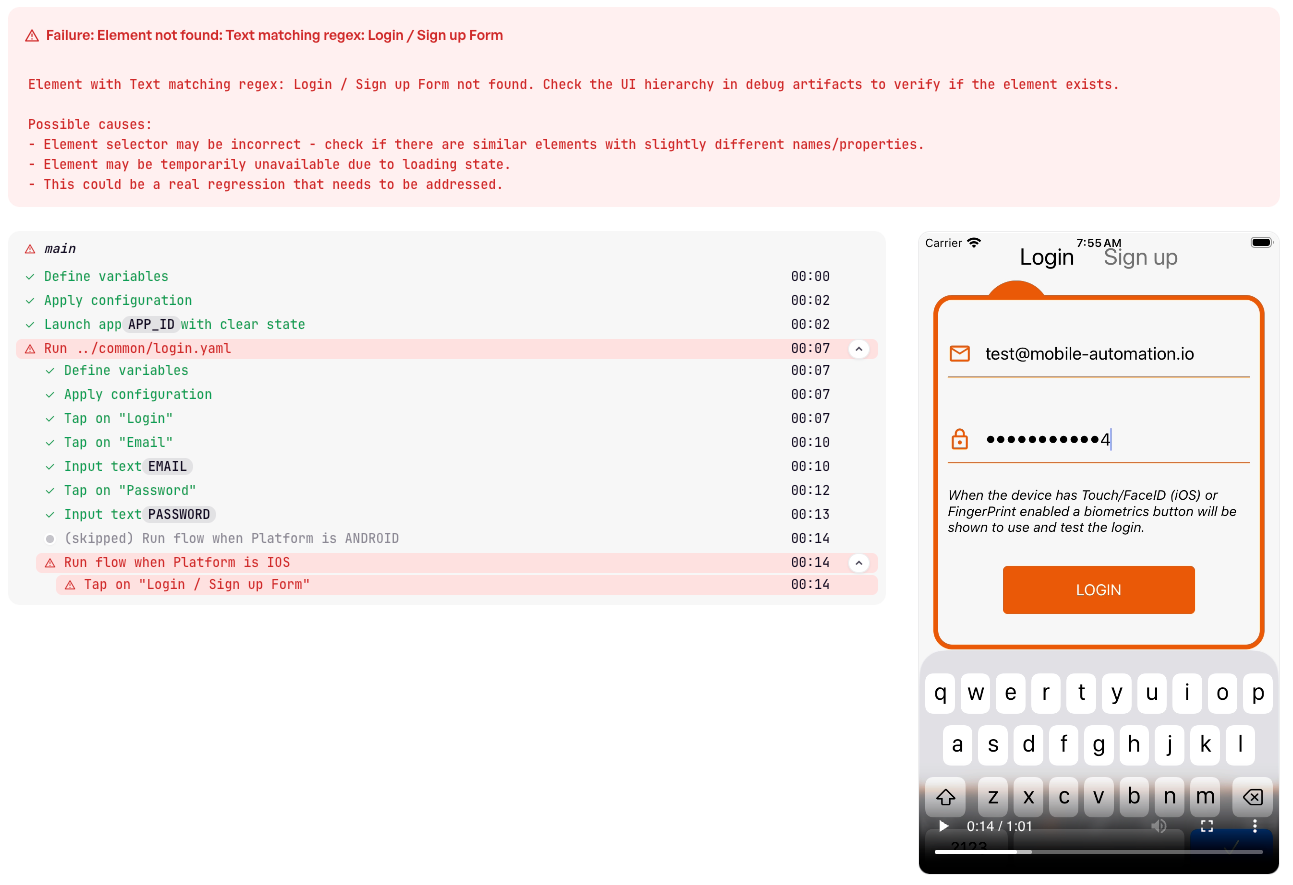
Why we didn't keep the screen-position tap: it worked on all three phones, but it taps whatever is at that spot. On another screen size or after a design change, that spot could be a button or a text field.
The fix we kept: don't close the keyboard at all. hideKeyboard was never part of the login. It was only there to make sure the keyboard didn't cover the LOGIN button. On this screen, LOGIN stays visible above the keyboard on every iPhone we tried, so on iOS the flow taps it right away, just as a real user would. If a button on your own screen is hidden behind the keyboard, this won't work there. Try the header tap instead.
Here's the updated end of common/login.yaml:
- runFlow:
    when:
      platform: Android
    commands:
      - hideKeyboard
      - tapOn: "button-LOGIN"
- runFlow:
    when:
      platform: iOS
    commands:
      - tapOn:
          id: "button-LOGIN"
Android keeps hideKeyboard, which uses the system back action there and worked on every Android run.
With that change, the full iOS regression suite passed on Cloud's default iPhone 11:
[Passed] successful_login (41s)
[Passed] api_login (45s)
[Passed] logged_in_alert (45s)
[Passed] failed_login (41s)
👍 Best practice: Only close the keyboard when it actually covers the next thing you tap. When it does, tap a non-interactive element that stays on screen on your smallest supported device. If your app has a screen where neither works, ask your developers to make the field's return key close the keyboard.
💡 Note: this is also a strong argument for testing on more than one device model, which is exactly what Part 2 is about. Every one of these runs used the same flows; only the device changed.
Run Flows in Parallel
Parallel runs are the main thing Cloud's price buys. Your plan's number of parallel devices decides how many flows run at the same time; flows beyond that wait in a queue until a device frees up.
For this series, the account had 2 Android devices and 1 iOS device.
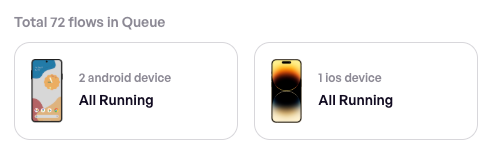
💡 Note: "1 iOS device" doesn't mean one particular iPhone. It's one slot: one iOS test running at a time. For each run, Cloud creates a fresh simulator of whatever model and iOS version you ask for, which is how the previous section ran six different iPhones on a 1-device plan, one after another.
Here's the full regression suite (all four tests) on Android:
maestro cloud --project-id <your-project-id> --app-file app.apk --flows flows/ \
  -e APP_ID=com.wdiodemoapp --include-tags=regression
All four flows passed in every run. Here's what the CLI reported for the first run:
[Passed] api_login (1m 5s)
[Passed] successful_login (1m 8s)
[Passed] failed_login (1m 3s)
[Passed] logged_in_alert (1m 6s)

4/4 Flows Passed
The JUnit report's timestamps show how Cloud used the two devices: api_login and successful_login started at the same second and failed_login and logged_in_alert started together about 70 seconds later, once the first two finished. Two flows at a time, one on each device.
You can also watch it happen. While an upload runs, the Console shows a counter for each state its flows are in. Here's a nine-flow Android run, caught partway through:

Read it from left to right:
- 2 Success: the first two flows have already finished.
- 2 Preparing: the next two are each getting their own Android device ready at the same moment. That's both devices in use at once.
- 5 Pending: the other five flows have no free device yet, so they wait until one of the two frees up.
The counters never showed more than two flows preparing or running at once, which matches the plan's two Android devices.
Compare that with the iOS regression run from the previous section, on the plan's single iOS device. There, the four flows started one after another at 11:06:29, 11:07:11, 11:07:57 and 11:08:43: each one waited for the last to finish.
Over three runs:
| Run 1 | Run 2 | Run 3 | Median | |
|---|---|---|---|---|
| All four flows, start to finish on Cloud | 2m 15s | 2m 19s | 2m 19s | 2m 19s |
| Whole command, including upload | 2m 34s | 2m 33s | 2m 32s | 2m 33s |
Each flow reported about a minute, so the four add up to about 4 minutes 22 seconds. That's what one Cloud device would need to run them one after another. With two devices, the suite finished in about 2 minutes 19 seconds and the upload added only about 15 seconds on top.
Is That Faster Than Running It Yourself?
To find out, we ran the same four flows with the setup from Maestro in GitHub Actions: GitHub's own machine, booting one Android emulator and running maestro test on it.
| Self-hosted: 1 emulator on GitHub | Cloud: 2 devices | |
|---|---|---|
| The four flows | 1m 32s | 2m 19s |
| Start to finish | 3m 55s | 2m 33s |
Two things stand out:
- One emulator ran the tests faster than two Cloud devices. The self-hosted emulator starts once, then runs every flow on the same device, so each flow took 20 to 27 seconds. Cloud gives every flow a brand-new device, which adds about 40 seconds to each one (the next section shows where that time goes). Running two flows at a time doesn't win that time back: Cloud's four flows took 2m 19s and the emulator's took 1m 32s.
- Cloud still finished first overall. Before the self-hosted run could test anything, it spent about 2 minutes setting up GitHub's machine, installing Maestro and starting the emulator. Cloud's devices are ready as soon as you upload.
What happens as the suite grows? We added five short flows (filling in a form, flipping a switch, tapping a button that shows an alert, swiping a carousel and signing up) and ran all nine both ways. Then we added eight more (checking the home screen, moving between tabs, the login and sign-up error messages, the in-app browser and a few more form and swipe checks) and ran all seventeen:
| Flows | Self-hosted: 1 emulator on GitHub | Cloud: 2 devices |
|---|---|---|
| 4 | 3m 55s | 2m 33s |
| 9 | 4m 35s | 5m 38s |
| 17 | 6m 41s | 9m 29s |
With nine flows, self-hosted finished about a minute ahead. With seventeen, it was almost three minutes ahead. The reason is the short flows: the emulator ran each one in 6 to 12 seconds but Cloud took about 50 seconds for each, because it prepares a fresh device for every flow however short the test is.
So what does parallel execution really save? On Android with two devices, less than you might expect. Cloud is faster at the start because it skips the machine setup. But every flow you add costs more time on Cloud than on the emulator, so that head start shrinks: Cloud was faster with four flows, slower with nine and further behind with seventeen. Two things help Cloud keep its lead:
- More devices. Two devices run nine flows in five rounds (two at a time then one on its own). Three devices would need only three rounds. We estimate that at about 3½ minutes but couldn't test it on a 2-device plan.
- Longer flows. Cloud adds the same setup time to every flow. That matters less when the test itself takes a minute than when it takes ten seconds.
Self-hosted can run flows in parallel too. As Maestro in GitHub Actions mentioned, maestro test --shard-split=N splits your flows across N emulators that you start yourself. You get parallel runs without paying for Cloud but you have to start and look after every emulator and the machine has to be powerful enough to run them all.
On iOS, it's a different story. The iOS job from Maestro in GitHub Actions took about 10 minutes for a single flow, mostly starting the simulator and installing the app. On Cloud, the same flow finished in under 2 minutes in most runs, including device setup.
⚠️ Watch out: these numbers come from one small suite and a few runs. Before deciding how many devices to pay for, time your own suite both ways.
What a "1-Minute" Flow Really Is
Each Android flow above reported about a minute, but the test itself is much shorter. Take a passing login run on Android: in the Console, its steps finished at 24 seconds while the CLI reported 1 minute 5 seconds for the same flow.
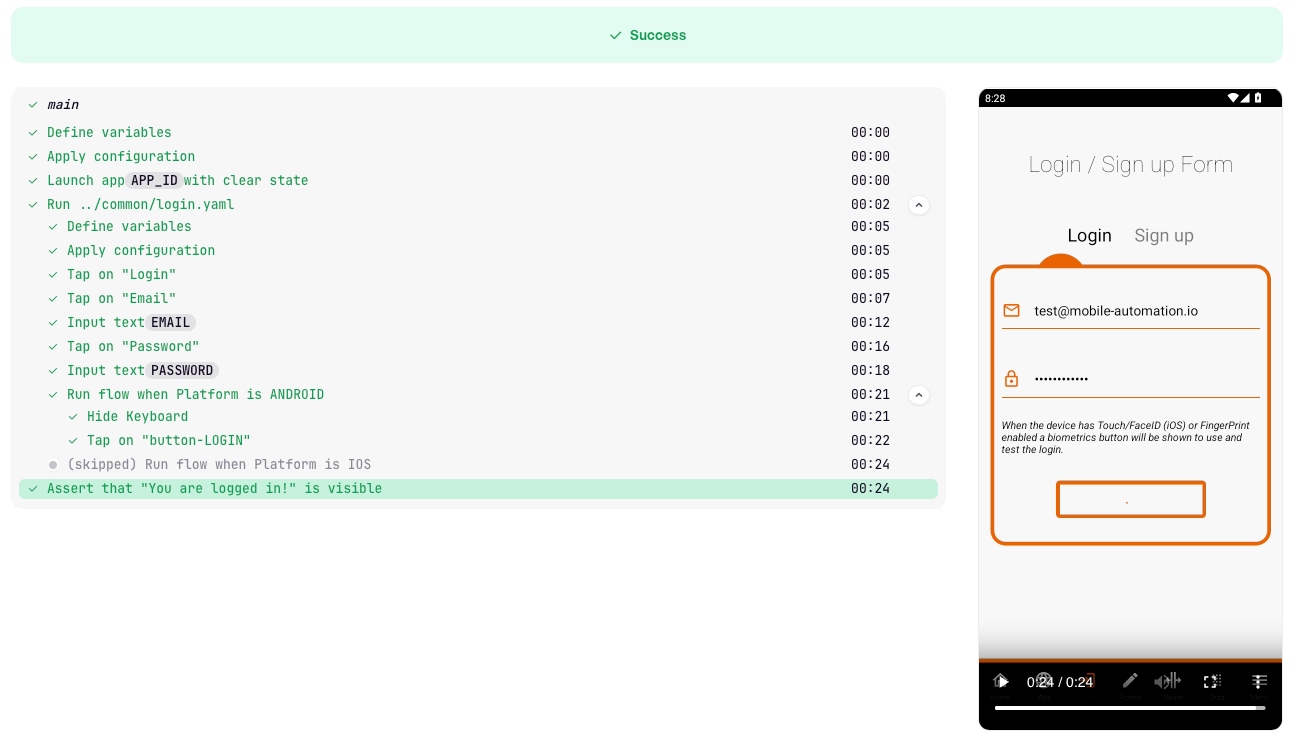
On iOS, the gap was even bigger. One run's steps finished at 13 seconds and its video lasted 16 seconds while the CLI reported 2 minutes 56 seconds.
Where does the rest of the time go? Into preparing the device. Before the first step runs, Cloud creates a fresh emulator or simulator and installs your app and the CLI's time includes all of that. Preparation time also varies: the same login flow reported anywhere from 43 seconds to almost 3 minutes on different iPhones even though the test steps took about the same time.
This has two consequences:
- Parallel devices matter more on Cloud than locally. Every flow waits for its own device to be prepared. With one device, four flows mean four device preparations, one after another. With two devices, they happen two at a time, so the wait is cut in half.
- Don't split your suite into many tiny flows to "speed it up". Every flow you add gets its own device preparation however short the test is. In our timing runs, a test that took 7 seconds on the emulator took about 50 seconds on Cloud. So a few longer flows that each test a whole task will finish faster than dozens of tiny ones.
Quick-Reference
| Need | Command / setting |
|---|---|
| Run flows on Cloud | maestro cloud --project-id <id> --app-file <app> --flows <folder> |
| Give the CLI your API key | maestro login or export MAESTRO_CLOUD_API_KEY=<key> |
| Pass the app id | -e APP_ID=com.wdiodemoapp / -e APP_ID=org.wdiodemoapp |
| Run only tagged flows | --include-tags=smoke |
| Use a different config file | --config <path> |
| JUnit or HTML report | --format JUNIT / --format HTML / --format HTML-DETAILED, --output <path> |
| Reproduce Cloud's device locally | maestro start-device |
| Check your APK's architectures | unzip -l app.apk | grep "lib/" |
What's Next?
Your flows now run on Maestro's devices, in parallel, with a video of every run. But so far they've only run on whatever device Cloud picked, in US English.
In Maestro Cloud, Part 2, you'll choose the OS version and device for each run, test your app in other languages and find out about a setting Cloud won't let you change: the time zone.


Discussion