
In Part 1, you learned to pick selectors that find the right element and you moved the login steps into a reusable subflow, flows/common/login.yaml with two tests that call it.
That's a good start, but real apps throw more at you. Some screens only appear sometimes. Some steps need repeating. Some tests leave data behind when they fail. And once you have more than a few tests, running them one at a time becomes slow and tedious.
This part turns your flows into a real test suite. By the end, you'll know how to:
- Handle screens that don't always look the same
- Repeat actions without repeating YAML
- Run setup and cleanup steps that always execute, even when a test fails
- Call your own backend from inside a flow
- Organize your flows before they turn into a messy folder of YAML files
Conditionals: Handling Screens That Don't Always Look the Same
Some screens don't show up every time. A permission dialog might appear on first launch and never again. A promotional banner might show up depending on region or account state. assertVisible on something that's conditionally there fails your test for the wrong reason. Maestro's when clause handles this declaratively instead of forcing you into a try/catch.
- runFlow:
    when:
      platform: Android
      visible: "Allow Notifications"
    commands:
      - tapOn: "Allow"
You've already used one of these. Article 1's cross-platform login flow used when: platform: to tap the LOGIN button differently on Android and iOS — that's a conditional, just one based on the platform rather than on what's on screen.
You can run steps based on four kinds of conditions:
visible— only if an element is on screen.notVisible— only if an element is not on screen.platform— only onAndroid,iOSorWeb.true— only if a JavaScript expression is true. Use this when a simple on-screen check isn't enough.
If you list more than one condition, all of them must be true. In the example above, Maestro taps "Allow" only if the test is running on Android and the "Allow Notifications" dialog is showing.
💡 Note: the "Allow Notifications" dialog above is a generic example, not a screen from the demo app. In your own app, check the exact dialog text and which platform triggers it in Maestro Studio (or with maestro hierarchy) before wiring it into a flow; system dialog wording varies between OS versions.💡 Shortcut for a single tap: if all you need is to tap one thing if it's there, you can skiprunFlowandwhenand addoptional: trueto the command instead:
- tapOn:
    text: "Dismiss"
    optional: true
    label: "Dismiss popup if it exists"
The difference: when skips the step entirely if the condition isn't met. optional: true still tries the step, but if the element isn't there, the test carries on instead of failing. For one tap, optional: true is shorter. For several steps, stick with runFlow and when.
Loops: Repeating Actions Without Repeating YAML
repeat runs a block of commands multiple times, either a fixed number of times or until a condition is met.
# Fixed number of iterations
- repeat:
    times: 5
    commands:
      - tapOn: "Add Item"
      - tapOn: "Save"

# Runs until a condition is met
- repeat:
    while:
      notVisible: "Your inbox is empty"
    commands:
      - tapOn: "Delete Message"
      - tapOn: "Confirm"

# Both together — a safety net against an infinite loop
- repeat:
    times: 10
    while:
      visible: "Update available"
    commands:
      - tapOn: "Dismiss"
⚠️ Important: a loop with onlywhilekeeps going until its condition changes. If the condition never changes — because of a bug in the app, or a selector that matches the wrong element — the loop never stops, and your test hangs. Addingtimessets a maximum. In the last example above, the loop stops as soon as "Update available" disappears, or after 10 rounds, whichever comes first.
while also accepts a JavaScript expression through the true condition type for loops driven by something more than an element check:
- evalScript: ${output.attempt = 0}
- repeat:
    while:
      true: ${output.attempt < 3}
    commands:
      - tapOn: "Refresh Data"
      - evalScript: ${output.attempt++}
Lifecycle Hooks: Reliable Setup and Teardown
Article 1 introduced clearState: true as the way to start a flow from a clean slate. onFlowStart and onFlowComplete are the more general version of the same idea: guaranteed setup before the flow's real steps run, and guaranteed cleanup after — success or failure.
# flows/tests/logged_in_alert.yaml
appId: ${APP_ID}

onFlowStart:
  - launchApp:
      clearState: true
  - runFlow:
      file: ../common/login.yaml
      env:
        EMAIL: "test@mobile-automation.io"
        PASSWORD: "Password1234"

onFlowComplete:
  - stopApp

---
- assertVisible: "You are logged in!"
- tapOn: "OK"
- assertNotVisible: "You are logged in!"
Here's what each part does:
onFlowStartopens the app fresh and logs in. That's setup not what you're testing.- The main steps (below the
—) check only what this test is about: the "You are logged in!" alert appears, and tapping OK closes it. onFlowCompletecloses the app when the test ends — whether it passed or failed. In a real app, this is where you'd log out or delete any test data the flow created.
Both hooks can run any command, including runFlow. In practice, most teams put their setup and cleanup steps in a subflow and call it from the hook.
What happens when something fails:
- If
onFlowStartfails, the test is marked as failed and the main steps are skipped.onFlowCompletestill runs, so cleanup still happens. - If
onFlowCompletefails, the test is marked as failed, even if the main steps passed.
👍 Always put cleanup inonFlowComplete, not at the end of your test. When a step fails, Maestro stops the test right there, so any cleanup steps after it never run. The demo app doesn't save any data, so you won't run into this here. In a real app, though, picture a test that creates a new account and then fails before the step that deletes it. The account stays behind, and the next test that signs up with the same email fails too.onFlowCompleteruns no matter what, so the cleanup always happens.
Calling Your Backend From a Flow
Maestro's JavaScript commands (runScript and evalScript) can do more than help you find elements on screen — they can also send requests straight to your app's API. That lets you set up test data before the test starts instead of tapping through the app to create it.
The demo app has no API of its own, so this example uses JSONPlaceholder, a free public API built for testing. The script gets a fake user from it and the flow logs in to the demo app with that user's email. Create a scripts folder inside flows, then add the script:
// flows/scripts/get_test_user.js
const response = http.get('https://jsonplaceholder.typicode.com/users/1');
const user = json(response.body);

output.testUser = {
    name: user.name,
    email: user.email
};
# flows/tests/api_login.yaml
appId: ${APP_ID}
---
- runScript: ../scripts/get_test_user.js
- launchApp:
clearState: true
- runFlow:
file: ../common/login.yaml
env:
EMAIL: ${output.testUser.email}
PASSWORD: "Password1234"
- assertVisible: "You are logged in!"# Android
maestro --platform android test -e APP_ID=com.wdiodemoapp flows/tests/api_login.yaml# iOS
maestro --platform ios test -e APP_ID=org.wdiodemoapp flows/tests/api_login.yamlWhen you run it, you'll see Sincere@april.biz typed into the email field — that's the email JSONPlaceholder returns for user 1 — and the test passes.
💡 On a real app, you'd usually go one step further: usehttp.postto create a brand-new test user through your own API then log in with it. Every run starts with fresh data, and no test depends on an account someone else might have changed. Pair it withonFlowCompleteto delete the user when the test ends.
The example used http.get. Maestro also has http.post, http.put, http.delete and http.request for any other method. In the script, json() turns the API's response into an object you can read from — that's how user.email works — and anything you save to output can be used back in the flow as ${output.yourKey}. For all the options, see Maestro's HTTP requests docs.
💡 Tip: need different test data on every run? Maestro has a built-infakerobject that makes up realistic values for you — names, emails, phone numbers. For example,${faker.internet().emailAddress()}gives you a new email each time. That's handy for sign-up tests where reusing the same email fails with "already registered" on the second run.
⚠️ Know the limits: Maestro's JavaScript is more limited than JavaScript on your computer. Scripts can call APIs, but they can't read files on your computer (like a CSV of test users) or use extra libraries from npm, so there's no way to load a database driver either. If your setup needs any of those, write it as a separate script and run it before your Maestro tests. The next article shows where that step fits in a CI pipeline.
Organizing a Growing Flow Library
Your flows folder now holds three kinds of files: tests you run (tests/), reusable steps (common/) and scripts (scripts/). Running tests one file at a time stops being practical. You want one command that runs all your tests. But not every file in flows is a test: common/login.yaml is a building block that tests call with an email and password. Run on its own, it has nothing to type and would fail. Maestro needs to know which files are tests and which aren't.
That's what a config.yaml file is for. Here's the problem it solves: when you give Maestro a folder to run, it only looks at the files directly inside that folder. It doesn't look inside subfolders. Your tests are in flows/tests/ — one level down — so if you run maestro test flows/ without a config, Maestro doesn't see any tests and stops with this message: Top-level directories do not contain any Flows
Create flows/config.yaml:
# flows/config.yaml
flows:
  - tests/**
This tells Maestro: "run every flow inside tests/." common/ isn't listed, so Maestro skips it — which is what you want, because common/login.yaml isn't a test on its own. It only works when a test calls it with an email and password.
💡 In these patterns,*means "the files directly in this folder," and**means "this folder and every folder inside it."
Now point maestro test at the whole folder instead of a single file:
# Android
maestro --platform android test -e APP_ID=com.wdiodemoapp flows/
# iOS
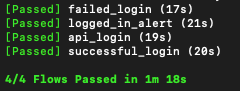
maestro --platform ios test -e APP_ID=org.wdiodemoapp flows/Maestro runs all four tests you've built in this article — successful_login, failed_login, logged_in_alert, and api_login — and finishes with a summary line for each one.
Tags: running a subset of your suite
config.yaml tells Maestro which files are tests. But you won't always want to run all of them. Sometimes you just want a quick check that the most important things still work — often called a smoke test.
That's what tags are for. A tag is a label you stick on a test like smoke or regression. You can then tell Maestro to run only the tests with a certain label. Add tags to the top of a flow, above the - - -:
# flows/tests/successful_login.yaml
appId: ${APP_ID}
tags:
  - smoke
  - regression
---
- launchApp:
    clearState: true
# ... rest of the flow
Then filter on the command line:
# Only flows tagged smoke
maestro --platform android test -e APP_ID=com.wdiodemoapp --include-tags=smoke flows/

# Everything except flows tagged network
maestro --platform android test -e APP_ID=com.wdiodemoapp --include-tags=smoke flows/
You can also combine tags:
- List more than one tag to run tests that have any of them. For example,
--include-tags=smoke,regressionruns a test if it's taggedsmoke,regression, or both. - Use
--include-tagsand--exclude-tagstogether to pick a group of tests, then leave some out. For example,--include-tags=regression --exclude-tags=networkruns all the regression tests, but skips any that are also taggednetwork.
Here's how that works with the four tests you've built. Say you tag them like this:
| Test | Tags |
|---|---|
successful_login |
smoke, regression |
failed_login |
regression |
logged_in_alert |
regression |
api_login |
regression, network |
api_login gets the network tag because it depends on an API over the internet. If that API is down the test fails even when your app is fine — so sometimes you'll want to skip it. Now run:
maestro --platform android test -e APP_ID=com.wdiodemoapp --include-tags=regression --exclude-tags=network flows/All four tests are tagged regression but api_login is also tagged network, so Maestro skips it:
[Passed] failed_login (22s)
[Passed] logged_in_alert (22s)
[Passed] successful_login (20s)

3/3 Flows Passed in 1m 4s
In practice, this is how teams keep test runs fast. A few quick smoke tests run every time someone changes the code so problems show up within minutes. The full regression suite takes longer so it runs once a night. The next article shows how to use tags in CI — an automated pipeline that runs your tests for you whenever the code changes.
Right now you have four tests in one folder. Once you have forty, you'll want a plan for where each one goes. Maestro's docs suggest two ways to organize them — by what the user is trying to do or by feature:
User Journey — organized around what a user is trying to accomplish, start to finish. The demo app doesn't have goals like that, so imagine a shopping app instead:
flows/
├── config.yaml
├── tests/
│   ├── new_users/
│   │   ├── register.yaml
│   │   └── first_purchase.yaml
│   └── existing_users/
│       ├── login.yaml
│       └── checkout.yaml
└── common/
Feature Test — one folder per screen or feature. Here, the four tests you've built all live in login/ next to tests you might add for the app's other screens:
flows/
├── config.yaml
├── tests/
│   ├── login/
│   │   ├── successful_login.yaml
│   │   ├── failed_login.yaml
│   │   ├── logged_in_alert.yaml
│   │   └── api_login.yaml
│   ├── forms/
│   │   └── fill_form.yaml
│   ├── swipe/
│   │   └── swipe_cards.yaml
│   └── drag/
│       └── drag_and_drop.yaml
├── common/
│   └── login.yaml
└── scripts/
    └── get_test_user.js
💡 If you know the Page Object Model, this might look similar — both are organized by screen. The difference: page objects organize the code that uses a screen while these folders organize the tests. In Maestro, the closest thing to a page object is a subflow incommon/, likelogin.yaml: the steps for using a screen are written once there and your tests call it.
Which one should you pick? Ask yourself: do people open your app to get one specific thing done?
- Yes → User Journey. Think of a food delivery app: people open it to order dinner then close it. The most important thing to test is that they can get from "I'm hungry" to "order placed," so each test follows that whole path.
- No → Feature Test. Think of a social media app: people scroll, like post and message, with no single finish line. So you test each feature on its own.
Maestro's docs recommend the same split: User Journey for shopping, banking and food delivery apps, Feature Test for social media, content and entertainment apps.
For the demo app, the answer is no. It's a set of separate screens — Login, Forms, Swipe, Drag — with nothing to "finish." That's why the Feature Test example above uses it.
Adding a new folder is easy. Want tests for the Forms screen? Create flows/tests/forms/ and put them there. You don't need to touch config.yaml — tests/** already picks up every folder inside tests/.
👍 You don't have to pick just one. Many apps mix both. What matters is deciding early before you have forty test files and no idea where anything is.
Quick-reference table
Flow control
| Command | Purpose | Example |
|---|---|---|
when: { visible } |
Run commands only if an element is visible | visible: "Allow" |
when: { platform } |
Run commands only on a given platform | platform: Android |
when: { true } |
Run commands only if a JS expression is true | true: ${output.x < 3} |
repeat: { times } |
Repeat a fixed number of times | times: 5 |
repeat: { while } |
Repeat until a condition is false | while: { notVisible: "..." } |
onFlowStart / onFlowComplete |
Guaranteed setup / teardown | Declared above the --- separator |
tags + --include-tags / --exclude-tags |
Run a subset of your suite | tags: [smoke] in the header |
optional: true |
Let one step fail without failing the test | tapOn: { text: "Dismiss", optional: true } |
config.yaml → flows: |
Tell Maestro which files are tests | flows: [tests/**] |
What's Next?
Across both parts, you've gone from one flow to a real test suite: selectors that find the right element, a login subflow every test reuses, conditions and loops, setup and cleanup that always run, an API call from inside a flow and a flows folder you can run — in full or by tag — with one command.
None of it matters if the only place these flows run is your own laptop. The next article, Maestro in CI/CD, wires everything you've built into a pipeline that runs on every push. It also looks at Maestro Cloud, a paid hosted option for when your suite outgrows what a single CI runner can handle.
Download the code
Everything from both parts — the login subflow, all four tests, the API script, and config.yaml — is available as a free download.
🔒 Members-only (free). Subscribe for free to download the code for both parts. No payment, just your email. It also unlocks every other companion download on the site.


