
If you’re just starting with mobile test automation, Appium Inspector is one of the most useful tools you’ll use. It helps you explore and interact with mobile apps without writing any code, so you can understand how your app works and prepare for automation testing.
With Appium Inspector, you can:
- Inspect UI elements of Android and iOS apps. See exactly what buttons, text fields, and labels are in your app.
- Get element locators like IDs, XPaths, or Accessibility IDs. These locators are what you’ll use in your automated tests to tell Appium which elements to interact with.
- Test actions such as tapping buttons, typing text, scrolling through screens, or swiping lists. This allows you to validate your actions before writing any code.
Think of Appium Inspector as a visual debugger for your mobile app. You can see the app’s structure and behavior in real time, which makes it much easier to write reliable and maintainable automation scripts.
Why It Matters
Before writing any Appium automation scripts, it’s important to know how to find and interact with elements in your app. If you try to automate without this understanding, your tests may fail or behave unpredictably.
Appium Inspector solves this problem by:
- Showing you the hierarchy of elements in your app.
- Displaying all relevant properties and locators for each element.
- Allowing you to try actions directly and see what works.
✅ Tip: Always start by inspecting your app with Appium Inspector before writing scripts. It saves a lot of trial and error later.
Prerequisites
Before using Appium Inspector, make sure your mobile automation environment is already set up. If you haven’t completed these steps yet, I recommend following my previous setup guides first.
1. Install Appium
Appium must be installed on your machine since Appium Inspector connects to an Appium server to start a session with your mobile app.
If you haven’t installed Appium yet, follow this guide:
2. Android Setup (for Android Inspection)
To inspect Android applications with Appium Inspector, you need the following:
- Android Studio installed
- Android SDK configured
- An Android emulator created
(See the next step for instructions on creating one) - A sample application (for example: You can download the
android.wdio.native.app.v2.0.0.apkfrom this GitHub repository: https://github.com/webdriverio/native-demo-app/releases. We’ll be using it in our Appium inspection examples.
If you haven’t set up Android for Appium yet, check out:

Steps to Create an Android Emulator (if you don’t have one yet)
- Open Android Studio
- In the Projects panel, click More Actions and select Virtual Device Manager.
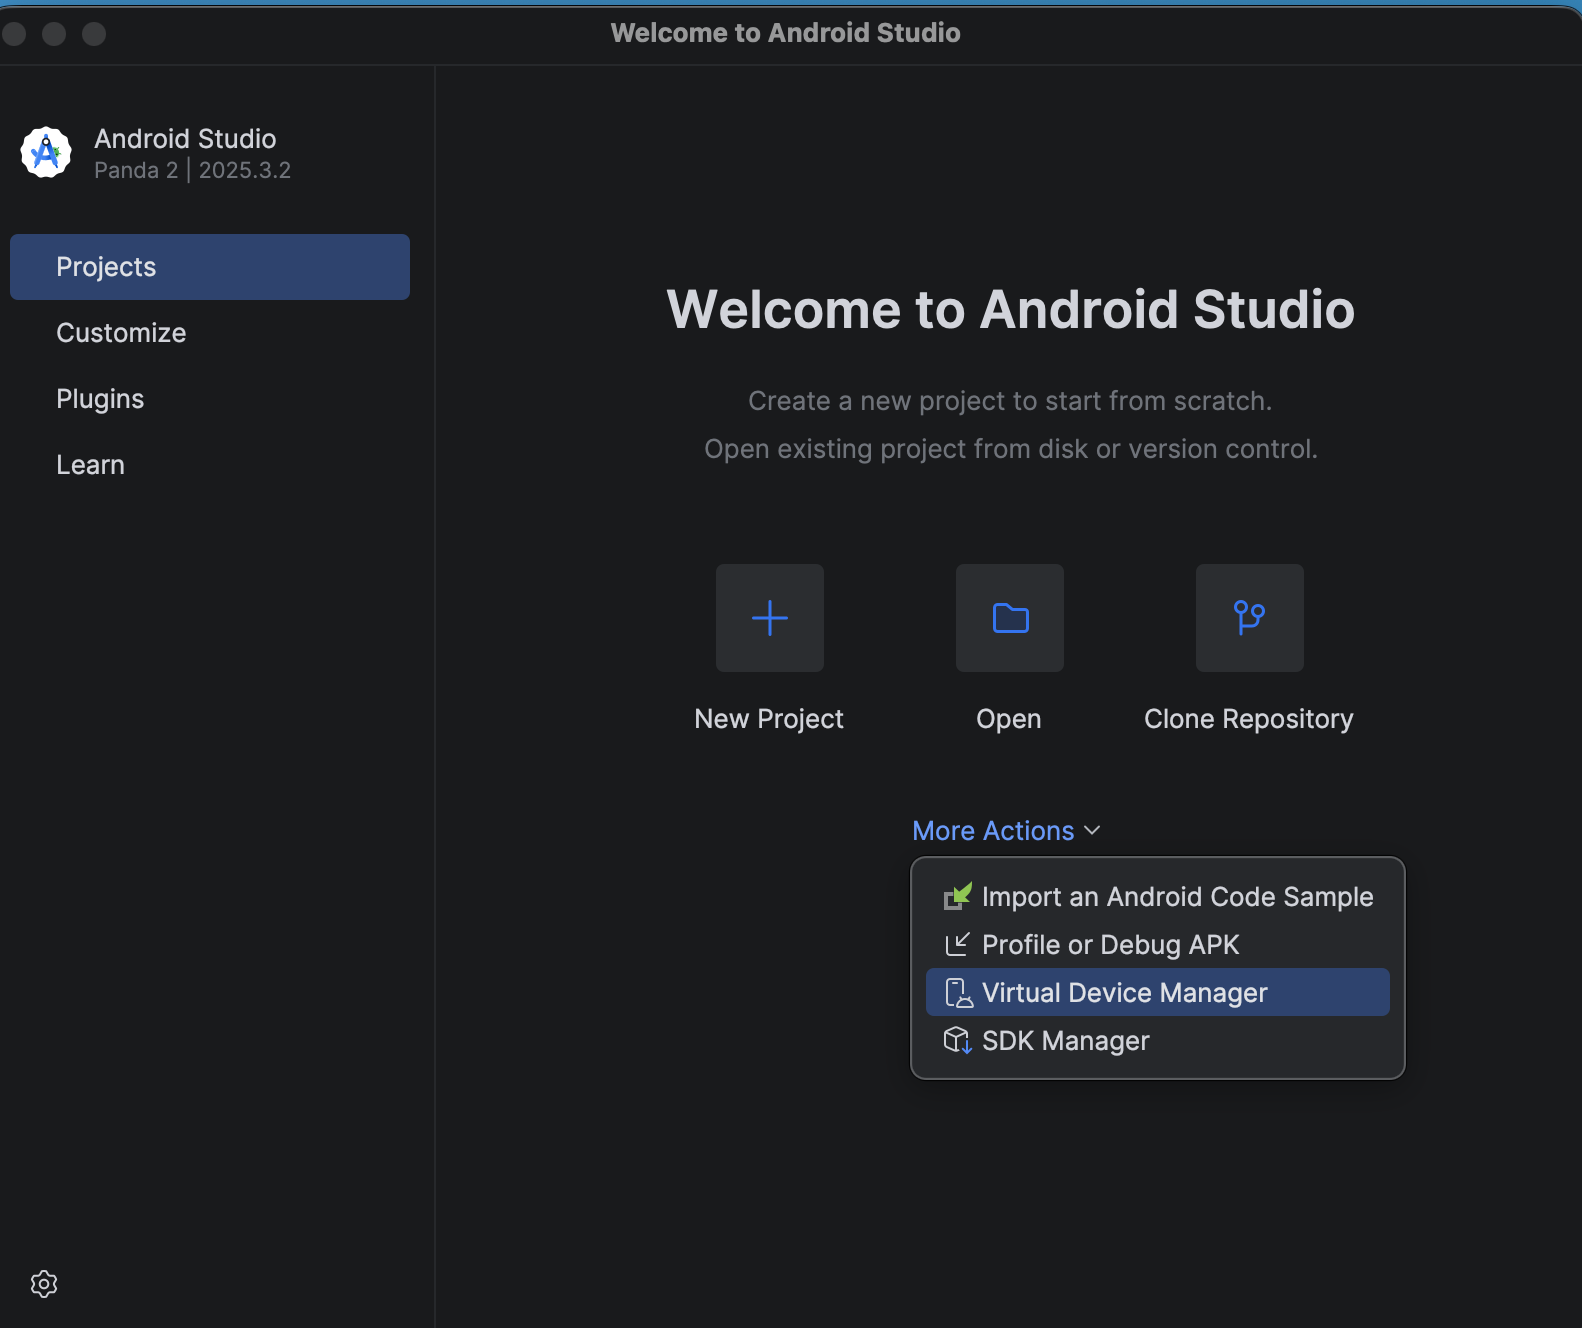
- In the Virtual Device Manager, click the + button to create a new virtual device.
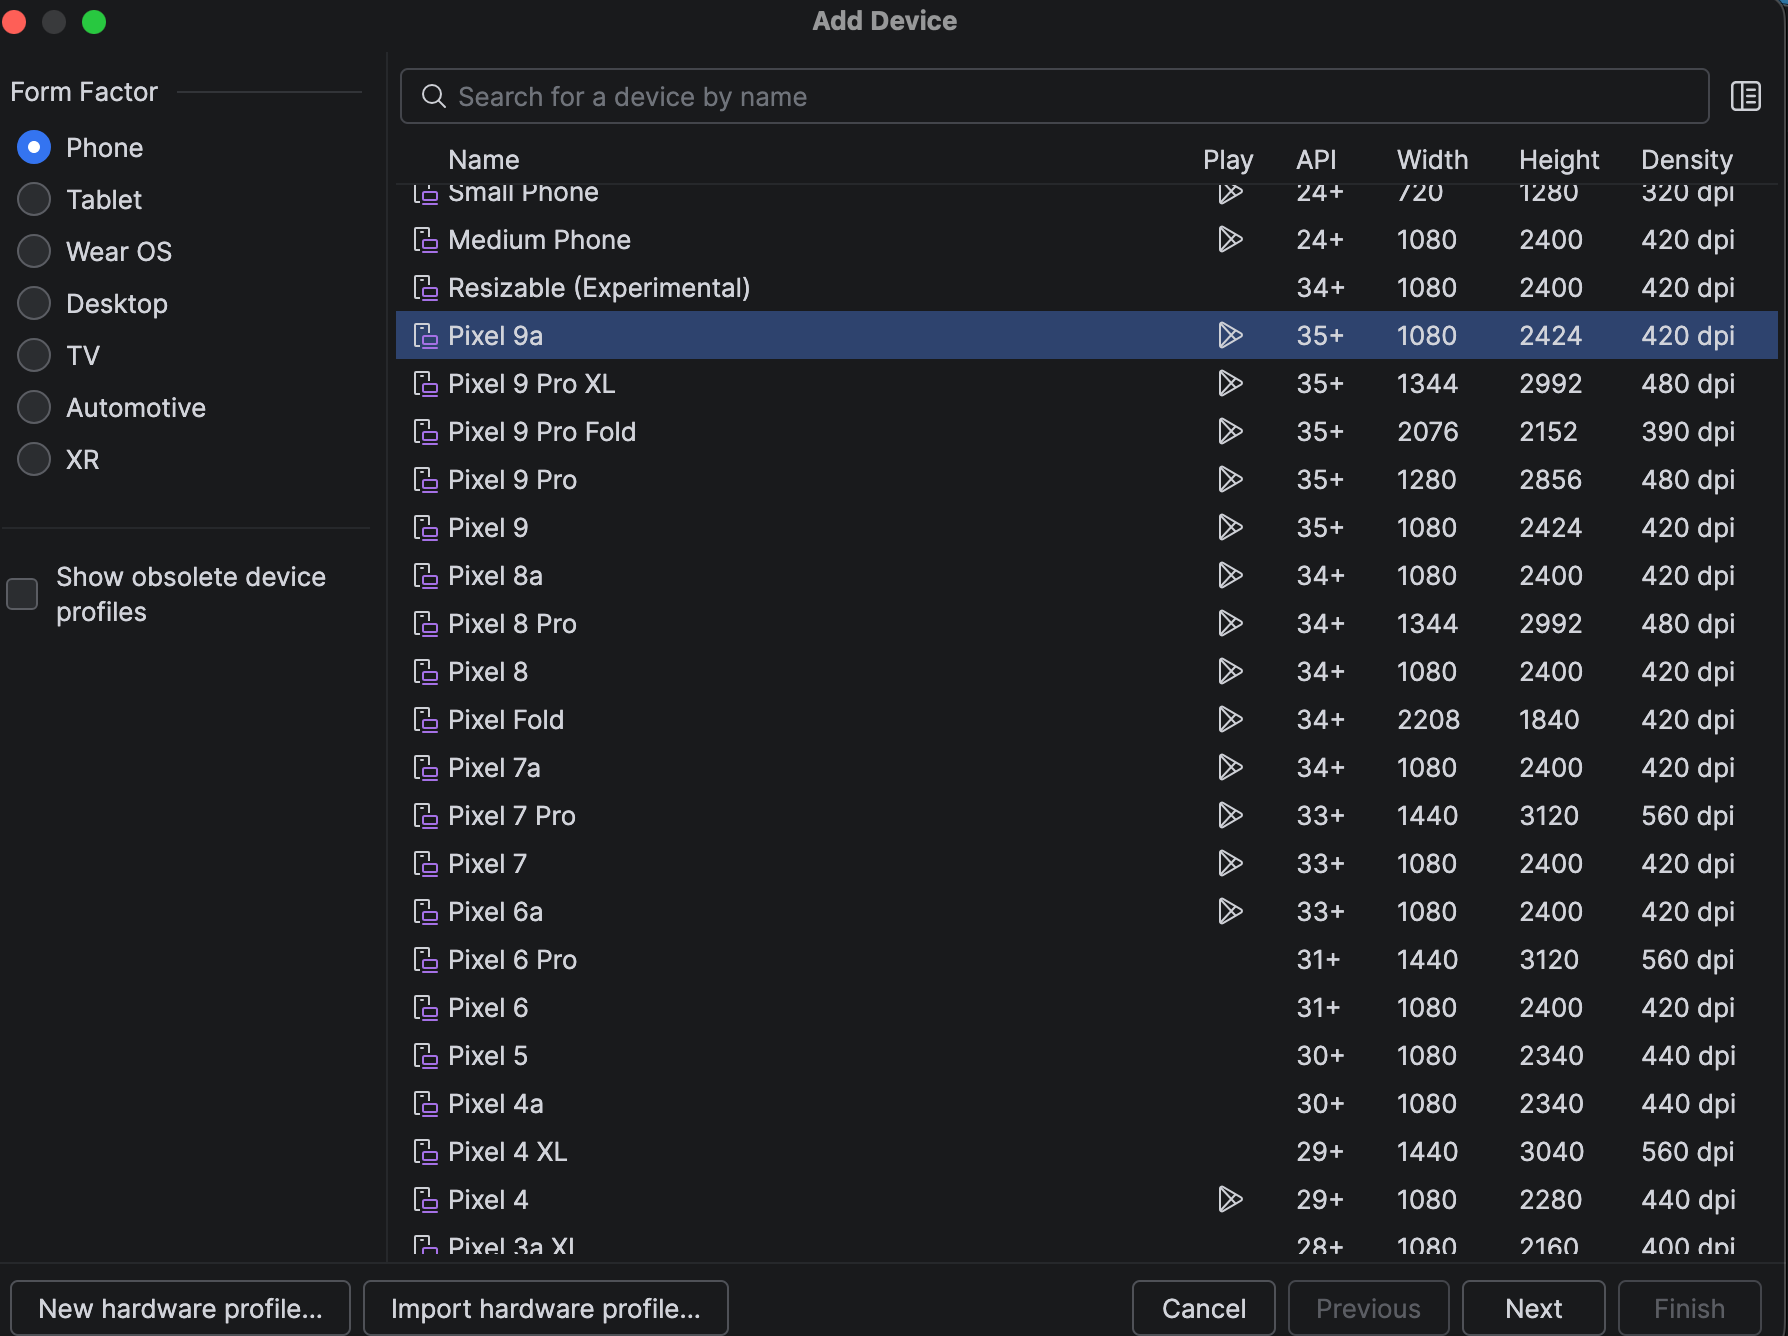
- Select the virtual device you want to create (for example, Pixel 9a) and then click Next.
- Update the device name (optional) and then click on Finish.

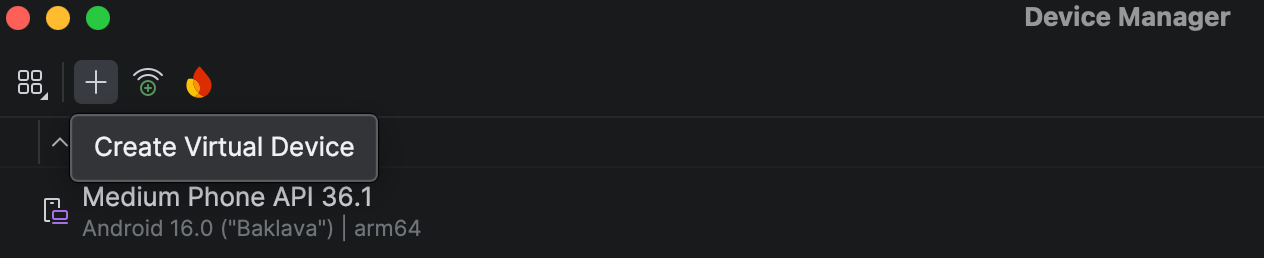
- Your new virtual device will now appear in the Device Manager. Click the play ▶️ button next to it to start the emulator.
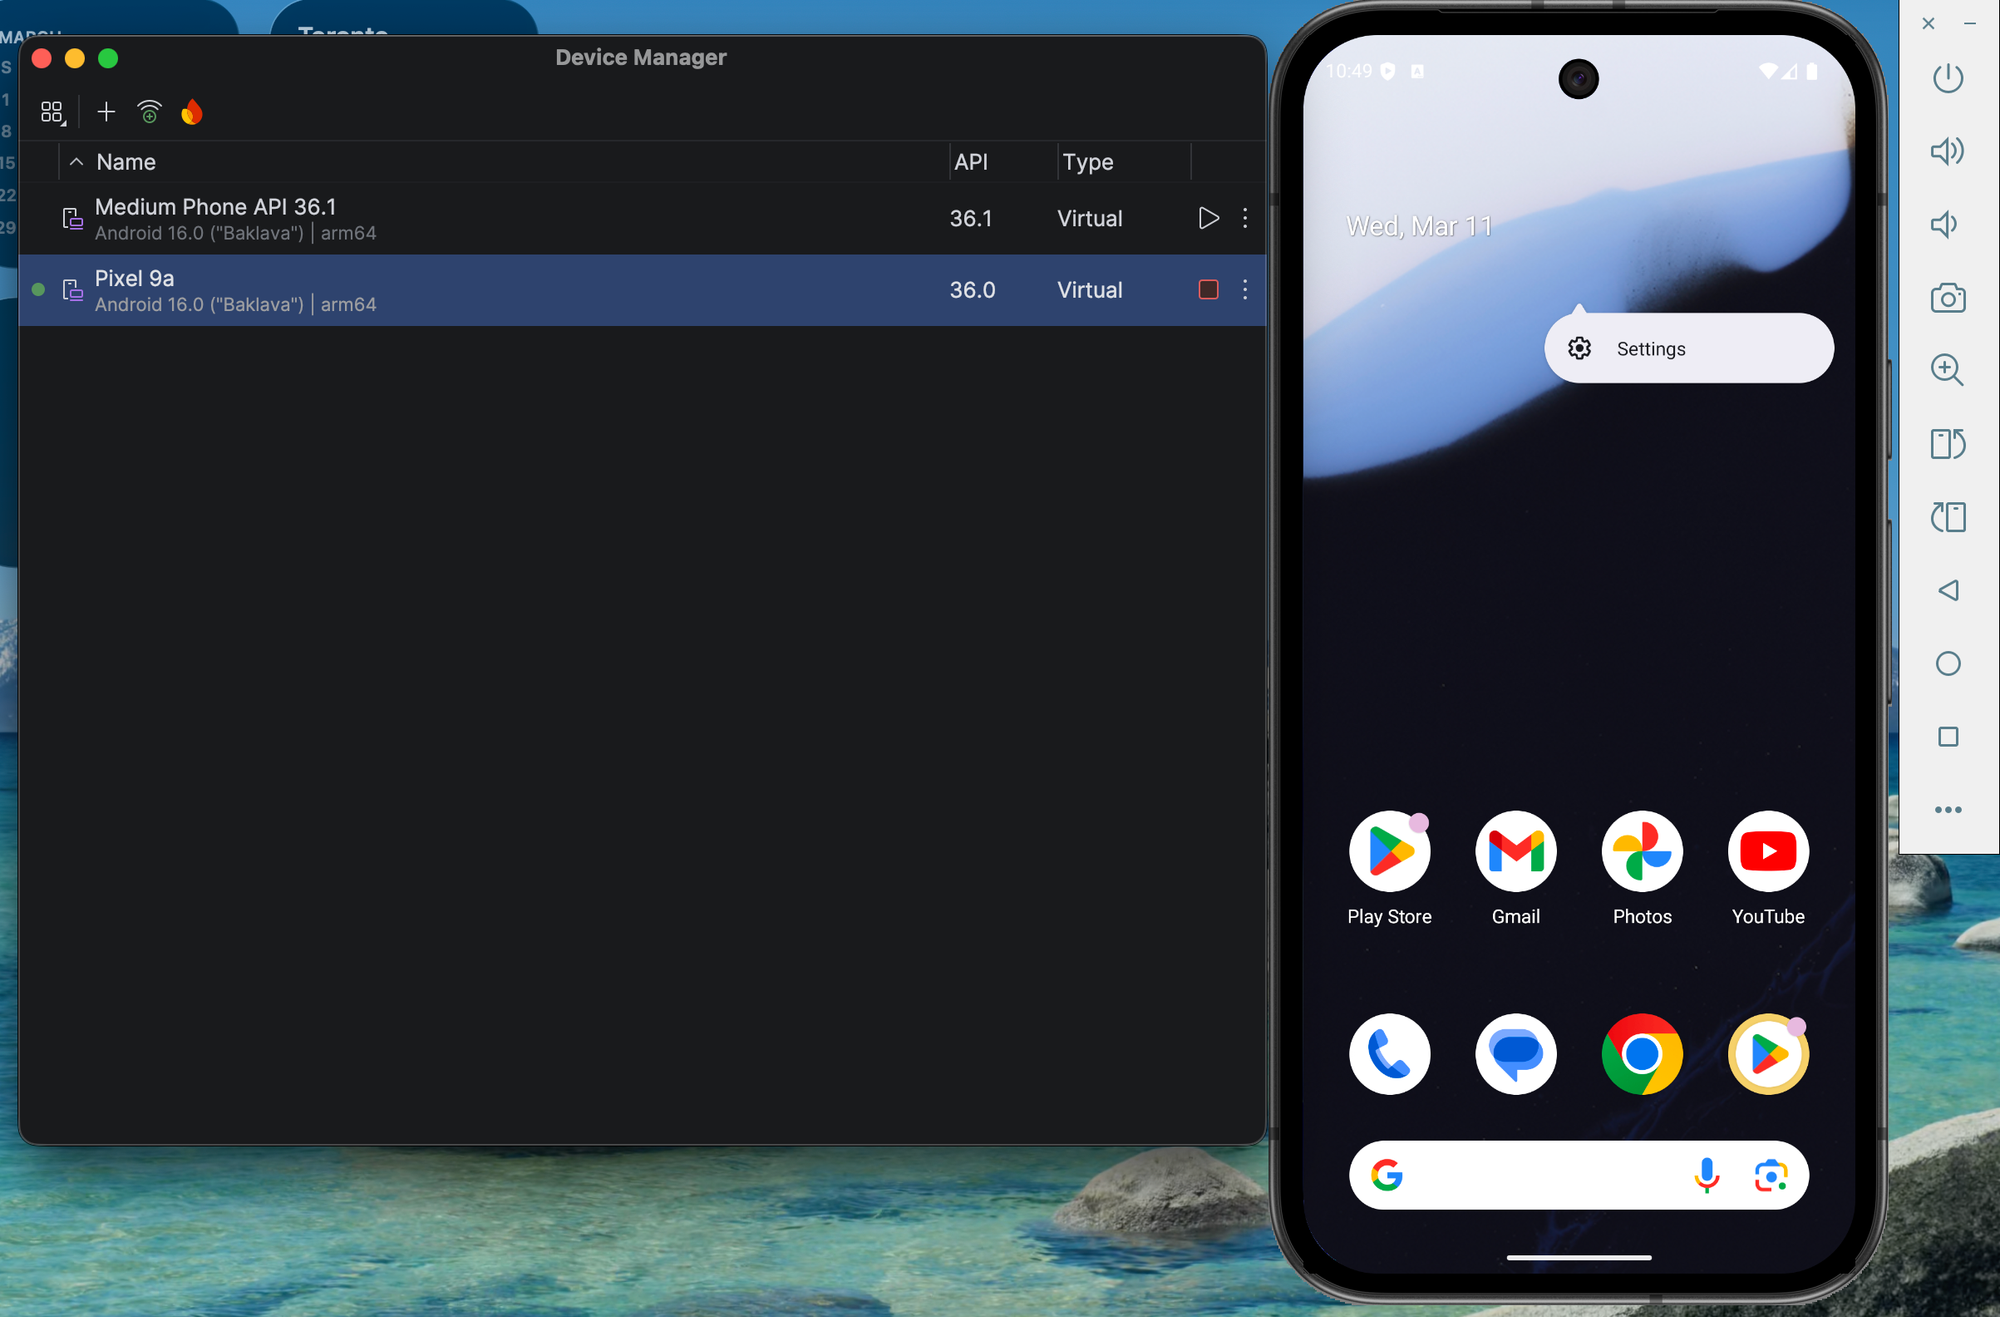
- Once the virtual device is running, open your terminal and type:
adb devices
This will display a list of all connected Android devices and emulators. Make a note of the device name you plan to use for your Android inspection.

3. iOS Setup (for iOS Inspection)
To inspect iOS applications with Appium Inspector, make sure you have the following:
- Xcode installed
- An iOS simulator available
(See the next step for instructions on checking available simulators) - A sample application (for example,
wdioDemoApp.app). You can download the demo app here: https://github.com/webdriverio/native-demo-app/releases
If your iOS environment isn’t set up yet, follow:

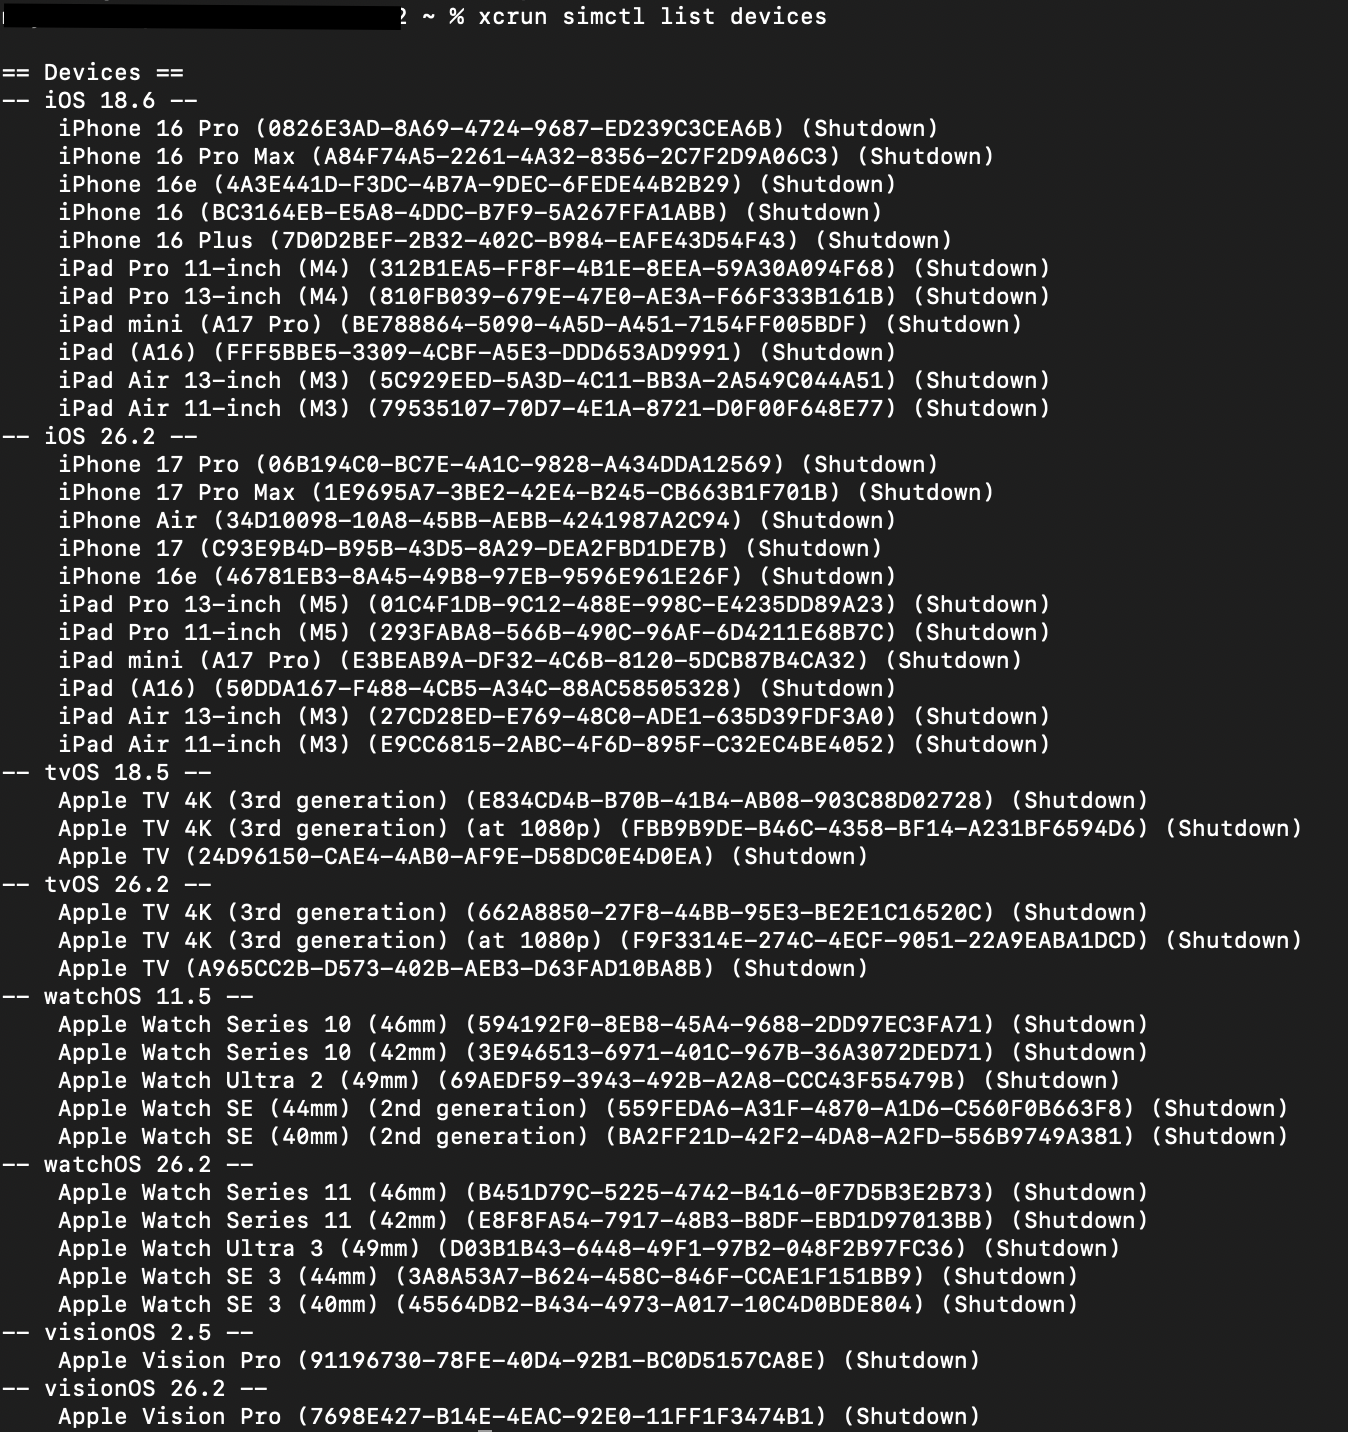
To see all available iOS simulators, open your terminal and run:
xcrun simctl list devices
Make a note of the UUID or device name of the simulator you plan to use for your Appium Inspector session.
4. Appium Inspector Installed
You’ll also need Appium Inspector, the graphical tool used to inspect your mobile applications. It allows you to:
- Start an Appium session
- View the UI hierarchy of your application
- Inspect element properties
- Test interactions with elements
There are two ways to install Appium Inspector:
- Download the standalone app from the official repository: https://github.com/appium/appium-inspector/releases
- Install it as a plugin (Appium 3.x and later). Open your terminal and run the following command:
appium plugin install inspector

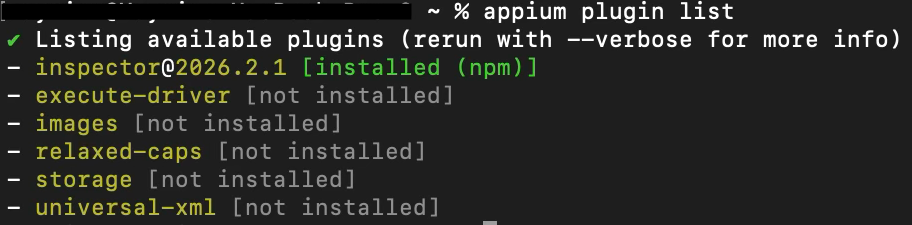
You can then verify that Appium Inspector was installed correctly by running the following command in your terminal:
appium plugin list
This will show a list of installed Appium plugins, including Inspector.
Starting Your First Appium Inspector Session (Android & iOS)
Now that your environment is ready, you can launch Appium Inspector and connect it to a mobile application.
Appium Inspector works by creating an Appium session with your device (or simulator/emulator). To establish this session, you must provide Desired Capabilities. These capabilities tell Appium how to start the session and launch the application you want to inspect.
Opening Appium Inspector
- Start Appium Inspector.
There are two ways to launch Appium Inspector, depending on how you installed it.
Option 1 — Using the Standalone Application
If you installed Appium Inspector as a standalone application, first make sure your Appium server is running.
Start the Appium server in your terminal:
appium
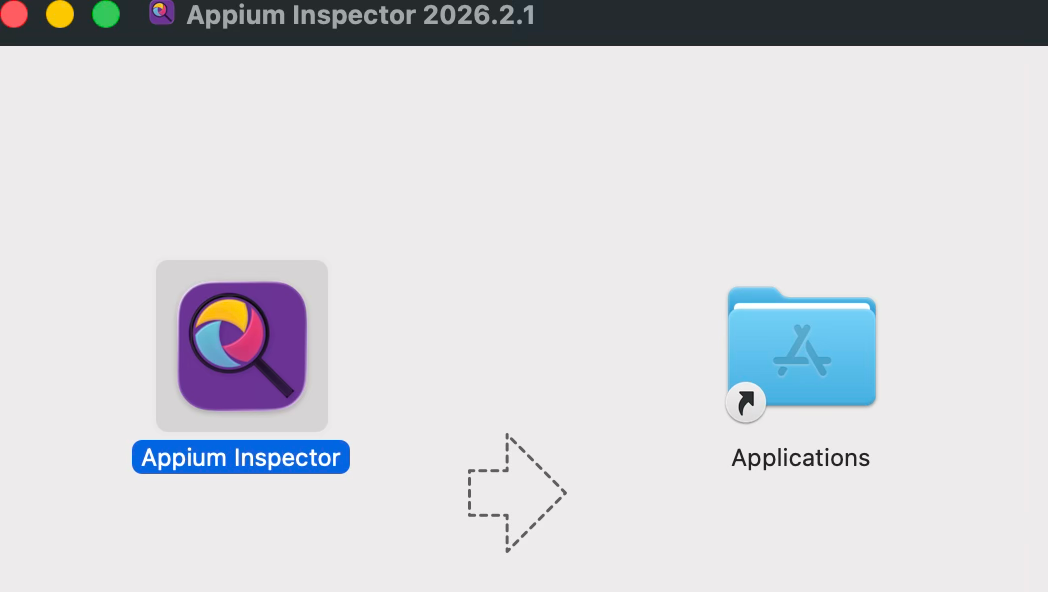
Then open the Appium Inspector application from your Applications folder.
Option 2 — Using the Appium Inspector Plugin (Appium 3.x and later)
If you installed Appium Inspector as an Appium plugin, you can start both the Appium server and Appium Inspector with the following command:
appium --use-plugins=inspector --allow-cors
After starting the server, open the following URL in your web browser:
http://127.0.0.1:4723/inspector
This will launch the Appium Inspector interface, where you can configure your Appium session and start inspecting your mobile application.
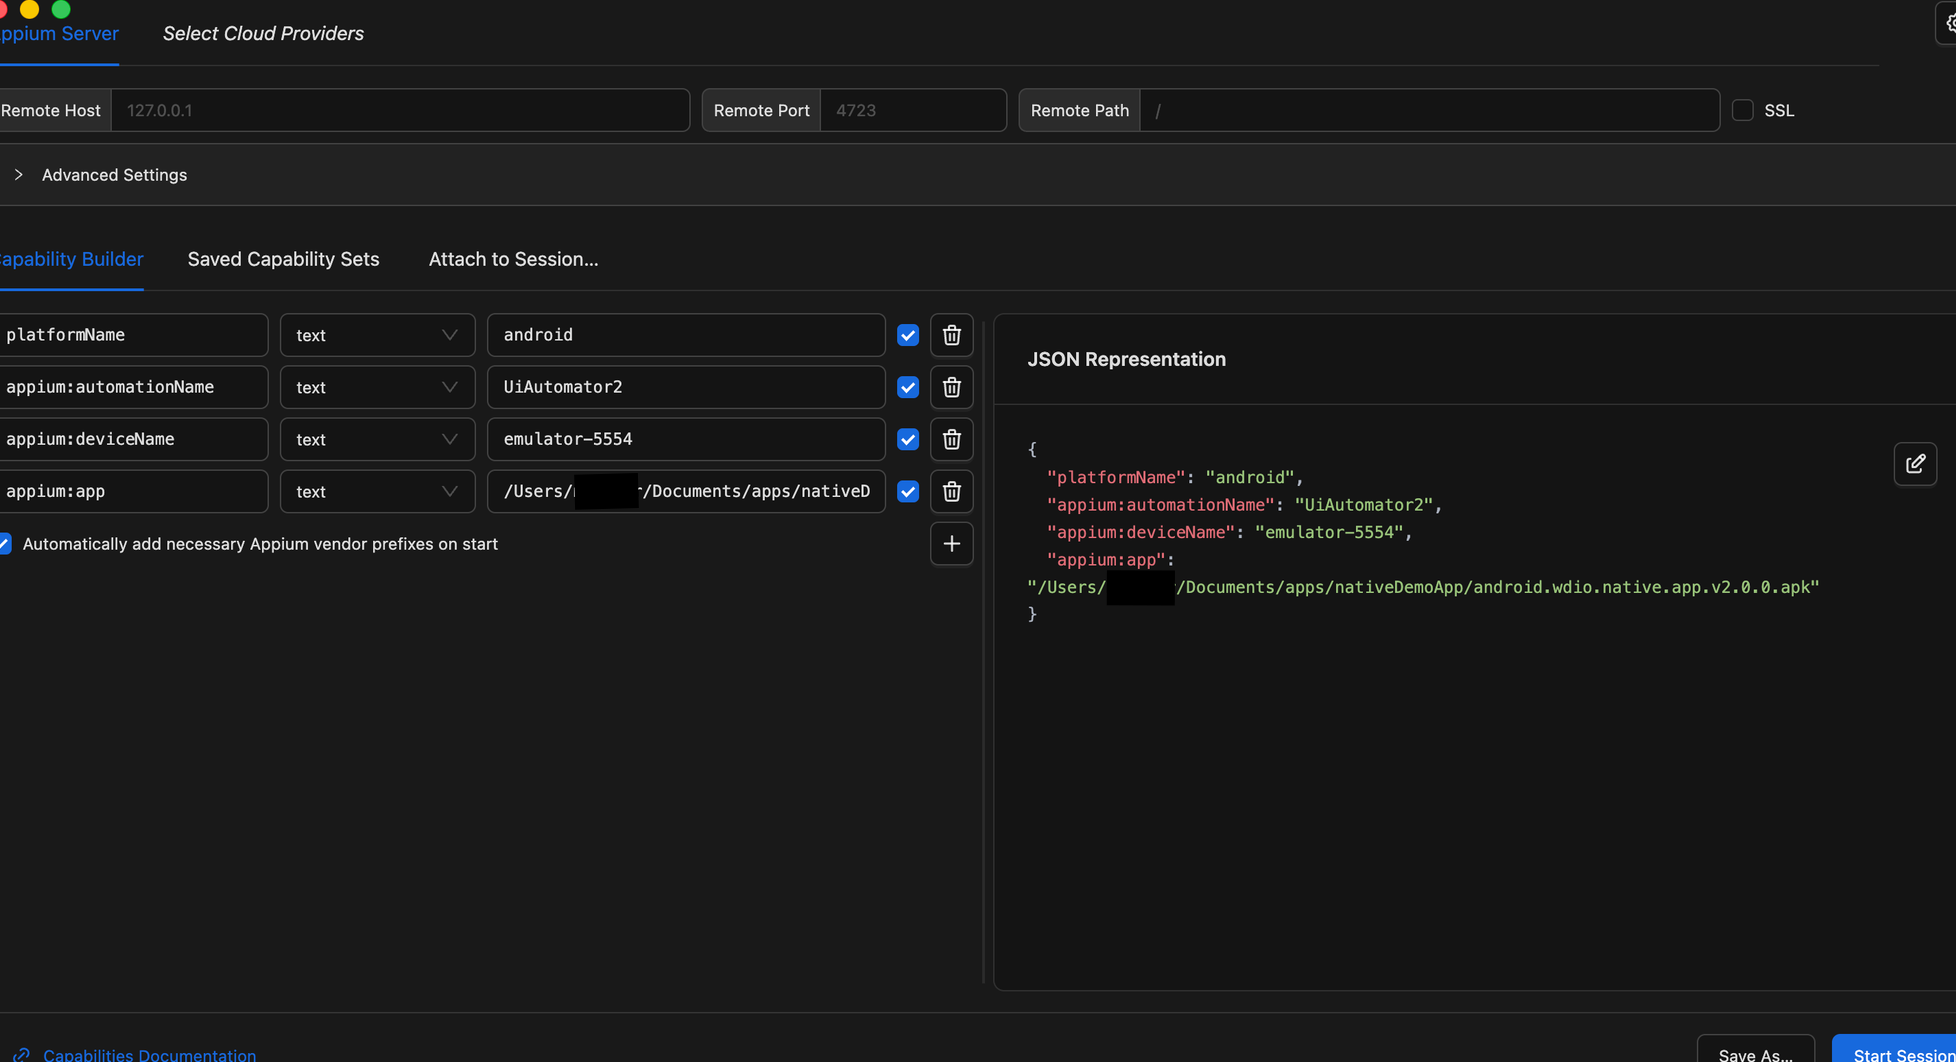
- Create Desired Capabilities for Android
Enter the following Desired Capabilities:
{
  "platformName": "android",
  "appium:automationName": "UiAutomator2",
  "appium:deviceName": "emulator-5554",
  "appium:app": "/Users/${user}/Documents/apps/nativeDemoApp/android.wdio.native.app.v2.0.0.apk"
}
What These Capabilities Mean
platformName
Specifies the mobile platform you want to automate (android or iOS).
automationName
Specifies the automation engine used by Appium:
- UiAutomator2 for Android
- XCUITest for iOS
deviceName
Defines the device, emulator, or simulator that will be used for the session.
Make sure it matches one of the available devices on your system.
app
The path to the mobile application you want to launch during the session:
.apkfile for Android.app(or.ipa) file for iOS
Note: Make sure that:
-deviceNamematches the name of the emulator you are using.
-apppoints to the correct path where your Android APK file is located on your machine.
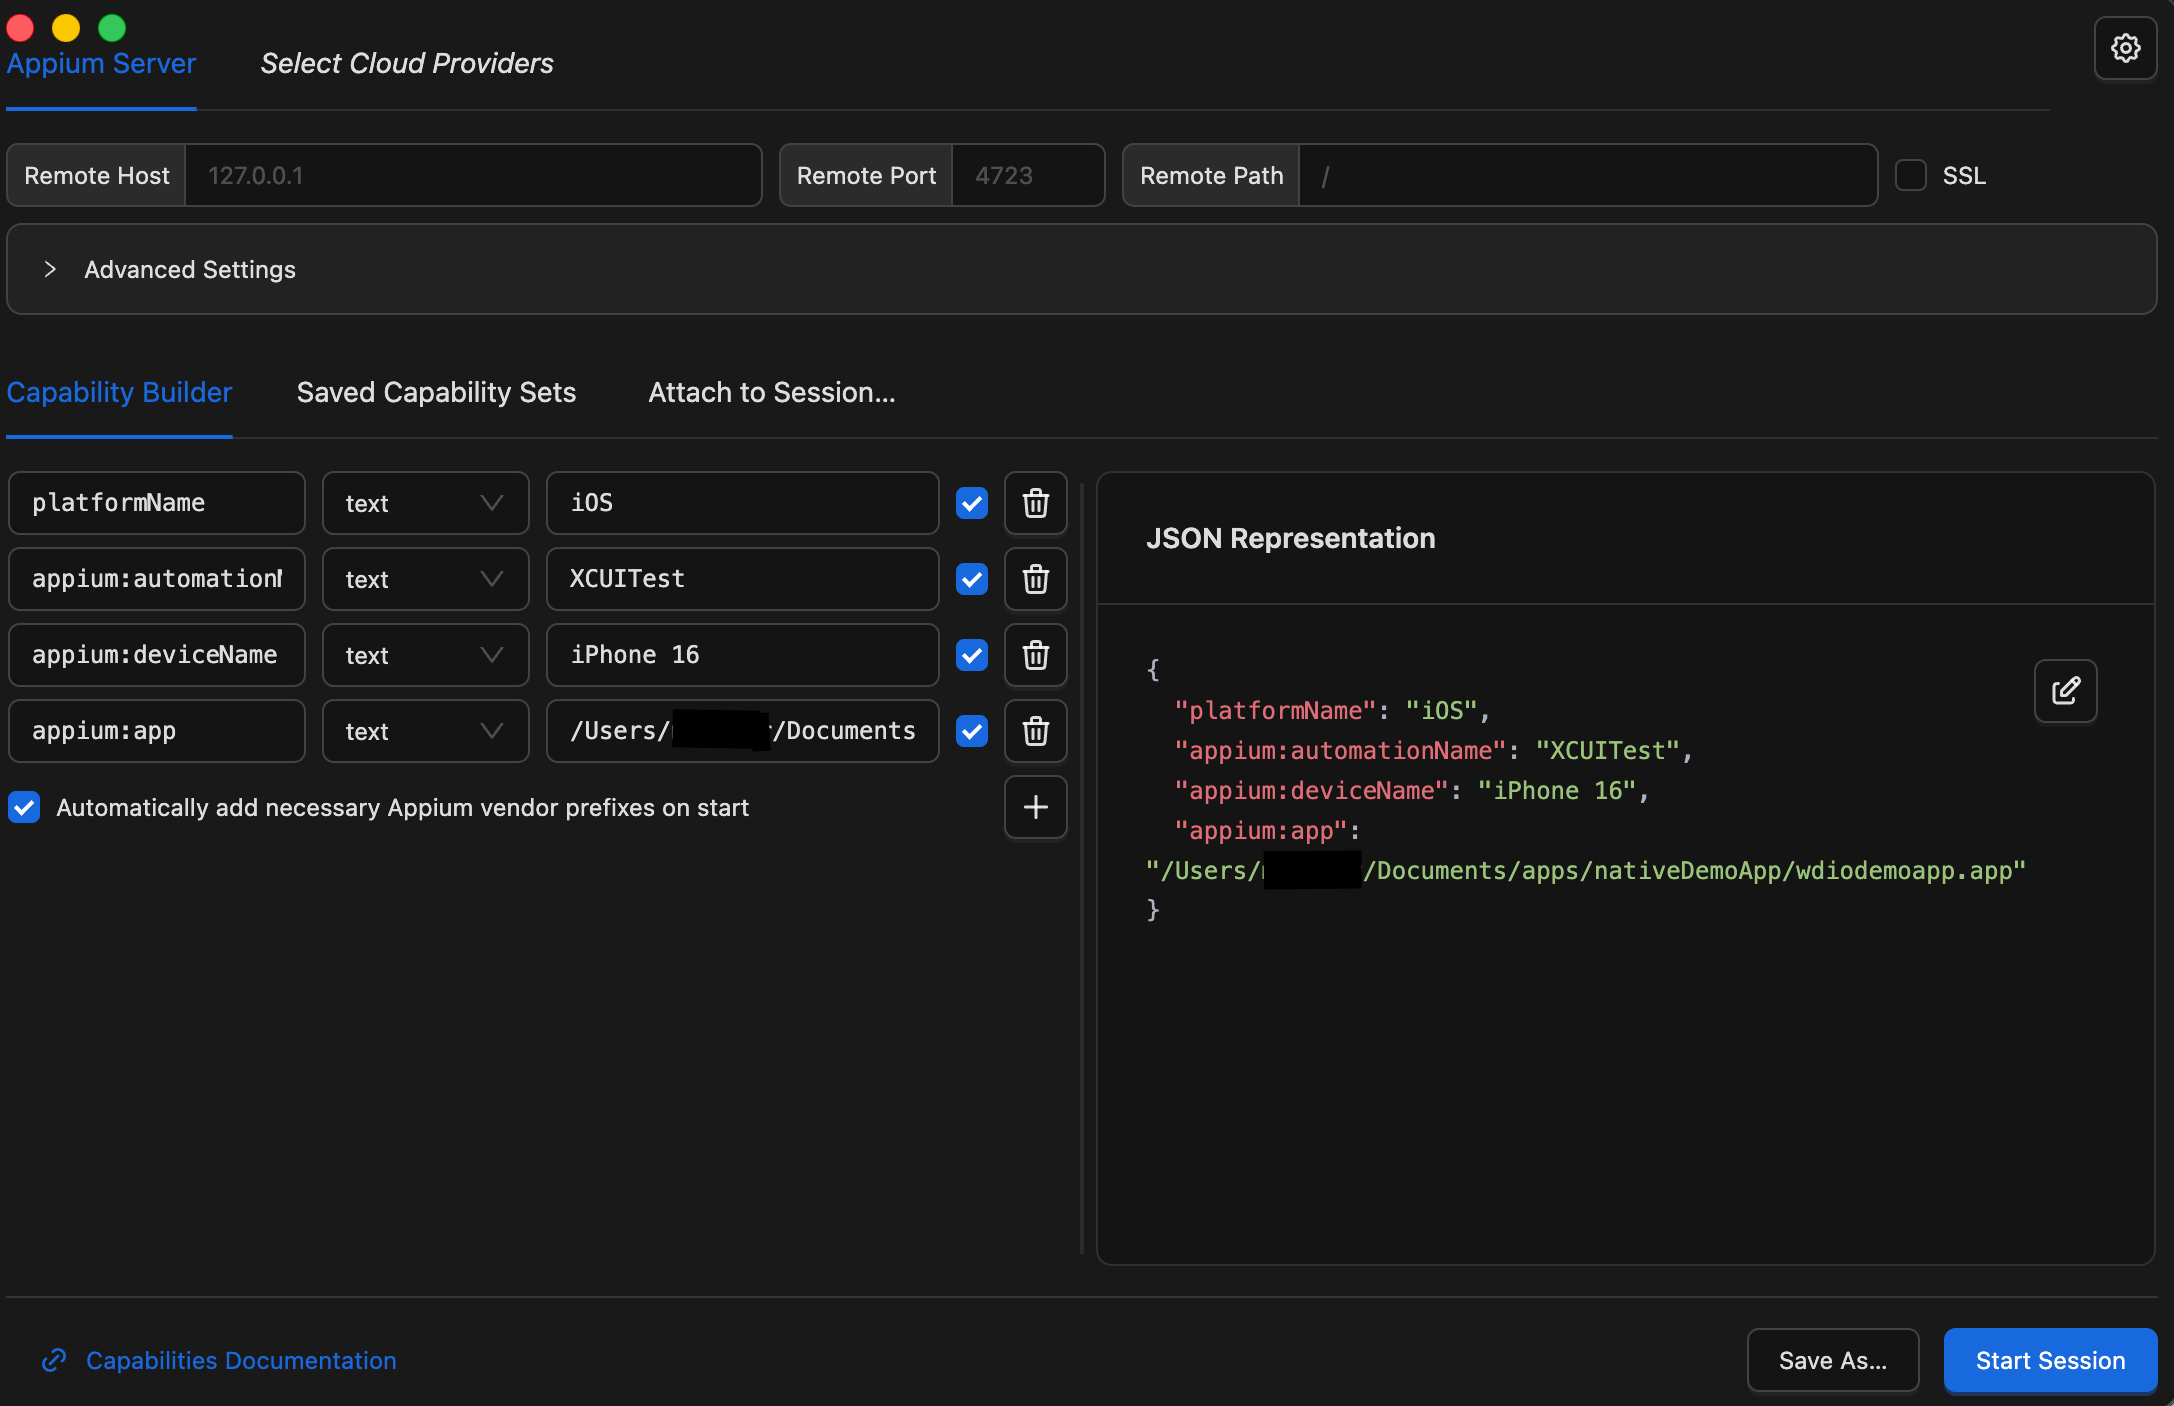
- Create Desired Capabilities for iOS
Enter the following Desired Capabilities:
{
  "platformName": "iOS",
  "appium:automationName": "XCUITest",
  "appium:deviceName": "iPhone 16",
  "appium:app": "/Users/${user}/Documents/apps/nativeDemoApp/wdiodemoapp.app"
}
Note: Make sure that:
-deviceNamematches the name of the simulator you are using.
-apppoints to the correct path where your iOS app file is located on your machine.
- Start the Session
After entering the Desired Capabilities for Android or iOS, click Start Session.
- For Android, the emulator will launch your application.
- For iOS, the simulator will start the app.
Appium Inspector will then connect to the running app. If everything is set up correctly, you should see a new window displaying your application.
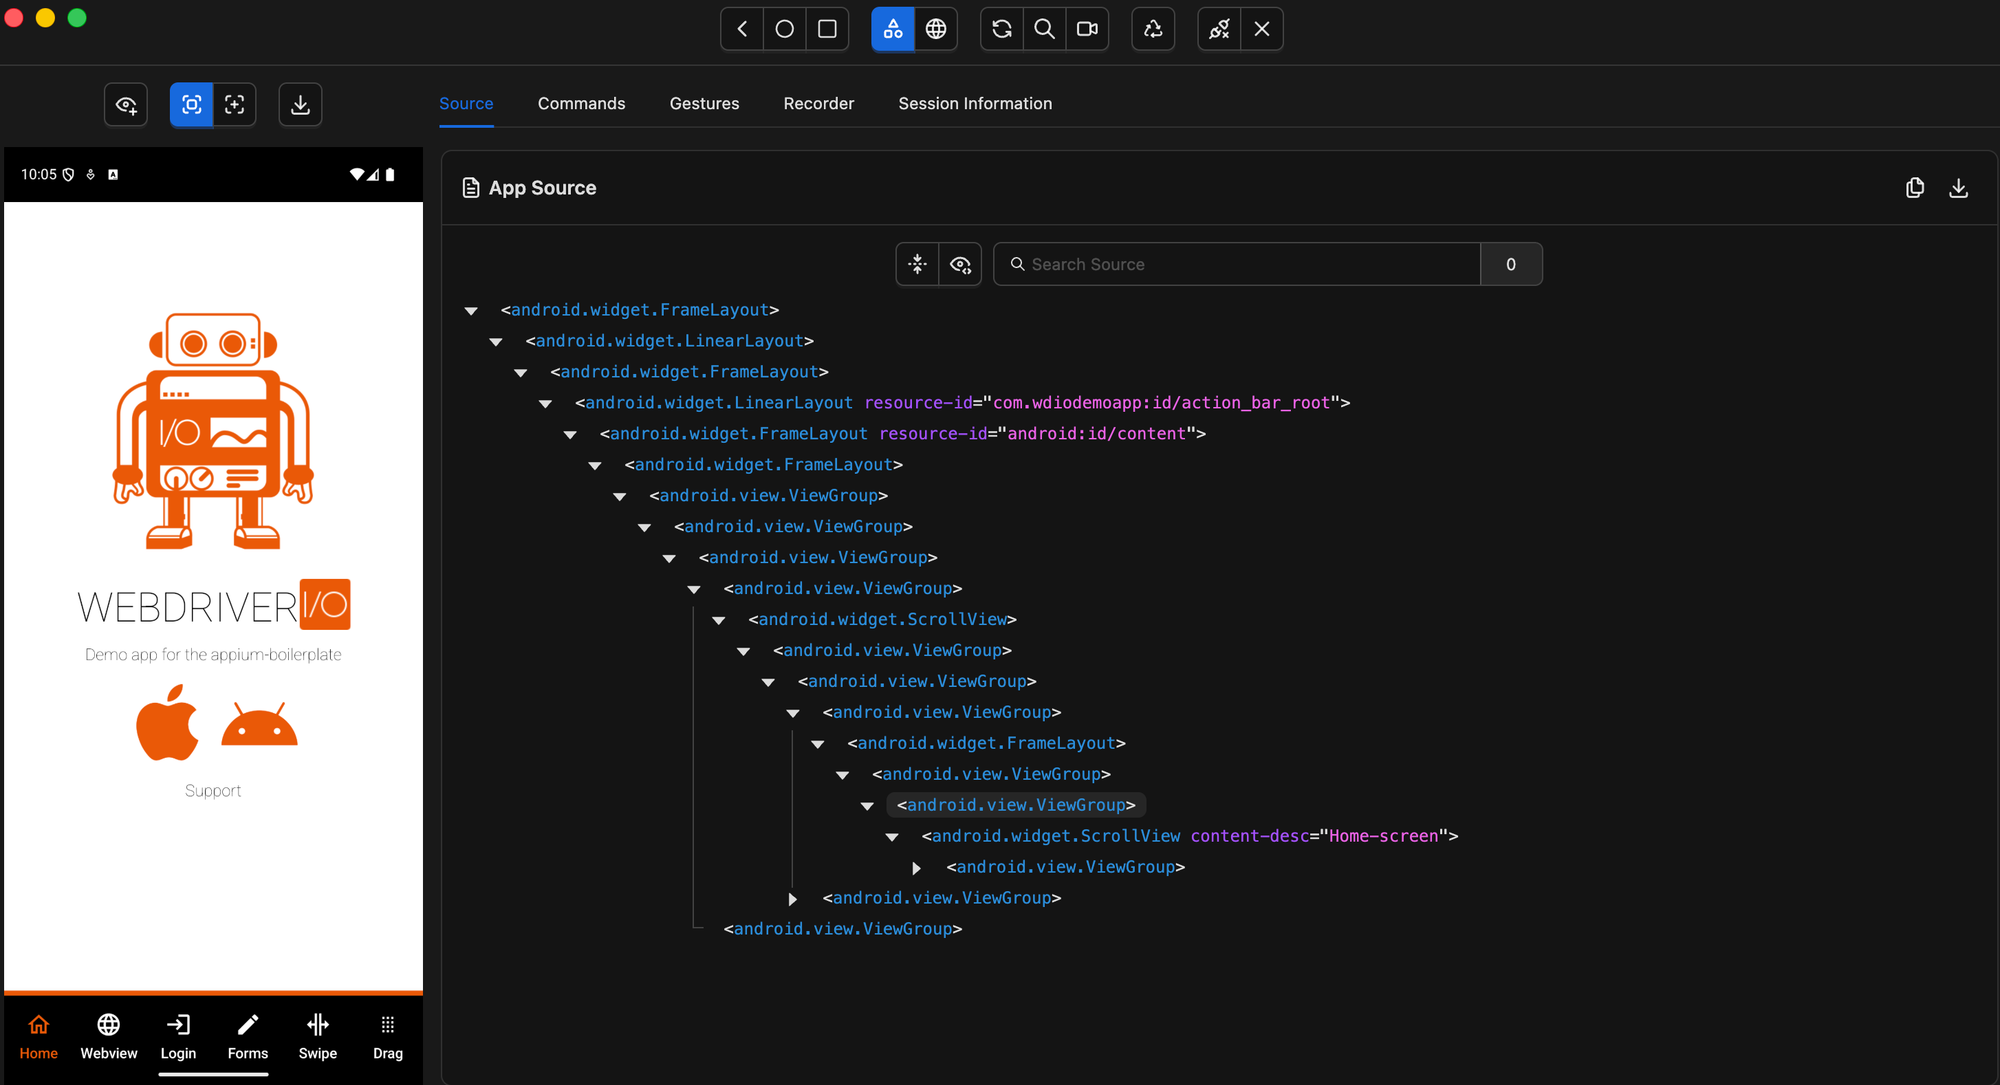
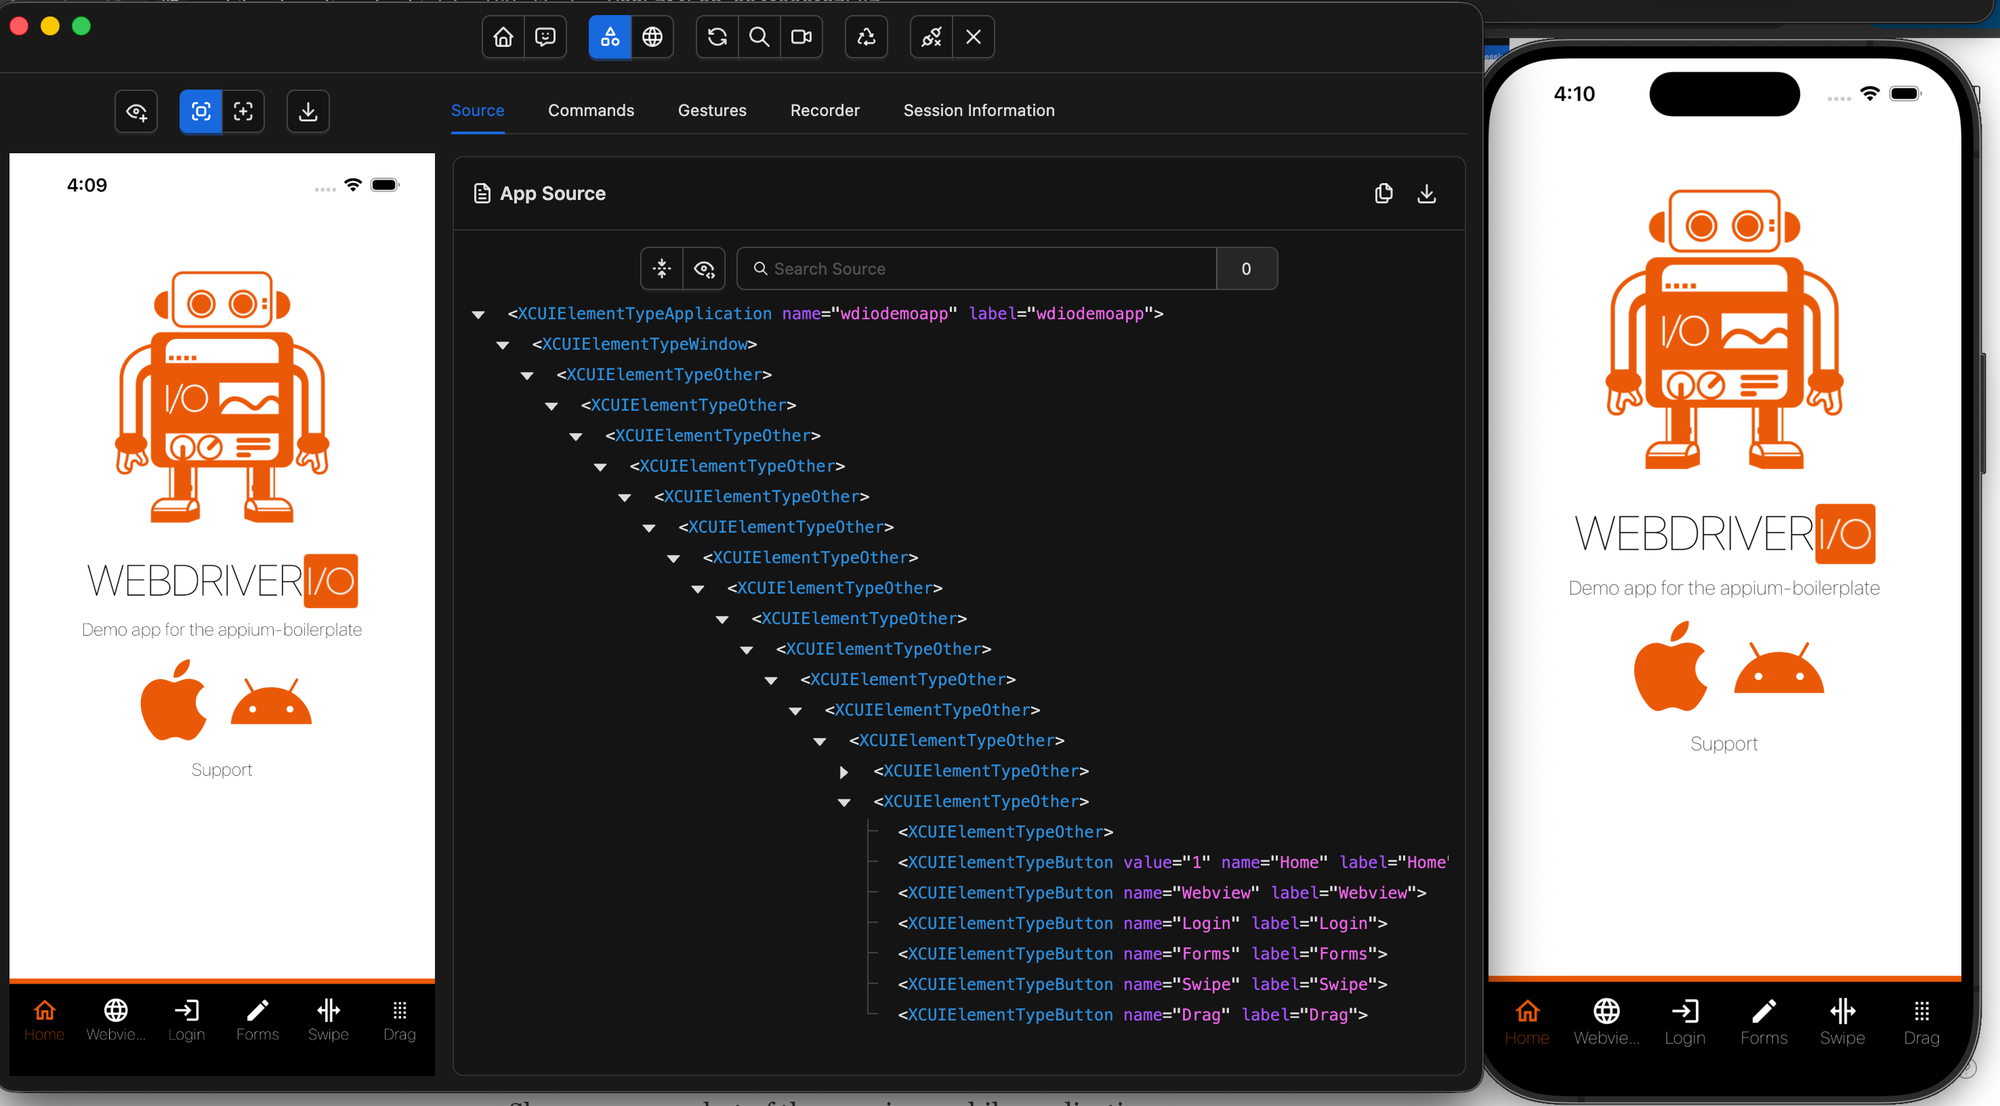
Appium Inspector Interface
Once the session is created successfully, Appium Inspector shows three main panels:
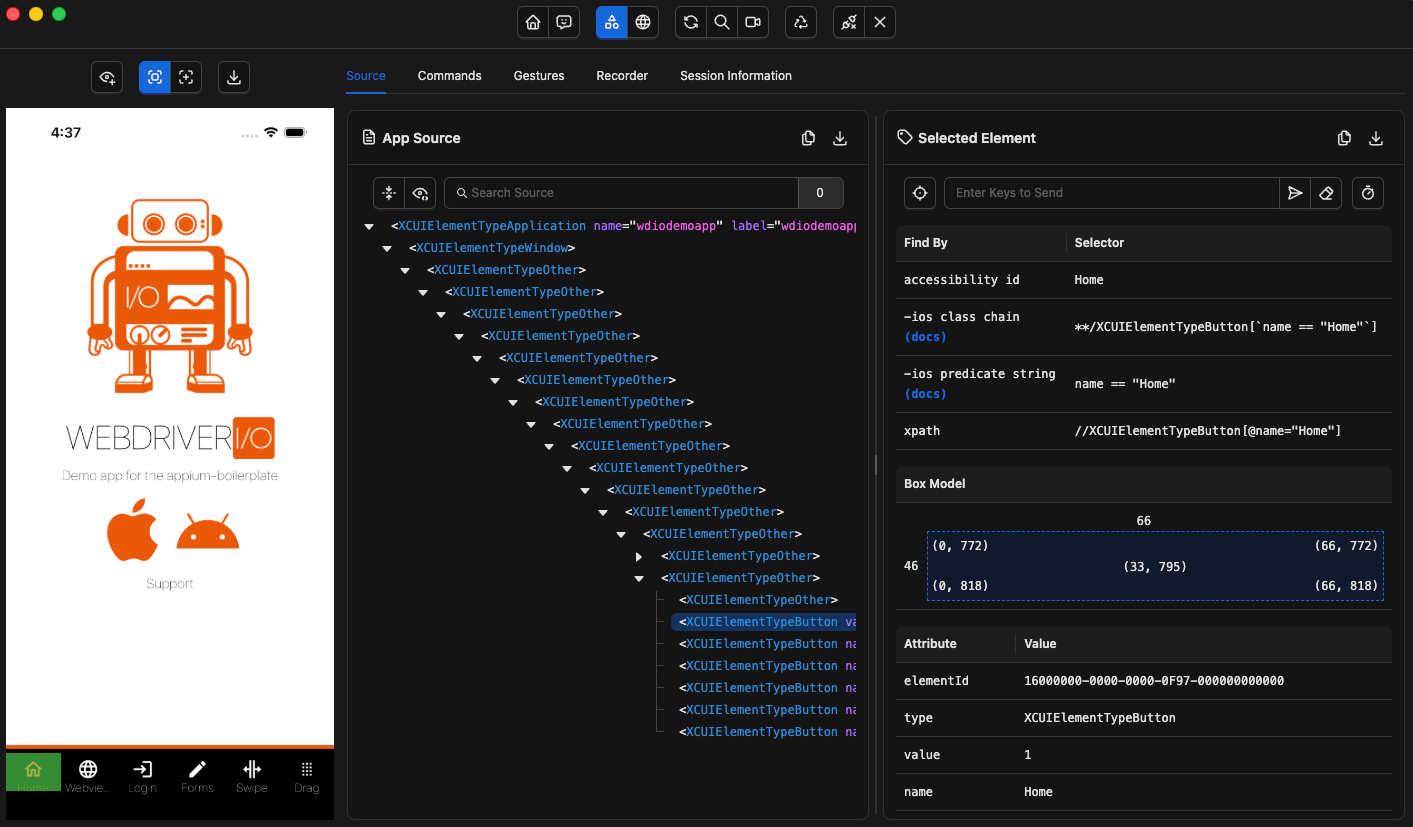
- Application Preview
Displays a live screenshot of the running mobile application. - Element Hierarchy
Shows the UI structure of the app, allowing you to navigate and view all elements on the screen. - Element Properties
Displays detailed information about the selected element, including attributes and locators.
This interface allows you to inspect and interact with your app without writing any code, making it easier to identify elements and prepare locators for your automated tests.
Troubleshooting Common Issues
When working with Appium Inspector, you may encounter some common issues. Below are the most frequent problems and how to fix them.
Appium Session Not Starting
Issue:
Clicking Start Session does nothing or fails with an error.
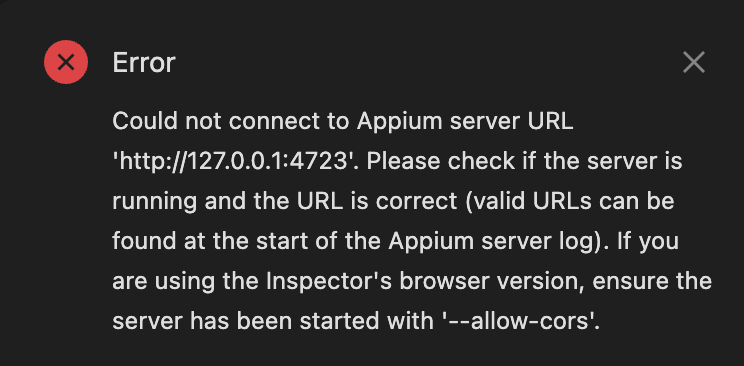
Possible causes & solutions:
- Make sure the Appium server is running
- Verify your Desired Capabilities are correct
- Check that the deviceName matches your emulator/simulator
- Ensure the app path is valid
Device or Emulator Not Detected
Issue:
Appium cannot find your Android emulator or iOS simulator.
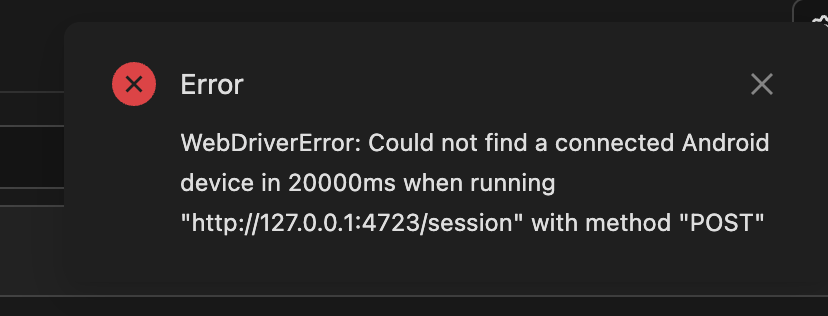
Solutions:
Android: Make sure your emulator appears in the list.
adb devices
iOS: Verify that your simulator is available and booted.
xcrun simctl list devices
App Fails to Launch
Issue:
The session starts, but the app does not open.
Solutions:
- Double-check the app file path
- Ensure the app is compatible with your device/emulator
- Try restarting the emulator or simulator
Invalid Platform name
Issue:
Configuration error - incorrect platformName
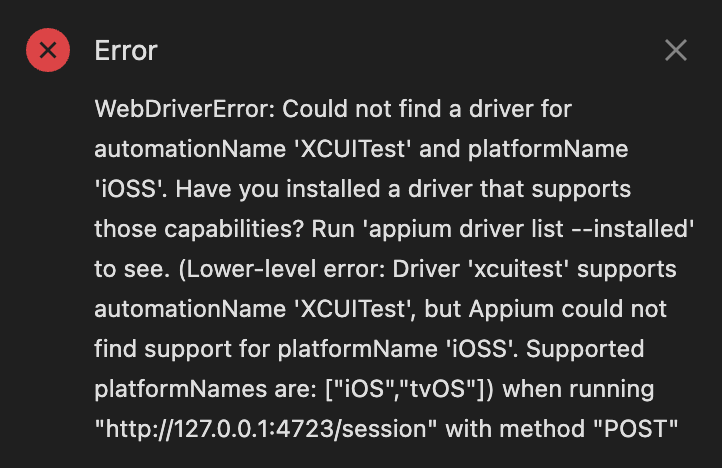
Solutions:
- Verify that the platformName is correct (
AndroidoriOS)
Cannot find Driver
Issue:
Configuration error - cannot find driver
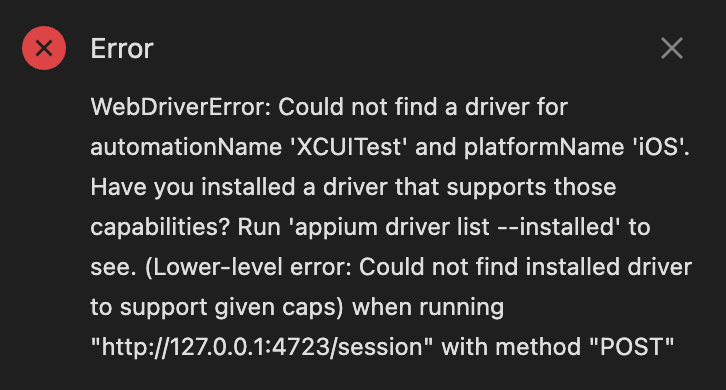
Solutions:
- Ensure the correct automationName:
UiAutomator2for AndroidXCUITestfor iOS
- Check that your Appium drivers are properly installed
Inspector Shows Empty or Incorrect UI
Issue:
Appium Inspector opens, but elements are missing or incorrect.
Solutions:
- Click Refresh Source in Appium Inspector
- Make sure the app screen is fully loaded
- Try interacting with the app and refresh again
Appium Inspector Not Opening
Issue:
The Inspector UI does not load in the browser.
Solutions:
- Ensure Appium is running on the correct port (
4723)
http://127.0.0.1:4723/inspector
- If using plugin mode, make sure you started Appium with:
appium --use-plugins=inspector --allow-cors
- macOS security restriction
On macOS, Appium Inspector may be blocked the first time you open it because it was downloaded from the internet.
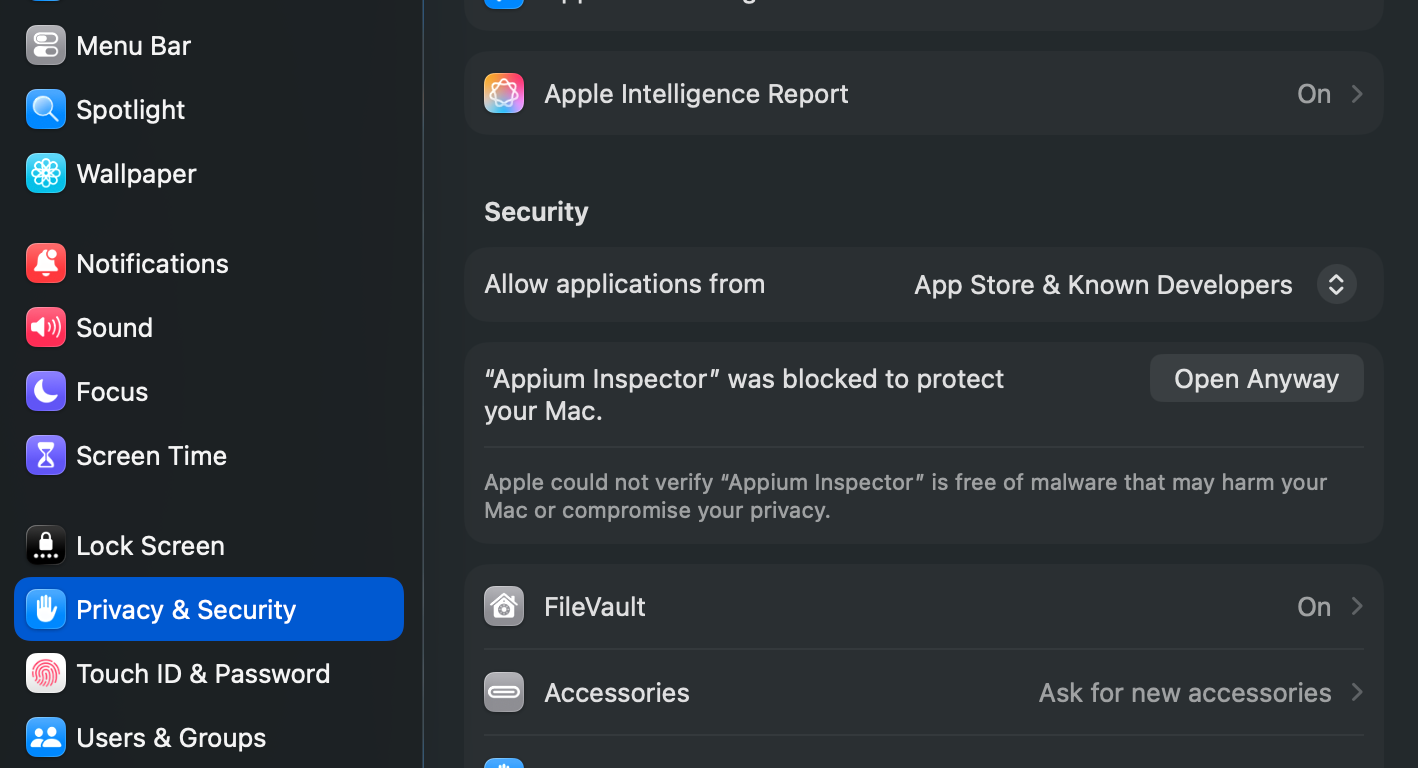
If you see a message like “Appium Inspector can’t be opened because it cannot be verified”, you can fix it by:
- Going to System Settings → Privacy & Security
- Scrolling down to the Security section
- Clicking “Open Anyway” for Appium Inspector
Then try launching the application again.
What's Next?
Stay tuned for the next article, where we'll take a hands-on look at Appium Inspector: exploring its features and panels to help you master one of the most powerful tools in your Appium toolkit.


Discussion