
The structure is there. The modules compile. But a framework that can't open a driver, can't initialize a screen object, and can't run a test isn't ready — nothing works yet.
This article changes that. You'll build a DriverManager that opens an Appium session before the first test runs and closes it cleanly when the last one finishes, a BasePage that wires PageFactory into every screen object automatically, your first concrete screen object with real locators, and a test that exercises the whole stack against a live device. By the end, you'll run your first test and watch it pass — a real Appium session, a live app on a device, and the full stack working end to end.
💡 This is Article 3 of the Framework Series. It picks up directly from [How to Structure a Mobile Test Automation Framework That Scales Across Teams] — if you haven't completed that article yet, start there first. Everything here assumes your Maven multi-module project is already in place: the root POM, thecoreandteam-testsmodules, the stubBasePage, andTestApplication.
What You're Building
This article adds four things to the framework: DriverManager, BasePage, a screen object, and a test. Before writing any code, it helps to understand what each piece is and why the framework needs it.
DriverManager is the class that owns the Appium session — it opens the connection to the Appium server, launches the app on the device, and closes everything down when the test run finishes. Without it, there's no driver, and without a driver, nothing works. Centralizing session management in one place means tests never have to deal with it directly.
BasePage is the abstract class every screen object extends. When a screen object is created, BasePage's constructor does one thing: it calls PageFactory.initElements with the Appium driver, which scans the class for annotated locator fields and wires each one up to the live device. Every screen object that extends BasePage gets this automatically — you never repeat that setup in each individual class.
PageFactory is an Appium utility that turns annotated fields into live element lookups. You declare @AndroidFindBy(accessibility = "some-label") on a field, call PageFactory.initElements, and from that point on, accessing the field triggers a real Appium call to find that element on the device. The lookup is lazy — it only happens when you actually interact with the element, not when the screen object is constructed.
Together, these three pieces form the working core of the framework: DriverManager provides the session, BasePage wires it into every screen object via PageFactory, and screen objects expose clean interaction methods that tests can call without touching Appium directly.
The Sample App
This series uses the WDIO Native Demo App — the same app from the beginner series: free, open source, cross-platform, and purpose-built with proper accessibility labels on every key element.
💡 Any app works — updateapp.path, package name, bundle ID, and selectors to match yours. On iOS, unzip the download and pointapp.pathat the.appbundle inside.
Step 1: Build DriverManager
Create core/src/main/java/com/mobileframework/driver/DriverManager.java:
package com.mobileframework.driver;

import io.appium.java_client.AppiumDriver;
import io.appium.java_client.android.AndroidDriver;
import io.appium.java_client.android.options.UiAutomator2Options;
import io.appium.java_client.ios.IOSDriver;
import io.appium.java_client.ios.options.XCUITestOptions;
import jakarta.annotation.PostConstruct;
import jakarta.annotation.PreDestroy;
import org.springframework.beans.factory.annotation.Value;
import org.springframework.stereotype.Component;

import java.net.MalformedURLException;
import java.net.URI;
import java.net.URISyntaxException;
import java.net.URL;

@Component
public class DriverManager {

    @Value("${test.platform}")
    private String platform;

    @Value("${appium.server.url:http://127.0.0.1:4723}")
    private String appiumServerUrl;

    @Value("${device.udid}")
    private String deviceUdid;

    @Value("${app.path}")
    private String appPath;

    @Value("${app.package:}")
    private String appPackage;

    @Value("${app.activity:}")
    private String appActivity;

    private AppiumDriver driver;

    @PostConstruct
    public void initialize() {
        try {
            URL serverUrl = new URI(appiumServerUrl).toURL();

            if ("android".equalsIgnoreCase(platform)) {
                UiAutomator2Options options = new UiAutomator2Options()
                        .setUdid(deviceUdid)
                        .setApp(appPath)
                        .setAppPackage(appPackage)
                        .setAppActivity(appActivity);
                driver = new AndroidDriver(serverUrl, options);

            } else if ("ios".equalsIgnoreCase(platform)) {
                XCUITestOptions options = new XCUITestOptions()
                        .setUdid(deviceUdid)
                        .setApp(appPath);
                driver = new IOSDriver(serverUrl, options);

            } else {
                throw new IllegalArgumentException(
                        "Unknown platform: '" + platform + "'. Set test.platform to 'android' or 'ios'.");
            }

        } catch (URISyntaxException | MalformedURLException e) {
            throw new IllegalStateException("Invalid Appium server URL: " + appiumServerUrl, e);
        }
    }

    @PreDestroy
    public void quit() {
        if (driver != null) {
            driver.quit();
        }
    }

    public AppiumDriver getDriver() {
        return driver;
    }

}
There's a lot going on here — let's walk through each decision.
@Component registers DriverManager as a Spring bean. Spring will create one instance when the application context starts — which JUnit's SpringExtension triggers in the beforeAll phase, before any test instance is created or @BeforeEach runs — and manage its lifecycle.
@Value binds configuration properties to fields before the bean is used. The values come from application.properties in team-tests, which you'll create in the next step. The :http://127.0.0.1:4723 in ${appium.server.url:http://127.0.0.1:4723} is a default — if appium.server.url isn't set in properties, Appium's standard local port is used automatically. The : suffix on app.package and app.activity sets an empty string default — this prevents Spring from failing on startup when those properties aren't defined. On iOS, the code enters the iOS branch and never reads those fields at all, so the empty string is simply never used.
💡http://127.0.0.1:4723is the default base URL for Appium 3. Appium 1.x usedhttp://127.0.0.1:4723/wd/hub— that trailing/wd/hubpath was dropped in Appium 2 and is no longer needed.
UiAutomator2Options and XCUITestOptions are the modern replacements for the old DesiredCapabilities API. They set platformName and automationName automatically — you only need to specify what's unique to your session.
If you need a refresher on udid, appPackage, appActivity, or any other capability, the Appium Capabilities Explained article covers them in full.
@PostConstruct runs once, after Spring has injected all @Value fields. That's the right moment to start the Appium session — the properties are ready, and the Spring context is fully initialized.
@PreDestroy runs when the Spring context shuts down — the end of your test run. The driver is quit cleanly every time, whether the tests passed or failed.
💡 This is Single Responsibility from the framework blueprint: DriverManager has exactly one reason to change — the way the Appium session is managed. Everything else — locators, interactions, test logic — lives elsewhere and is completely unaware of how the session is created or torn down.⚠️ This article runs tests single-threaded with one shared Appium session. That's the right starting point — parallel execution is covered later in the series, where DriverManager is updated to create an isolated driver per thread.💡 This is Dependency Inversion from the framework blueprint: BasePage and every screen object depend on DriverManager's abstraction, not on a specific driver type. Swapping from a local session to a remote cloud device is a configuration change in DriverManager — nothing in the screen objects changes.
Step 2: Implement BasePage
BasePage already exists — it was created as an empty skeleton in the last article. Now it gets its real implementation: driver injection and PageFactory initialization.
Update core/src/main/java/com/mobileframework/pages/BasePage.java:
package com.mobileframework.pages;

import com.mobileframework.driver.DriverManager;
import io.appium.java_client.AppiumDriver;
import io.appium.java_client.pagefactory.AppiumFieldDecorator;
import org.openqa.selenium.support.PageFactory;

public abstract class BasePage {

    protected final AppiumDriver driver;

    protected BasePage(DriverManager driverManager) {
        this.driver = driverManager.getDriver();
        PageFactory.initElements(new AppiumFieldDecorator(driver), this);
    }

}
AppiumFieldDecorator is the bridge between your annotated locator fields and the Appium driver. When PageFactory.initElements is called, it scans the class for annotated fields and wraps each one in a lazy proxy — the element is only looked up on the device when you first interact with it, not when the screen object is constructed.
protected constructor — BasePage is abstract so Java already prevents new BasePage() from compiling. The protected visibility goes one step further: it makes the intent explicit — this constructor exists only for subclasses to call via super(driverManager), and nothing outside the class hierarchy can invoke it.
💡 This is LSP (Liskov Substitution Principle) from the framework blueprint: every screen object is constructed the same way — it receives a DriverManager, calls super, and comes out fully initialized. No screen object can skip that step.
Step 3: Configure application.properties
The @Value fields in DriverManager need a source. Create team-tests/src/test/resources/application.properties:
# Platform: android or ios
test.platform=android

# Appium server — default is fine for a local Appium installation
appium.server.url=http://127.0.0.1:4723

# Device UDID — run `adb devices` (Android) or `xcrun simctl list` (iOS)
device.udid=emulator-5554

# Full path to your APK (Android) or .app bundle (iOS)
app.path=/Users/you/apps/android.wdio.native.app.v2.0.0.apk

# Android only — package name and launch activity
app.package=com.wdiodemoapp
app.activity=com.wdiodemoapp.MainActivity
Replace /Users/you/apps/android.wdio.native.app.v2.0.0.apk with the actual path to your downloaded APK, and set device.udid to match your emulator or device.
💡 This configuration targets Android. If you're on iOS, settest.platform=ios, updatedevice.udidandapp.pathto point to your simulator UDID and.appbundle, and omitapp.packageandapp.activityentirely — those are Android-only. Full iOS setup, including platform-specific screen objects, is covered in a later article in this series.
💡src/test/resourcesis Maven's test-scoped resource directory — Spring Boot picks upapplication.propertiesfrom here automatically during a test run, but Maven excludes it from the compiled JAR. Device paths, emulator UDIDs, and Appium server URLs belong here: they're runtime configuration that changes per environment and should never ship with the framework code.
⚠️ Don't commit real device paths or environment-specific values to version control. This file is fine for local development. Article 6 (Configuration Management) replaces it with application.yml, Spring profiles, and externalized configuration — device settings and environment URLs come from outside the JAR, with nothing hardcoded in any committed file.Step 4: Build Your First Screen Object
With DriverManager and BasePage in place, you can write your first screen object. Screen objects live in team-tests/src/main/java/com/mobileframework/screens/.
This example models the WDIO Native Demo App's home screen. The most important element on that screen is the home screen container — it's visible immediately after launch and a reliable smoke-test target: if it's present and displayed, the app launched successfully and the framework wired up correctly.
Create team-tests/src/main/java/com/mobileframework/screens/HomeScreen.java:
package com.mobileframework.screens;

import com.mobileframework.driver.DriverManager;
import com.mobileframework.pages.BasePage;
import io.appium.java_client.pagefactory.AndroidFindBy;
import org.openqa.selenium.WebElement;
import org.springframework.stereotype.Component;

@Component
public class HomeScreen extends BasePage {

    @AndroidFindBy(accessibility = "Home-screen")
    private WebElement screenContainer;

    public HomeScreen(DriverManager driverManager) {
        super(driverManager);
    }

    public boolean isLoaded() {
        return screenContainer.isDisplayed();
    }

}
A few things to call out here:
@Component makes HomeScreen a Spring bean. Spring will inject DriverManager into the constructor automatically when it creates the bean. Spring knows to look here because @SpringBootApplication on TestApplication enables component scanning across the com.mobileframework package hierarchy.
@AndroidFindBy is the Appium PageFactory annotation for Android locators. AppiumFieldDecorator picks up these annotations at initialization time and wraps each field in a lazy proxy — the element is only located on the device when you first interact with it, not when the screen object is constructed.
Accessibility ID — when an element has an accessibility label set, it's one of the most reliable locator strategies available. It maps to content-desc on Android and is far more resilient to layout changes than XPath — which breaks whenever the view hierarchy shifts. The locator strategies article covers the full range of options and when to reach for each one.
💡 Verify your locators with Appium Inspector before writing screen objects. Inspect your app, confirm the element's attributes, and use the locator that's stable and unambiguous. The WDIO Native Demo App was built with automation in mind — every key element has an accessibility label set deliberately, so the locators are stable and documented.
💡 This is DRY from the framework blueprint: one screen object per screen, one place to update if the UI changes. Test classes never touch locators or Appium calls directly.
Step 5: Write Your First Test
Create team-tests/src/test/java/com/mobileframework/tests/HomeScreenTest.java:
package com.mobileframework.tests;

import com.mobileframework.TestApplication;
import com.mobileframework.screens.HomeScreen;
import org.junit.jupiter.api.Test;
import org.springframework.beans.factory.annotation.Autowired;
import org.springframework.boot.test.context.SpringBootTest;

import static org.assertj.core.api.Assertions.assertThat;

@SpringBootTest(classes = TestApplication.class)
class HomeScreenTest {

    @Autowired
    private HomeScreen homeScreen;

    @Test
    void homeScreenShouldLoad() {
        assertThat(homeScreen.isLoaded())
                .as("Home screen should be visible after app launch")
                .isTrue();
    }

}💡assertThatcomes from AssertJ, which is already on your classpath —spring-boot-starter-test(added toteam-testsin Article 2) includes it automatically. No extra dependency needed.
@SpringBootTest(classes = TestApplication.class) boots the full Spring context — DriverManager, HomeScreen, and all Spring-managed beans. The Appium session starts via @PostConstruct before the first test runs. Spring injects HomeScreen directly into the test via @Autowired.
Spring Boot Test creates the application context once and reuses it across every test class that shares the same @SpringBootTest(classes = TestApplication.class) configuration. In practice, that means one DriverManager and one Appium session for the entire mvn test run — not one per test class. @PreDestroy fires once, when the JVM shuts down at the very end.
The test itself is straightforward: verify the app launched and the home screen is in the expected state. That single assertion is more valuable than it looks — it proves the driver started, the app installed and launched, and the first screen rendered correctly. If it passes, every layer of the framework is doing its job — the session opened, the app launched, and the locator resolved against a live element on the device.
✅ Keep test methods focused on one scenario. A test named homeScreenShouldLoad has one job: verify the home screen loaded. A test named shouldNavigateToLogin has one job: verify that navigation lands on the login screen. When a test fails, the name alone should tell you exactly what broke.
Step 6: Run the Tests
Before running, make sure:
- Appium is running — open a terminal and type
appium - Your device is ready — Android emulator running, or iOS simulator launched, or a physical device connected
app.pathis correct — the path inapplication.propertiespoints to the downloaded APK or.appbundle
Then run the tests from the project root:
mvn clean testIf everything is set up correctly, Maven will build both modules, start the Spring context, open an Appium session, launch the app, run the test, and quit the driver at the end. You'll see output like this:
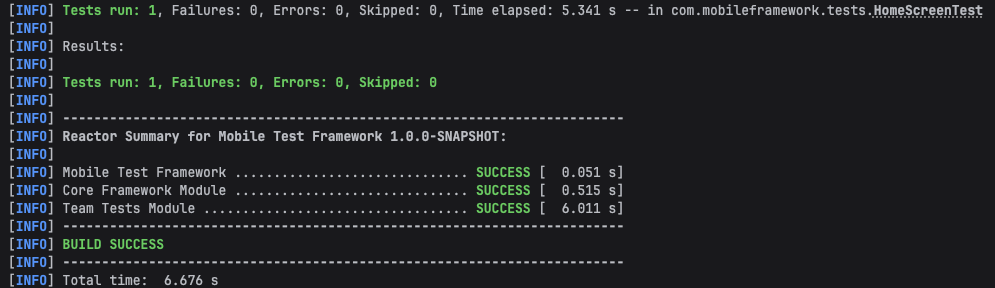
🚨 Common failure points at this step:
Connection refusedon Appium server URL — Appium isn't running. Start it withappiumin a separate terminal.-
Could not find app— the path inapp.pathis wrong, or the file doesn't exist at that path. Check the full path, including the filename. No such element— the app launched but the locator didn't match. Open Appium Inspector, inspect the home screen container, and confirm the accessibility label isHome-screen. If you're using a different app, use Inspector to find the correct accessibility ID for your target element.An unknown server-side error occurred— the device name or platform version isn't matching an available emulator or simulator. Check that your emulator is running and useadb devices(Android) orxcrun simctl list devices(iOS) to verify it's visible.
💡 Prefer the finished workspace over building it file by file? The complete, runnable code for this article is available to download at the end — subscribe free to grab it.
Understanding What You've Built
Here's how the pieces fit together at runtime:
mvn clean teststarts the build- Maven builds
corefirst (it has no test sources), then compilesteam-tests - JUnit's test runner finds
HomeScreenTestand asks Spring to start the application context - Spring creates a
DriverManagerbean and injects@Valueproperties fromapplication.properties @PostConstructfires — Appium session opens, app launches on device- Spring creates a
HomeScreenbean, injectsDriverManager,BasePageconstructor runs,PageFactoryinitializes locators - Spring injects
HomeScreenintoHomeScreenTest homeScreenShouldLoadruns —screenContainer.isDisplayed()triggers a live Appium call to the device- Test passes
- Spring context shuts down,
@PreDestroyfires, driver quits cleanly
| Component | Location | Responsibility |
|---|---|---|
DriverManager |
core/.../driver/ |
Opens and closes the Appium session; provides the driver to the rest of the framework |
BasePage |
core/.../pages/ |
Injects the driver and initializes PageFactory for every screen object that extends it |
HomeScreen |
team-tests/.../screens/ |
Describes the home screen: locators and interaction methods for that screen only |
HomeScreenTest |
team-tests/.../tests/ |
Verifies expected behavior — calls screen objects, never Appium directly |
application.properties |
team-tests/src/test/resources/ |
Runtime configuration — platform, Appium server URL, app path |
What's Next?
The next article — BDD and Cucumber with Appium: A Practical Integration Guide — wires Cucumber into the framework you've just built. Step definitions become Spring beans, feature files describe your tests in plain English, and cucumber-spring connects the whole thing to TestApplication with a single annotation. The DriverManager and BasePage you built here don't change — Cucumber plugs into the existing structure.
From there, the series continues building on what you have:
- Cross-platform testing — running the same tests on Android and iOS with platform-specific screen object implementations
- Configuration management — Spring profiles, device profiles, and externalized config to replace the hardcoded
application.properties - Parallel execution — thread-safe driver isolation across multiple devices simultaneously
- Device farm integration — running your tests on cloud device farms without changing your framework code
- Visual testing and accessibility — visual regression checks and accessibility validation in your test suite
- AI-powered testing — self-healing selectors, AI-generated scenarios, and intelligent tooling
Each article picks up exactly where the last one left off. If you ran your first test in this article and saw BUILD SUCCESS, you're building something real.
Download the code
You don't have to copy each file by hand. The complete, runnable workspace for this article is available as a free download — everything built across Articles 2 and 3, wired together and ready to open in your IDE.
What's inside:
- The full Maven multi-module project — root POM, the
coremodule, and theteam-testsmodule DriverManager, the fully implementedBasePage, your firstHomeScreenscreen object, andHomeScreenTest- A ready-to-edit
application.propertiestemplate with every key documented
💡 Before running, open application.properties and update app.path and device.udid to match your machine (and set test.platform=ios if you're on iOS). Then run mvn clean test from the project root — Step 6 above covers the full prerequisite checklist.
✅ Subscribe below to download the workspace .zip — free, just your email, and you'll get every new Framework Series article as it's published.


