
In the previous guide, we covered how to choose the right locator strategy for Android and iOS. Before we start writing actual test scripts, there are still two concepts worth understanding well — and this is the first: Appium capabilities.
You've already seen them in action. When we set up our first session in How to Use Appium Inspector for Android and iOS: Beginner Guide, we filled in a few fields before hitting Start Session — those fields were capabilities. We didn't go deep on them at the time, and that was intentional. But now that you understand locator strategies and how Appium Inspector works, it's the right moment to properly unpack what's going on there.
Capabilities are how you tell Appium what it's working with: which device, which app, which driver, and how the session should behave. Get them wrong, and your session won't even start. Get them right, and you have a solid foundation for everything that comes next.
In this guide, we'll focus on the most important capabilities for the UiAutomator2 driver (Android) and the XCUITest driver (iOS). We won't go through every single one — there are dozens, and most of them you'll rarely touch. Instead, you'll come away knowing which capabilities you actually need, which ones have the biggest impact on your sessions, and when to use each one.
What Are Capabilities?
Capabilities are a set of key-value pairs that you pass to the Appium server when starting a new test session.
Think of them as the configuration settings that tell Appium everything it needs to know before it can do anything:
- Which platform are you testing on? (Android or iOS)
- Which device should it use?
- Which app should it launch?
- Which driver should handle the automation?
- How should the session behave?
Without capabilities, Appium has no idea what to do. A missing or misconfigured capability can cause your session to fail before a single test even runs.
💡 Note: UiAutomator2Options and XCUITestOptions are part of the official Appium Java client. They provide strongly-typed methods for setting capabilities, which helps you avoid typos and makes your code easier to read and maintain. We'll use them when we write our first test.
Capabilities Common to Both UiAutomator2 and XCUITest
These capabilities work the same way regardless of whether you're testing on Android or iOS. They form the foundation of almost every Appium session.
1. platformName
This tells Appium which mobile platform you're targeting: Android or iOS.
✅ Why it matters: platformName is one of the first things Appium reads when a session request arrives. It uses this value to determine which driver to load and how to route the session. Without it, Appium doesn't know whether it's dealing with an Android or iOS device — and the session will fail immediately.
💡 Note: When usingUiAutomator2OptionsorXCUITestOptions, platformName is set automatically under the hood. You don't need to set it manually — but you'll encounter it constantly in documentation, Appium Inspector, and other people's code, so it's worth knowing what it does.
2. automationName
This tells Appium which driver to use to control the device.
✅ Why it matters: Appium supports multiple drivers per platform. automationName is how Appium knows which one to load. Without it, Appium can't make that decision for you and the session will fail.
On Android, the standard choice for most teams is UiAutomator2 — a black-box driver that can automate your app without access to its source code and can interact with system dialogs and other apps on the device. Appium also supports an Espresso driver for Android, which offers built-in UI synchronization and grey-box access to app internals, but it requires access to the app's source code and is less commonly used. For everything covered in this series, UiAutomator2 is the driver we'll be using — but Espresso is worth knowing about. In a future article, we'll explore how it compares to UiAutomator2 in practice and when it might be the better choice for your specific use case.
On iOS, it's always XCUITest — it's the only iOS driver Appium supports.
💡 Note: When usingUiAutomator2OptionsorXCUITestOptions, automationName is set automatically under the hood — so you don't need to set it manually. But you'll encounter it constantly in documentation, Appium Inspector, and raw capability examples, so it's worth knowing what it does.
3. deviceName, udid and platformVersion
These capabilities are closely related and often misunderstood together, so it's worth explaining them side by side.
deviceName is the name of the device you want Appium to connect to — for example "emulator-5554" on Android or "iPhone 15" on iOS.
udid is the unique identifier of the device — the serial number on Android, or the UDID on iOS.
When you only have one device connected, deviceName works fine. Appium simply connects to whatever is available, so it appears to do the job. This is probably how most people start out — and it works without any issues.
The difference becomes important when you have multiple devices connected at the same time.
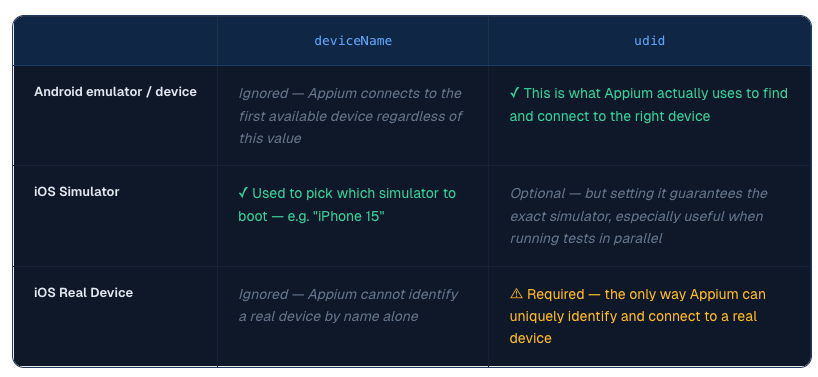
💡 Tip: If you're just getting started with a single emulator or simulator,deviceNameis fine for now. But as soon as you move to real devices, CI environments, or parallel testing, always setudidto guarantee Appium connects to the right device.
How to find the right value for each:
- Android emulator: Run
adb devicesin Terminal — the emulator appears as emulator-5554 (or similar). Use this value as yourudid - Android real device: Run
adb devices— the serial number is listed there. Use it as yourudid - iOS simulator: Run
xcrun simctl list devicesin Terminal to see available simulators and their UDIDs - iOS real device: Find the UDID in Xcode under Window → Devices and Simulators, or run
idevice_id -lin Terminal if you havelibimobiledeviceinstalled
💡 Note: Both drivers also support aplatformVersioncapability — for example "15.0" for iOS or "14" for Android. It's used for device autodetection whenudidis not set. If you've already setudid, it's optional — but including it makes your configuration more explicit and easier to read for anyone maintaining the tests later.
4. app
This tells Appium where to find the app file it should install and launch on the device. You provide an absolute path to the file — an .apk for Android, a .app bundle for iOS simulators, or an .ipa for iOS real devices.
✅ Why it matters: Without this, Appium doesn't know what to launch.
⚠️ Important: Every time a session starts with app set, Appium will reinstall the app from scratch. This ensures a clean install, but it adds time to every session — especially on real devices. If your app is already installed and you don't need a fresh install every run, skip app and use appPackage + appActivity on Android, or bundleId on iOS instead.
5. noReset and fullReset
These two capabilities control how Appium handles the app's state before starting a new session. They work on a spectrum — from keeping everything as-is, to wiping the app completely.
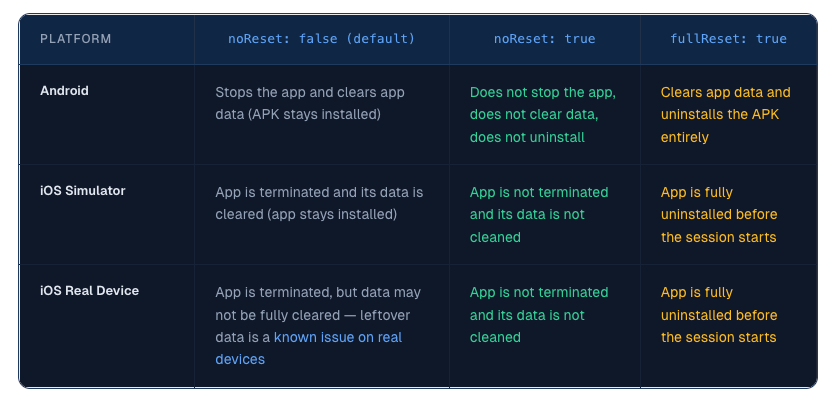
✅ When to use noReset: false (default): When you need a clean slate for every test. On Android, the app stays installed but its data is cleared. On iOS simulators, the app is terminated and its data is cleared. On iOS real devices, the app is terminated but data may not always be fully cleared — this is a known limitation acknowledged in the official XCUITest driver documentation. If clean state is critical on real devices, consider using fullReset: true instead.
✅ When to use noReset: true: When you need the app in a specific pre-configured state (e.g. already logged in), or when you want faster session startup by skipping the reset. The app stays installed and its data is preserved exactly as you left it.
✅ When to use fullReset: true: Only when you need to guarantee a completely clean state — including removing the app itself entirely before the session starts. This is especially useful on real devices where noReset: false may leave leftover data.
6. newCommandTimeout
This sets how long Appium will wait (in seconds) before automatically closing a session that stops receiving commands. The default value is 60 seconds.
✅ Why it matters: If your test crashes, hangs, or you forget to quit the driver, Appium will keep the session open — holding resources on your machine or device farm. newCommandTimeout acts as a safety net: if no new command arrives within the timeout window, Appium assumes the client has stopped and closes the session automatically.
⚠️ Important: Setting it to 0 disables the timeout entirely, meaning the session will stay open indefinitely until you explicitly close it. Avoid this in most setups — it's a resource leak waiting to happen.
💡 Tip: A value between 60 and 120 seconds works well for most test suites. Avoid setting it too low — if your test has a legitimate pause (like waiting for a slow network response or a loading screen), you don't want Appium closing the session prematurely.
7. printPageSourceOnFindFailure
When set to true, Appium automatically dumps the full XML page source to the logs whenever an element lookup fails.
✅ Why it matters: When a findElement() call fails, the error message alone often isn't enough to understand why. With this capability enabled, you get the full UI hierarchy printed directly in the logs — so you can see exactly what elements were on screen at the moment of failure, without needing to manually add debugging steps to your tests.
💡 Tip: This is especially useful when you're getting started and still building out your locators. Once your test suite is stable and reliable, consider turning it off — dumping the full page source on every failure adds noise to your logs and a small overhead to each failed lookup.
Capabilities Unique to UiAutomator2 (Android)
These capabilities are Android-specific and won't work with the XCUITest driver.
1. appPackage and appActivity
These two capabilities tell Appium which app to launch and where to start inside it — they always go together.
- appPackage — the unique identifier of the Android app.
- appActivity — the specific screen that Appium should open first — typically the main entry point of the app
✅ Why they matter: When you provide the app capability, Appium tries to detect these values automatically from the APK. This works most of the time — but not always. If your app has a complex launch flow, auto-detection can pick the wrong activity and your session will start on the wrong screen.
More importantly, when your app is already installed on the device, you typically skip the app capability to avoid reinstalling it every run. But without an APK file to inspect, Appium has no way to figure out which app to launch or which screen to start on. That's when appPackage and appActivity become required — they're the only way to tell Appium what to open.
For both reasons, it's good practice to always set them explicitly rather than relying on auto-detection.
💡 Note: WithnoReset: true, if the app is already running on the device when the session starts, Appium will connect to it on whatever screen it was on — it won't restart it. This is intentional — the app state is fully preserved. If you need the app to restart from scratch while still keeping its data, you can combinenoReset: truewithforceAppLaunch: true.
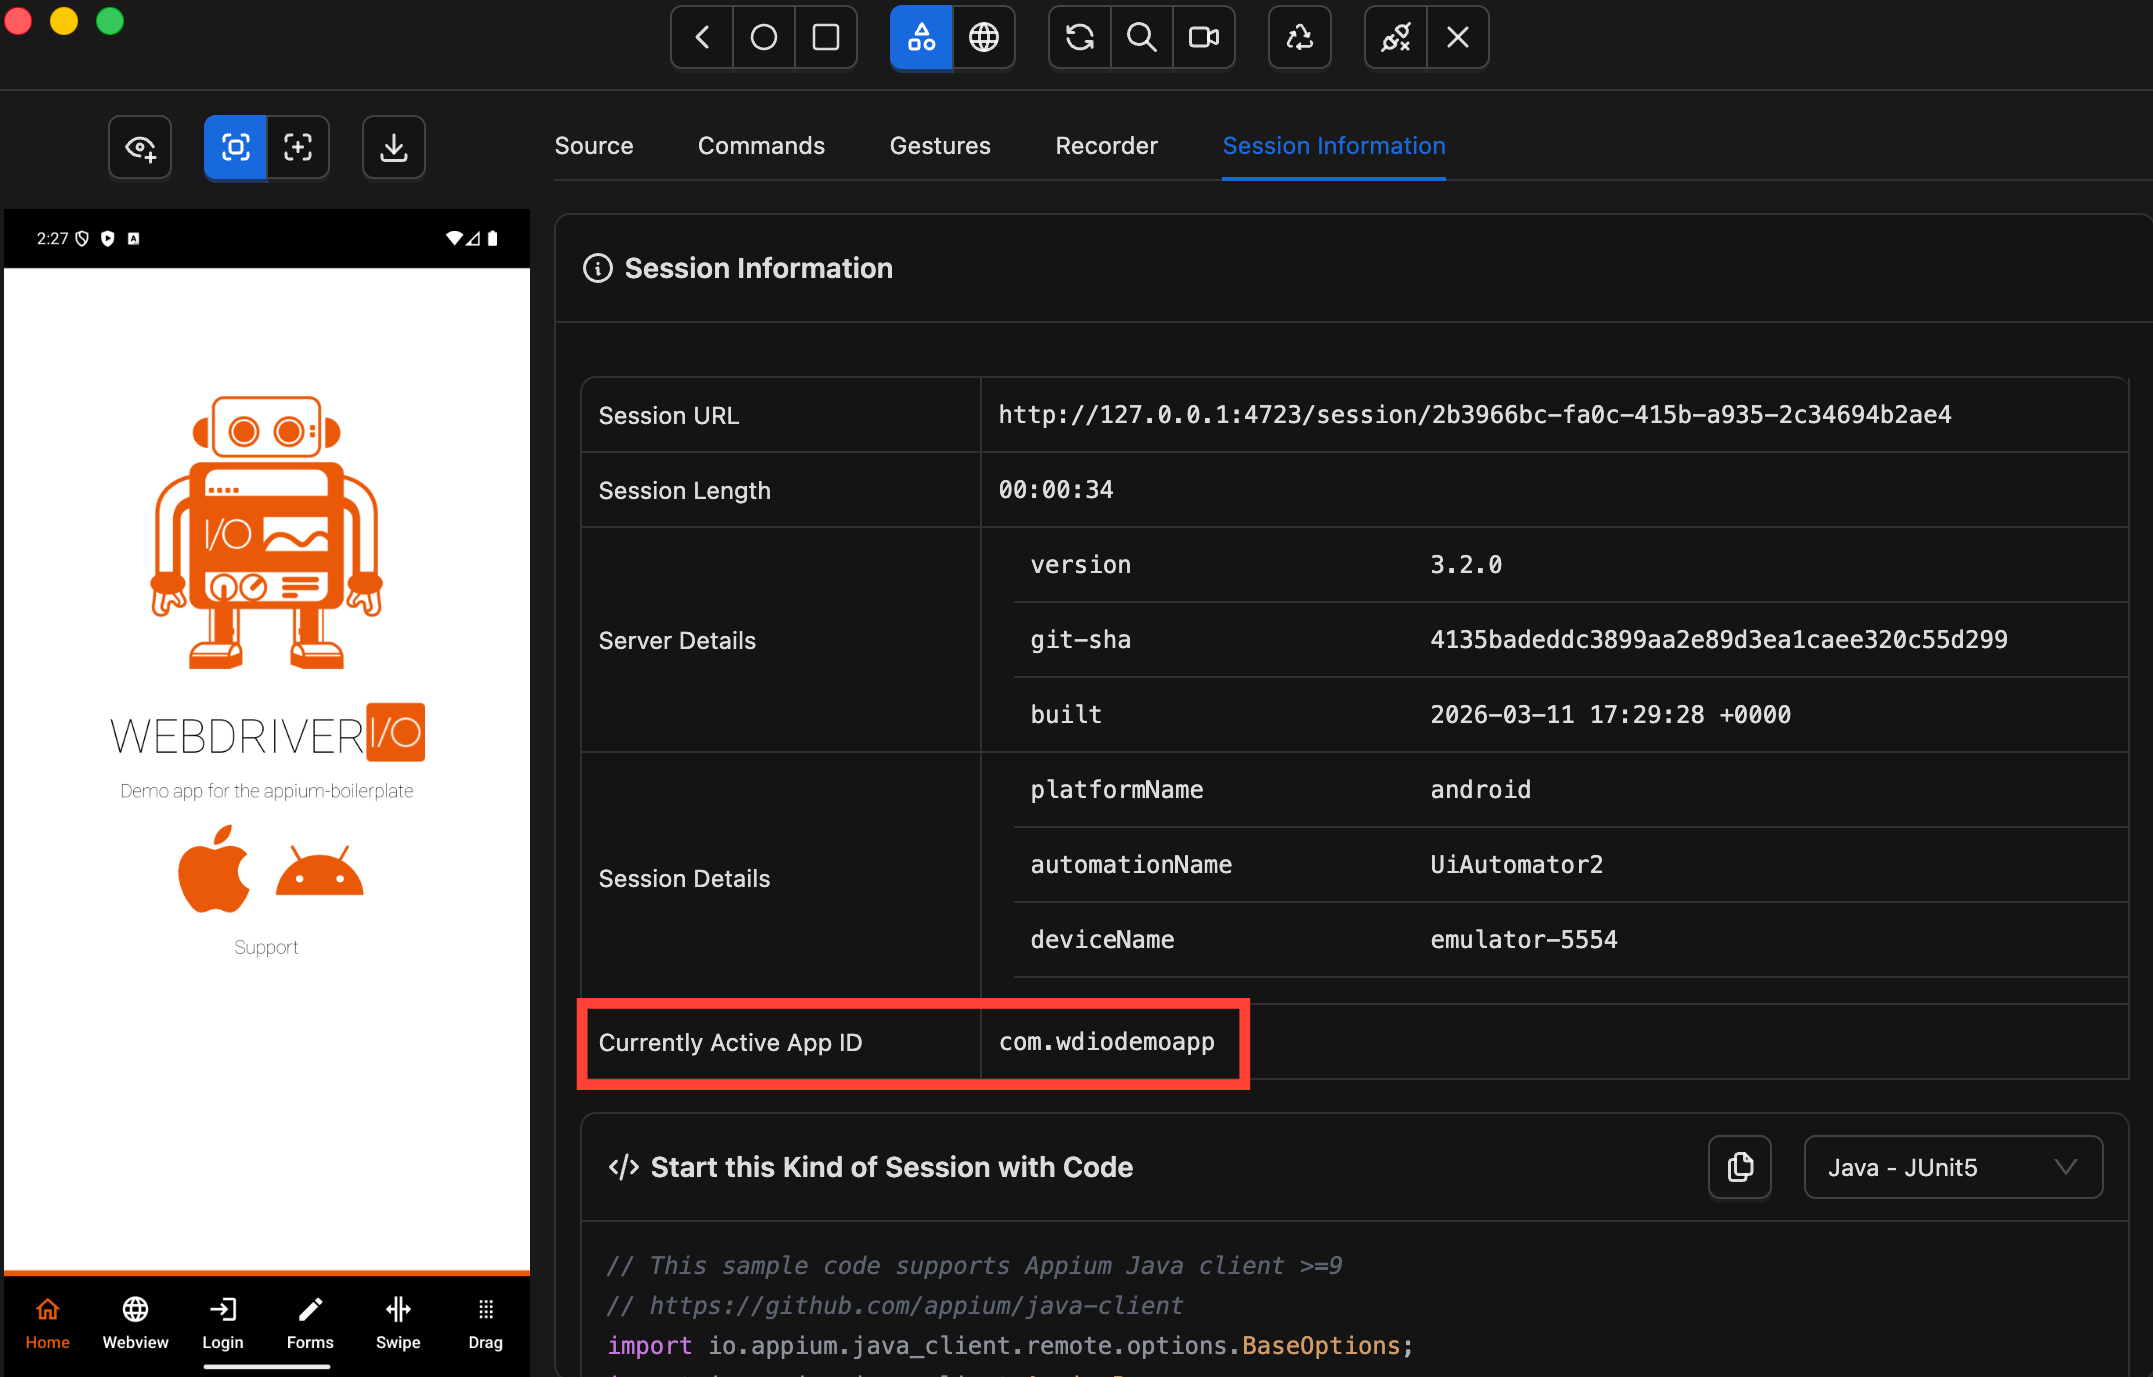
💡 How to find them?
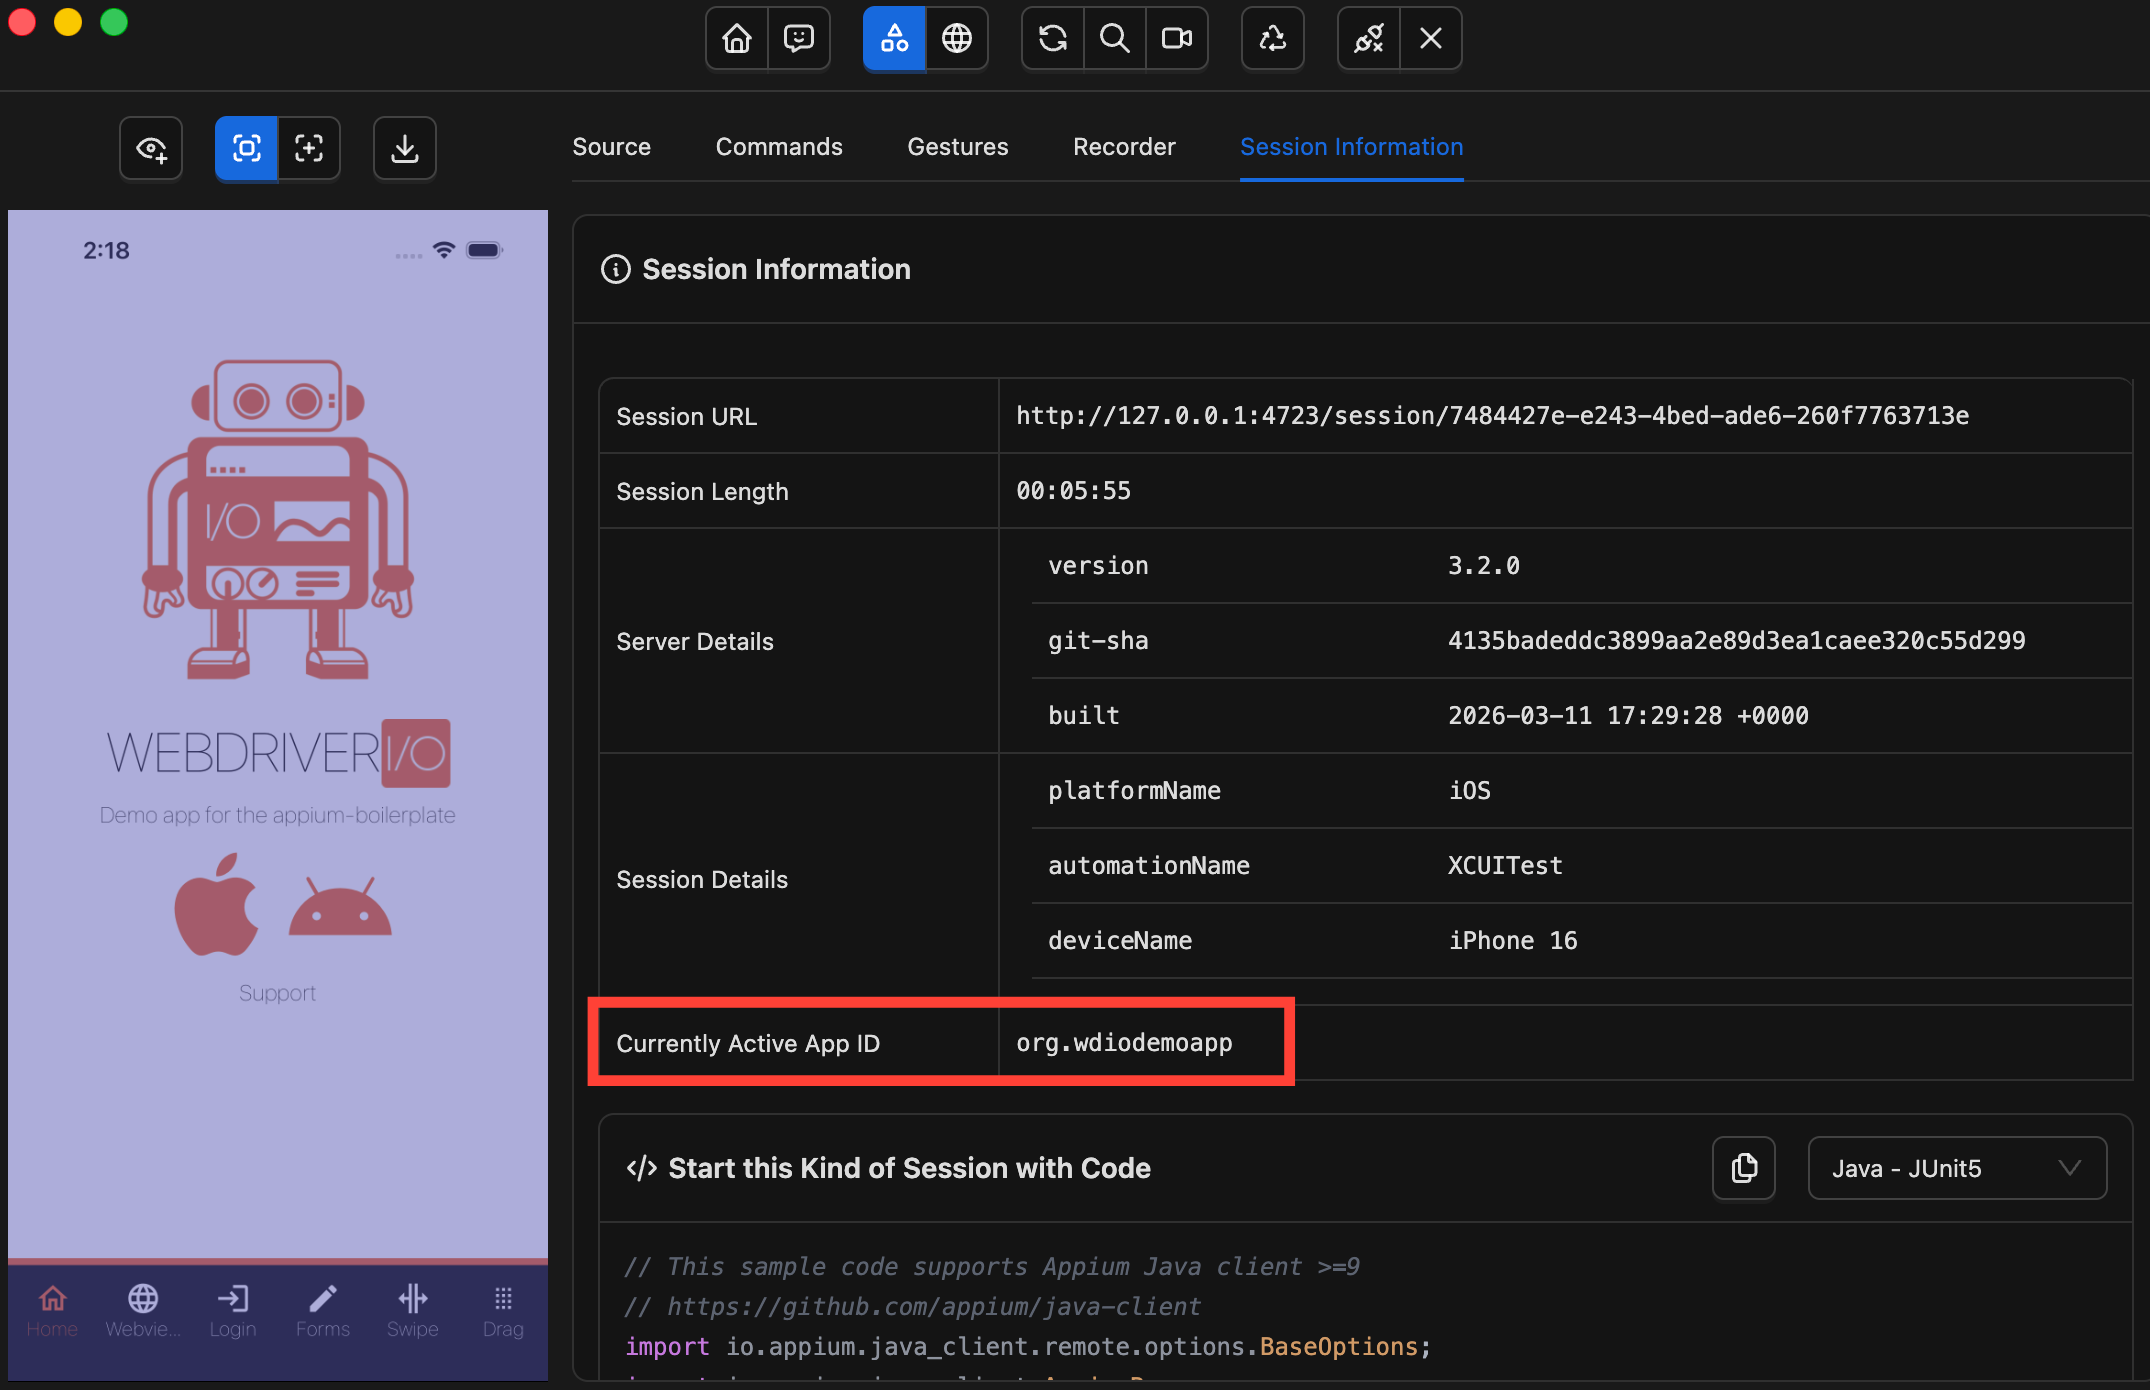
For appPackage, the easiest way is Appium Inspector — once a session is running, look at the Session Information panel where you'll see it listed as "Currently Active App ID" (com.wdiodemoapp for the demo app).
For appActivity, run this command in Terminal while the app is open on your device or emulator:
adb shell dumpsys window | grep mCurrentFocus
You'll see something like:

Everything before the / is your appPackage — everything after is your appActivity. Alternatively, ask your Android developer — they'll know both values directly.
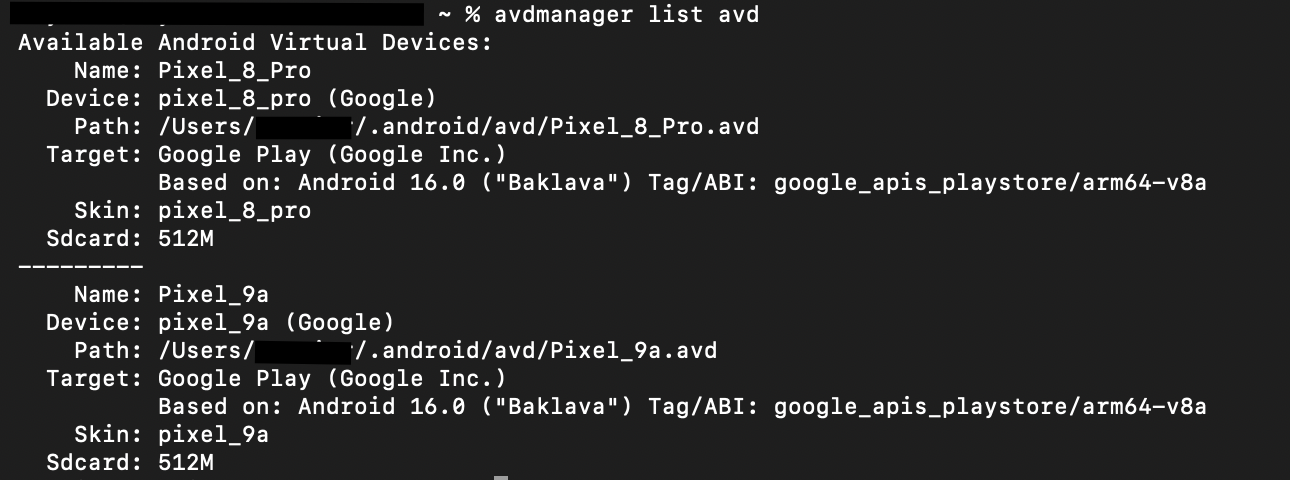
2. avd
This tells Appium the name of an Android emulator to use. If the emulator isn't already running, Appium will launch it automatically at session startup.
✅ Why it matters: Unlike udid or deviceName, avd is the only capability that can actually start an emulator for you. If you want Appium to boot the emulator as part of your session setup rather than having to launch it manually first, this is the capability to use.
💡 How to find your AVD name: Run avdmanager list avd in Terminal. This lists all the emulators you have already set up on your machine — the name shown there is exactly what you pass to this capability. If the emulator you want isn't listed, you'll need to create it first through Android Studio's AVD Manager.⚠️ Note:avdis for emulators only and has no effect on real devices. For real Android devices, simply connect your device via USB with USB debugging enabled — then useudidto target it precisely.
3. autoGrantPermissions
When set to true, Appium automatically grants all permissions the app requests at install time — without any permission dialogs appearing during the test. It is false by default.
✅ Why it matters: Android apps often request permissions on first launch — camera, location, notifications, and so on. If these dialogs appear during a test, they can block interactions and cause tests to fail. Setting autoGrantPermissions: true eliminates this problem entirely by granting all permissions upfront before the app even starts.
⚠️ When to be careful: If part of what you're testing is the permission request flow itself — for example, verifying that a permission dialog appears and behaves correctly — don't use this capability for those specific tests. It will bypass the dialogs you're trying to test.
💡 Tip: For most test suites, setting autoGrantPermissions: true is a safe default. It removes a common source of test flakiness, especially on first installs and in CI environments where the device state is always fresh.
Capabilities Unique to XCUITest (iOS)
These capabilities are iOS-specific and won't work with the UiAutomator2 driver.
1. bundleId
This is the unique identifier of the iOS app you want to launch.
✅ Why it matters: Think of bundleId as the iOS equivalent of appPackage on Android — it's the unique identifier Appium uses to know which app to launch.
How you use it depends on your situation:
- If you're providing
app— you don't need to setbundleIdmanually. Appium installs the app from the file path you provided, launches it, and automatically reads thebundleIdfrom the app bundle. - If your app is already installed — skip
appto avoid reinstalling on every run, and providebundleIdinstead. Since there's no app file to install or read,bundleIdis the only way Appium knows which app to launch.
💡 How to find it: The easiest way is Appium Inspector. Start a session with theappcapability pointing to your app file, then once the session is running look at the Session Information panel on the right side — you'll see it listed as "Currently Active App ID". For the demo app we've been using throughout this series, that value isorg.wdiodemoapp. For your own app, you can also ask your iOS developer — it's defined in the app'sInfo.plistunderCFBundleIdentifierand visible in Xcode under the app target's General settings.
2. xcodeOrgId and xcodeSigningId
These two capabilities are required when running tests on a real iOS device. To understand why, it helps to know that Apple requires every app installed on a physical device to be digitally signed with a valid developer certificate — this is Apple's security model, and there are no exceptions. This applies to Appium too: before it can control your device, it needs to install WebDriverAgent, and that installation requires a valid code signature. xcodeOrgId and xcodeSigningId are how you tell Appium which developer account and certificate to use for that.
xcodeOrgId— your Apple developer team ID, for exampleJWL241K123xcodeSigningId— the signing certificate to use, typically"Apple Development"or"iPhone Developer"
They must always be set together — one without the other has no effect.
💡 How to find your team ID: Open Xcode, go to Settings → Accounts, select your Apple ID, and click on your team name — the team ID is displayed there. You can also find it on the Apple Developer portal under Membership Details.
⚠️ Note: These capabilities are only needed for real devices. On a simulator, Apple does not require code signing — Appium handles everything automatically and these can be omitted.
3. wdaLaunchTimeout
This sets how long (in milliseconds) Appium will wait for WebDriverAgent to start up and become reachable before giving up and failing the session. The default is 60000 ms (60 seconds).
✅ Why it matters: Building and launching WebDriverAgent isn't always instant — on a real device it can take longer than expected, especially on the first run or after an Xcode update that forces a full rebuild. When the 60 second default expires before WebDriverAgent is ready, Appium treats it as a failure and throws an error — even when everything is configured correctly and the process just needed a bit more time.
💡 Tip: If you're seeing session startup failures on real devices with errors mentioning WebDriverAgent not being reachable, try increasing this value gradually — start with90000ms (90 seconds), and go up to120000ms (2 minutes) if failures persist. If it's still failing beyond that, the issue is likely something else worth investigating — a misconfigured signing certificate or a WebDriverAgent build error.
Quick Reference
Common to Both Platforms
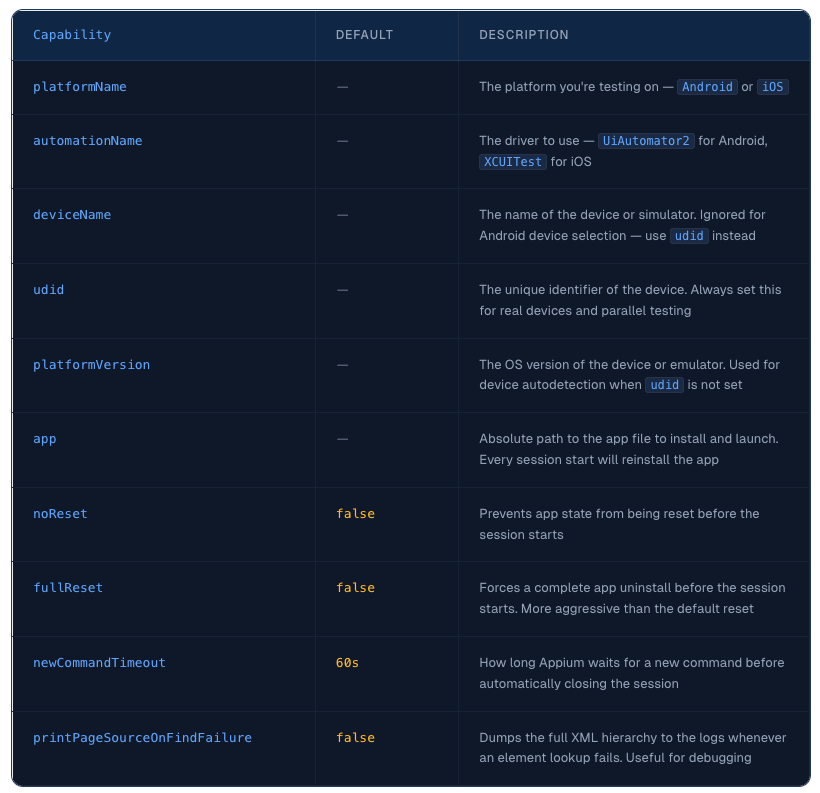
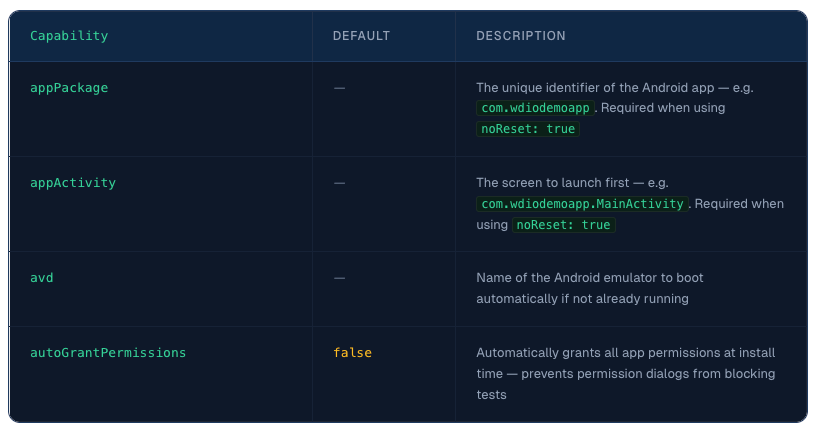
Android Only (UiAutomator2)
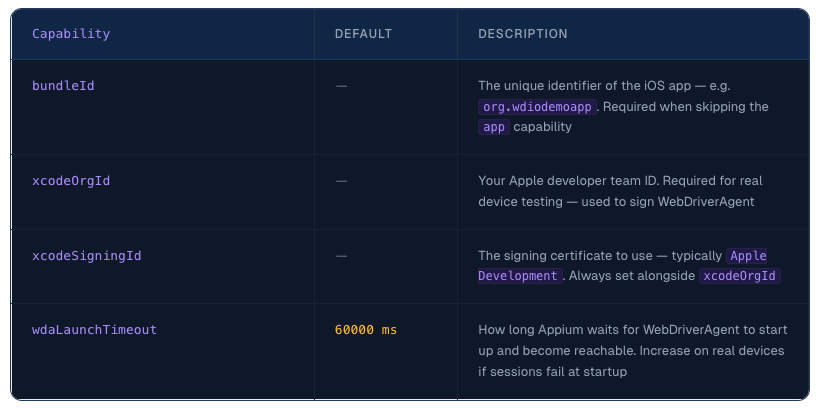
iOS Only (XCUITest)
Putting It All Together
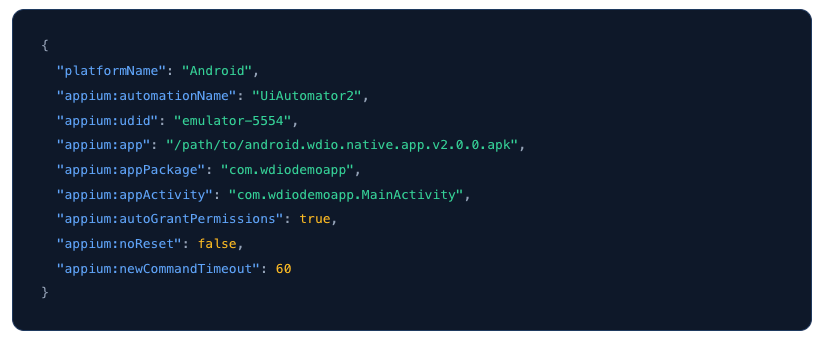
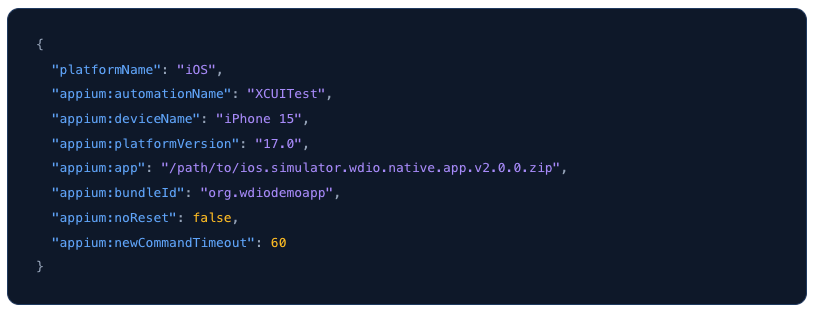
Now that we've covered each capability individually, here's what a complete session configuration looks like for the demo app we've been using throughout this series.
These are the same JSON capability sets you would enter in Appium Inspector to start a session — exactly as we did in the How to Use Appium Inspector for Android and iOS: Beginner Guide.
Android – emulator
iOS — simulator
What's Next
You now have a solid understanding of Appium capabilities — what they do, when to use them, and how to put them together into a working session configuration for both Android and iOS.
But configuring a session is only part of the picture. Before we write our first real test, there's one more area worth covering: Appium Execute Methods.
Execute Methods are a powerful set of mobile-specific commands that go beyond what standard WebDriver offers — things like scrolling to elements, controlling device location, managing the clipboard, and interacting directly with the device at a deeper level. Some of these methods will be essential building blocks in the tests we write later in the series.
In the next guide, we'll cover the most important ones for both UiAutomator2 and XCUITest, with practical examples of when and why to use each one.


Discussion