
Most mobile test automation frameworks start the same way: a single project, a handful of screen objects, tests in one place. And for a long time, that works.
The question isn't whether to start there — it's knowing when that structure has run its course, and what to do about it. For some teams, the answer is better package organization. For others, it means rethinking the project structure entirely.
This article helps you figure out which applies to you — then walks through a concrete implementation using Maven multi-module and Spring Boot for teams that need it.
💡 This is the first hands-on article in the series. If you haven't read Why Most Mobile Test Automation Frameworks Fail — And How to Build One That Doesn't, start there — it explains the architectural principles behind every decision you'll make here.
Single Module or Multi-Module?
Before anything else, it's worth being honest about when multi-module is the right choice — and when it isn't.
A single module with good package structure is often enough. If you're one team testing one app, a well-organized single Maven project with clear packages (driver/, screens/, utils/, tests/) is simpler to build, easier to onboard, and just as maintainable as a multi-module setup. Most mobile automation frameworks at small-to-medium scale are built this way, and they work well.
Multi-module earns its complexity when:
- A shared framework core is consumed by multiple teams or multiple apps — so changes need to be versioned and released independently
- Different teams need to upgrade the framework on their own schedule, without a single change forcing everyone to update at once
- The project is large enough that module isolation prevents one team's change from silently breaking another's build
Here's one from experience. I used to work on a large ecommerce platform where more than 20 agile teams were all building and testing different parts of the same product. Every team had their own test project, but they all pulled in the same shared framework core as a dependency — just like any other library. A dedicated framework team looked after it, shipped improvements regularly, and each product team upgraded when they were ready. Nobody was waiting on anyone else's schedule, and a change to the core never blindsided a team that wasn't expecting it. That independence is what made it work at that scale.
The core also drew a clear line between what was standardized and what was each team's call. Driver setup, configuration management, reporting, base classes — consistent everywhere. Below that line, teams were free to organise their screens, structure their test logic, and adapt their process however suited their product area. A shared framework doesn't have to mean a rigid one; that's exactly what the module boundary prevents.
If you're building a framework for one team and one app, start with a single module. A clean package structure gives you most of the same separation of concerns without the added build complexity. If the project grows to a point where the multi-module benefits genuinely apply — multiple apps, a shared framework team, independent versioning — the migration path is straightforward.
💡 This article assumes the multi-module case, a shared core that multiple teams or apps will build on. If that matches your situation, read on. If not, the structural and architectural principles still apply; you just won't need the Maven module boundaries to enforce them.
What Is a Maven Multi-Module Project?
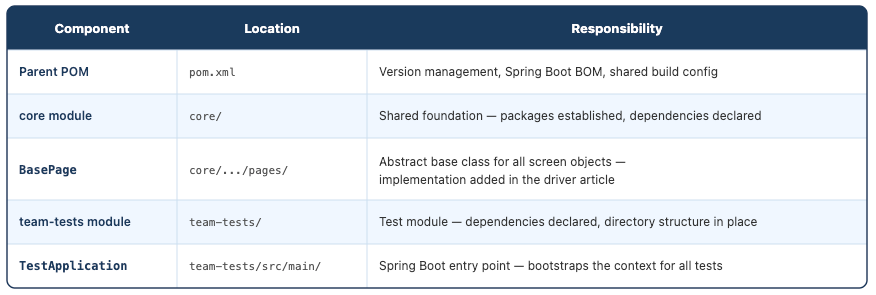
A Maven multi-module project is a single project composed of multiple sub-modules, each with its own pom.xml and responsibilities. A parent POM sits at the top and defines shared configuration — dependency versions, plugins, and build settings — that every module inherits.
Think of it like a building. The parent POM is the building's infrastructure: shared plumbing, shared wiring, shared foundation. Each module is a floor — independently built and maintained, but drawing on the same infrastructure below.
The key difference from a standard Maven project is that modules can depend on each other. Your test module can declare a dependency on your core module, and Maven resolves it automatically — no manual classpath management required.
Why Spring Boot?
Spring Boot and Maven multi-module are independent decisions — you can use either without the other. Spring Boot is chosen for what it brings to the test framework itself, not because of the project structure.
Every test framework eventually runs into two problems: configuration management and dependency injection.
Configuration is the first one that bites. Without a standard approach, teams reach for the same homegrown solution: a ConfigManager class that reads from .properties files, a system property to pick the environment, and a block of if statements that loads the right file at startup. It works — until someone runs a full test suite against production because the environment variable wasn't set, or a new team member spends an hour tracing through three utility classes trying to figure out which base URL is actually active.
Dependency injection surfaces as the framework grows. Screen objects and utilities need a shared driver instance. Without a DI container, that typically means a static singleton — which works for single-threaded execution and breaks the moment you run tests in parallel.
Spring Boot solves both:
application.ymlwith Spring profiles — instead of separate.propertiesfiles andifstatements switching between them, oneapplication.ymlholds every environment as a named profile block. Switching at runtime is a single flag:-Dspring.profiles.active=staging. No code changes, no risk of loading the wrong file.@ConfigurationProperties— you define a Java class whose fields match your YAML keys, and Spring populates it automatically at startup. Instead ofSystem.getProperty("baseUrl")calls scattered across the codebase, you inject one config object wherever it's needed. If a key is missing or the wrong type, Spring fails immediately with a clear error — not aNullPointerExceptionmid-test. Covered in detail in the configuration management article.cucumber-spring— connects Cucumber to the Spring context with one annotation (@CucumberContextConfiguration). Step definitions become Spring beans, so the driver and screen objects can be injected with@Autowiredrather than passed around manually. No custom wiring, no threading issues when running in parallel.
It's not the only option. Appium with JUnit 5 and no DI framework works fine at smaller scales — custom property loading and constructor injection are manageable for a single team. Spring Boot earns its place when configuration complexity grows (multiple environments, device profiles, locale switching) and when Cucumber BDD is on the roadmap.
⚠️ Decide now, not later. Adding Spring Boot to a framework that wasn't built with it in mind means going back through every module to change how configuration is read and how dependencies are wired together — it touches far more of the codebase than you'd expect. The further you build before making this call, the more existing code has to change.
The Architecture We're Building
The framework is built in two stages. This article covers Stage 1. Once the framework stabilises, Stage 2 moves it into its own repository and publishes it as a versioned dependency — test projects then consume it like any other library, with no framework source code in sight.
Stage 1 — Development (what this article builds)
core and team-tests live together in a single repository. core holds the shared foundation — driver management, Spring configuration, and base classes. team-tests depends on it directly as a local Maven module, with no publishing or external repository required. Maven resolves the dependency within the build. The module boundary is real — core has no knowledge of team-tests and never will — but the feedback loop is immediate: change the framework, run the tests, see the result.

Stage 2 — Shared framework (where this is heading)
mobile-framework-core holds two modules — core and cloud. core is the always-on foundation. cloud handles device farm integration and is optional. The repository as a whole stays completely app-agnostic: no screens, no test logic, no knowledge of any product.
That covers the framework. The second piece — mobile-common — exists because at larger scale the same infrastructure code starts appearing in every team's project. Every test needs to start a driver and tear it down. Every app hits the same OS-level screens: permission dialogs, biometric prompts, system notifications. Left to each team, everyone writes their own version. It drifts — a bug gets fixed in one project and missed in three others.
A separate mobile-common repository solves this: a BaseTest class with driver setup and teardown, and screen objects for the OS interactions any app can encounter — written once, shared across every team.
The key distinction: core is pure framework — it has no knowledge of any app, test, or product. mobile-common knows about test lifecycle and OS screens, which makes it a product-level concern. It lives in its own repository, owned and versioned independently of the framework.

Each test project declares only what it needs:
<!-- Always included — the shared foundation -->
<dependency>
    <groupId>com.mobileframework</groupId>
    <artifactId>core</artifactId>
    <version>1.0.0</version>
</dependency>

<!-- Optional — shared BaseTest and common screens, published from mobile-common -->
<dependency>
    <groupId>com.mobileframework</groupId>
    <artifactId>mobile-common</artifactId>
    <version>1.0.0</version>
</dependency>

<!-- Optional — only needed for device farm execution -->
<dependency>
    <groupId>com.mobileframework</groupId>
    <artifactId>cloud</artifactId>
    <version>1.0.0</version>
</dependency>💡coreandcloudare separate published artifacts — declaring one does not pull in the other, even though they share a repository. Importing the parent POM as a BOM manages versions only; nothing lands on your classpath until you declare it explicitly in<dependencies>. That is what keepscloudtruly optional.
💡 The module boundary you establish in Stage 1 becomes the project boundary in Stage 2. core is already isolated — extracting it into its own repository later is a structural move, not a rewrite.Why this module split?
core is the framework itself — no tests, no app-specific knowledge, no dependency on any test module. Every team builds on it.
cloud is kept separate from core so that adding or swapping a cloud provider never touches the framework itself. Teams running locally or on their own device lab don't declare it at all.
team-tests knows nothing about how the driver works, how the Spring context is configured, or how device farms are connected — those are framework concerns. Tests call screen objects, screen objects call the driver abstraction, the framework handles the rest.
💡 This is the Single Responsibility Principle from the framework blueprint at the module level.corehas one reason to change: the framework infrastructure.team-testshas one reason to change: the test scenarios. When responsibilities are clearly separated, a change in one module can never break the other.
✅ Benefits of this structure:
coreandcloudare versioned independently of test code — teams upgrade on their own schedule- A broken test can never prevent the framework from building
- Swapping a cloud provider only touches
cloud— nothing incoreor any test project changes - A new team — even one testing a completely different app — gets the full framework by declaring
coreas a dependency. New repository, same foundation, no fork
💡 This is DRY from the framework blueprint at the project level: one authoritative source for shared code, one place to fix a bug, no copies drifting out of sync across teams.
Prerequisites
Before starting, make sure the following are installed and on your PATH:
- Java 21 — install via Homebrew:
brew install --cask temurin@21(or [download from Adoptium]) - Maven 3.9+ — install via Homebrew:
brew install maven(or [download from Apache]) - IntelliJ IDEA (recommended) — or any Java IDE you're comfortable with
Run the following to confirm both are set up:
java -version
mvn -version
The exact output depends on which JDK distribution you have installed, but you should see a Java version of 17 or higher and Maven 3.9 or higher:
# Temurin (Adoptium):
openjdk version "21.0.x" ...
OpenJDK Runtime Environment Temurin-21.0.x+x ...

# Oracle JDK:
java version "21.0.x" ...
Java(TM) SE Runtime Environment ...

# Either way, Maven output looks like:
Apache Maven 3.9.x ...
💡 The JDK distribution doesn't matter — Temurin, Oracle JDK, and other OpenJDK builds all work. What matters is the version: Spring Boot 4.x requires Java 17 as a minimum, but Java 21 or later is the better choice for new projects.
Step 1: Create the Project Root
Create the root directory for the framework. This is where the parent POM lives.
mkdir mobile-test-framework
cd mobile-test-framework
touch pom.xml
Then open the mobile-test-framework folder in IntelliJ: File → Open, select the folder, and click OK. IntelliJ will detect it as a Maven project once the POM is in place in the next step.
Step 2: Write the Parent POM
The parent POM is the backbone of the entire project. It defines the project's identity, declares child modules, centralizes all dependency versions, and configures shared build plugins.
Open pom.xml and add the following:
<?xml version="1.0" encoding="UTF-8"?>
<project xmlns="http://maven.apache.org/POM/4.0.0"
         xmlns:xsi="http://www.w3.org/2001/XMLSchema-instance"
         xsi:schemaLocation="http://maven.apache.org/POM/4.0.0
         http://maven.apache.org/xsd/maven-4.0.0.xsd">

    <modelVersion>4.0.0</modelVersion>

    <groupId>com.mobileframework</groupId>
    <artifactId>mobile-test-framework</artifactId>
    <version>1.0.0-SNAPSHOT</version>
    <packaging>pom</packaging>

    <name>Mobile Test Framework</name>
    <description>A modular mobile test automation framework built with Appium, Spring Boot, and Java</description>

    <!-- Declare child modules -->
    <modules>
        <module>core</module>
        <module>team-tests</module>
    </modules>

    <properties>
        <java.version>21</java.version>
        <maven.compiler.source>${java.version}</maven.compiler.source>
        <maven.compiler.target>${java.version}</maven.compiler.target>
        <project.build.sourceEncoding>UTF-8</project.build.sourceEncoding>

        <!-- Dependency versions — update here, apply everywhere -->
        <spring.boot.version>4.0.6</spring.boot.version>
        <appium.java.client.version>10.1.1</appium.java.client.version>
    </properties>

    <dependencyManagement>
        <dependencies>

            <!--
                Spring Boot BOM import — manages versions for all Spring libraries.
                Importing as a BOM lets the parent POM remain independent without
                inheriting from spring-boot-starter-parent.
            -->
            <dependency>
                <groupId>org.springframework.boot</groupId>
                <artifactId>spring-boot-dependencies</artifactId>
                <version>${spring.boot.version}</version>
                <type>pom</type>
                <scope>import</scope>
            </dependency>

            <!-- Appium Java Client -->
            <dependency>
                <groupId>io.appium</groupId>
                <artifactId>java-client</artifactId>
                <version>${appium.java.client.version}</version>
            </dependency>

            <!-- Internal module cross-references -->
            <dependency>
                <groupId>com.mobileframework</groupId>
                <artifactId>core</artifactId>
                <version>${project.version}</version>
            </dependency>

        </dependencies>
    </dependencyManagement>

    <build>
        <pluginManagement>
            <plugins>

                <plugin>
                    <groupId>org.apache.maven.plugins</groupId>
                    <artifactId>maven-compiler-plugin</artifactId>
                    <version>3.13.0</version>
                    <configuration>
                        <release>${java.version}</release>
                    </configuration>
                </plugin>

                <plugin>
                    <groupId>org.apache.maven.plugins</groupId>
                    <artifactId>maven-surefire-plugin</artifactId>
                    <version>3.5.5</version>
                </plugin>

            </plugins>
        </pluginManagement>
    </build>

</project>
The key difference from a standard parent POM is the Spring Boot BOM import. Rather than having the parent POM itself inherit from spring-boot-starter-parent, the Spring Boot BOM (spring-boot-dependencies) is imported inside <dependencyManagement>. This achieves the same result — all Spring library versions are managed centrally — without restricting what your parent POM can inherit from later.
💡 The<type>pom</type>and<scope>import</scope>commbination is the Maven BOM import pattern. It pulls in Spring Boot's full dependency manifest, so every module that declares a Spring dependency gets the correct, compatible version without specifying one. JUnit 5 is part of the Spring Boot BOM — no version property needed.
Step 3: Create the Core Module
The core module is the shared foundation. At this stage it establishes the package structure and the base page class. Driver management is introduced in the next article alongside the Page Object Model. Spring configuration and shared utilities follow in their own articles after that.
Create the module directory and folder structure:
mkdir -p core/src/main/java/com/mobileframework/config
mkdir -p core/src/main/java/com/mobileframework/driver
mkdir -p core/src/main/java/com/mobileframework/pages
mkdir -p core/src/main/java/com/mobileframework/utils
mkdir -p core/src/main/resources
💡 The -p flag stands for parents — it creates the full directory path in one command, including any intermediate directories that don't exist yet. Without it, the command would fail if any parent directory in the path was missing.The directories are created now even though most are empty — they define the package layout that the rest of the series builds into. Each package has a clear, single responsibility: driver for session management, config for Spring and environment configuration, pages for base page classes, utils for shared helpers.
Now create core/pom.xml. In IntelliJ, right-click the core folder in the Project panel → New → File → type pom.xml and press Enter. Then paste in the following:
<?xml version="1.0" encoding="UTF-8"?>
<project xmlns="http://maven.apache.org/POM/4.0.0"
         xmlns:xsi="http://www.w3.org/2001/XMLSchema-instance"
         xsi:schemaLocation="http://maven.apache.org/POM/4.0.0
         http://maven.apache.org/xsd/maven-4.0.0.xsd">

    <modelVersion>4.0.0</modelVersion>

    <parent>
        <groupId>com.mobileframework</groupId>
        <artifactId>mobile-test-framework</artifactId>
        <version>1.0.0-SNAPSHOT</version>
    </parent>

    <artifactId>core</artifactId>
    <name>Core Framework Module</name>
    <description>Shared foundation: driver management, base classes, Spring configuration, and utilities</description>

    <dependencies>

        <!-- Spring Boot — enables auto-configuration, profiles, and @ConfigurationProperties -->
        <dependency>
            <groupId>org.springframework.boot</groupId>
            <artifactId>spring-boot-starter</artifactId>
        </dependency>

        <!-- Appium Java Client — Selenium is a transitive dependency, pulled in automatically -->
        <dependency>
            <groupId>io.appium</groupId>
            <artifactId>java-client</artifactId>
        </dependency>

    </dependencies>

</project>
Notice there are no version numbers in the dependency declarations. Versions are inherited from the parent's <dependencyManagement> block — Spring Boot's from the BOM import, Appium from the explicit entry you added. Selenium does not need to be declared separately — the Appium Java Client pulls in the exact Selenium version it was built against as a transitive dependency.
💡 After creating core/pom.xml, IntelliJ may show an "Add as Maven Project" notification or a "Load Maven Changes" prompt — click it if it appears. If nothing shows up, open the Maven tool window (View → Tool Windows → Maven) and click the reload icon (↻) to sync the module manually. IntelliJ may also sync automatically if auto-reload is enabled in your settings.
Add the base page class
The one class added to core in this article is BasePage — the abstract base class that every screen object in team-tests will extend. Its implementation (driver injection and PageFactory initialization) is built out in the driver setup article. What matters here is that it exists in core, establishing the convention and the cross-module dependency.
💡 In mobile automation, "screen objects" and "page objects" refer to the same pattern — the Page Object Model covered in the framework blueprint. Mobile apps have screens rather than pages, so the naming reflects that, but the principle is identical: one class per screen, containing locators and interaction methods, called by test classes that never touch Appium directly.
Create core/src/main/java/com/mobileframework/pages/BasePage.java:
package com.mobileframework.pages;

public abstract class BasePage {

}
Step 4: Create the Team-Tests Module
team-tests is where screen objects and test classes live. This step creates the module, declares its dependencies, sets up the directory structure, and adds the Spring Boot entry point. No screen objects or tests yet — those come in the next article.
💡team-testsis the generic name used throughout this article. In practice you'd name this after your team or the area they own —payments-tests,checkout-tests,onboarding-tests, or whatever makes it identifiable in your project.
mkdir -p team-tests/src/main/java/com/mobileframework/screens
mkdir -p team-tests/src/test/java/com/mobileframework/tests
mkdir -p team-tests/src/main/resources
mkdir -p team-tests/src/test/resources
Now create team-tests/pom.xml:
<?xml version="1.0" encoding="UTF-8"?>
<project xmlns="http://maven.apache.org/POM/4.0.0"
         xmlns:xsi="http://www.w3.org/2001/XMLSchema-instance"
         xsi:schemaLocation="http://maven.apache.org/POM/4.0.0
         http://maven.apache.org/xsd/maven-4.0.0.xsd">

    <modelVersion>4.0.0</modelVersion>

    <parent>
        <groupId>com.mobileframework</groupId>
        <artifactId>mobile-test-framework</artifactId>
        <version>1.0.0-SNAPSHOT</version>
    </parent>

    <artifactId>team-tests</artifactId>
    <name>Team Tests Module</name>
    <description>Screen objects and test classes for the application under test</description>

    <dependencies>

        <!-- Core framework — brings in Appium, Selenium, Spring Boot, and all shared classes -->
        <dependency>
            <groupId>com.mobileframework</groupId>
            <artifactId>core</artifactId>
        </dependency>

        <!-- Spring Boot Test — provides JUnit 5, Spring Test support, and AssertJ -->
        <dependency>
            <groupId>org.springframework.boot</groupId>
            <artifactId>spring-boot-starter-test</artifactId>
            <scope>test</scope>
        </dependency>

    </dependencies>

</project>
team-tests declares two dependencies. core transitively provides Appium, Selenium, and the Spring Boot runtime. spring-boot-starter-test brings in JUnit 5, Spring's test utilities, and AssertJ — everything needed to run tests and integrate with the Spring context.
💡 After creating team-tests/pom.xml, IntelliJ may show a "Load Maven Changes" prompt — click it if it appears. If it doesn't, open the Maven tool window (View → Tool Windows → Maven), and click the reload icon (↻) to sync the module manually. IntelliJ may also sync automatically if auto-reload is enabled in your settings.Why JUnit 5 with Cucumber?
Since all tests in this framework will run as Cucumber scenarios, JUnit 5 is the right choice:
- Recommended by the Cucumber team —
cucumber-junit-platform-engineis the current preferred integration. It's more actively maintained thancucumber-testngand maps cleanly to how Cucumber is designed to run. - Cleaner parallel execution — the JUnit Platform engine has native support for running Cucumber scenarios in parallel, without the workarounds required when using TestNG as the Cucumber runner.
- Simpler setup —
spring-boot-starter-testalready includes JUnit 5. No extra dependencies to add, no exclusions to manage.
Add the Spring Boot entry point
Every Spring Boot application needs a class that tells Spring where to start. In this framework that class is TestApplication — it lives in team-tests and acts as the anchor point for the Spring context when tests run.
Create team-tests/src/main/java/com/mobileframework/TestApplication.java:
package com.mobileframework;

import org.springframework.boot.autoconfigure.SpringBootApplication;

@SpringBootApplication
public class TestApplication {

}
TestApplication is the Spring Boot entry point for the test module. It has no main method — this framework is not a runnable application. Its purpose is to bootstrap the Spring context when tests run. @SpringBootApplication includes component scanning, so Spring will automatically discover beans and configuration across the com.mobileframework package hierarchy as they are added in subsequent articles.
Test classes reference it via @SpringBootTest(classes = TestApplication.class).
Step 5: A Note on Cucumber
The structure you've built here requires no changes when Cucumber BDD is added. TestApplication is the Spring Boot entry point that cucumber-spring connects to, and team-tests is where Cucumber's step definitions, feature files, and runner will live alongside your screen objects.
When the BDD article arrives, three dependencies are added to team-tests/pom.xml (cucumber-java, cucumber-spring, cucumber-junit-platform-engine) and the JUnit Platform Surefire provider is configured. Two classes are added: a @CucumberContextConfiguration class that references TestApplication, and a runner annotated with @Suite and @SelectClasspathResource. Nothing already built changes.
💡 This is the Open/Closed Principle from the framework blueprint: open for extension (Cucumber plugs in), closed for modification (nothing already built needs to change).
Step 6: Verify the Project Structure
Before running the build, take a moment to confirm the project structure is correct. A missing file or misnamed directory is the most common reason the build fails at this stage. Run the following from the project root:
find . -name "pom.xml" | sortExpected output:
./team-tests/pom.xml
./core/pom.xml
./pom.xml
Verify all source files:
find . -type f \( -name "*.java" -o -name "*.xml" \) | grep -v target | sortExpected output:
./team-tests/pom.xml
./team-tests/src/main/java/com/mobileframework/TestApplication.java
./core/pom.xml
./core/src/main/java/com/mobileframework/pages/BasePage.java
./pom.xml
💡 Thescreens/directory inteam-testswon't appear here yet —findonly lists files, not empty directories. It will show up once you add your first screen object in the next article.
💡 If you see .idea/ files in the output, ignore them — that's IntelliJ's internal configuration folder. It's not part of the Maven project and has no effect on the build.Step 7: Build the Project
From the project root, run a full build:
mvn clean install -DskipTestsThere are no tests yet — those are written in the next article. You're verifying the project structure is valid, the modules resolve correctly, and everything compiles cleanly.
If successful, you'll see:
[INFO] Scanning for projects...
[INFO] ------------------------------------------------------------------

[INFO] Reactor Build Order:
[INFO]
[INFO] Mobile Test Framework                                              [pom]
[INFO] Core Framework Module                                              [jar]
[INFO] Team Tests Module                                                   [jar]
[INFO]
...
[INFO] BUILD SUCCESS
Reactor Build Order is Maven's term for the sequence in which it builds modules. Maven resolves this automatically from the dependency graph — core always builds before team-tests because team-tests depends on it.
💡 In Stage 2, the Reactor only shows the test project —coreandcloudare resolved as external JARs from the Maven repository rather than rebuilt. The output above is specific to the Stage 1 monorepo.
🚨 The most common causes of `BUILD FAILURE` at this step:
- Version mismatch — the
<version>in the parent POM doesn't match the<version>in a child module's<parent>block. Maven error:Could not find artifact com.mobileframework:mobile-test-framework:pom:...— check that both version strings are identical. - Unmanaged dependency — a child module declares a dependency with no version, but it isn't listed in
<dependencyManagement>. Maven error:'dependencies.dependency.version' for X:Y:jar is missing— add the dependency and its version to the parent's<dependencyManagement>first. - Module directory mismatch — a name in the parent's
<modules>list doesn't match the actual directory name on disk. Maven error:Could not find the selected project in the reactor— check that the directory name and the<module>entry match exactly, including case. - Broken BOM import —
<type>pom</type>or<scope>import</scope>is missing from the Spring Boot BOM entry. Spring dependencies will have no managed version and the build will fail with version errors across multiple modules — refer back to the parent POM setup and ensure both attributes are present. - Missing
<packaging>pom</packaging>— the parent POM is missing this declaration. Maven will try to build it as a JAR instead of a multi-module project — add<packaging>pom</packaging>to the parent POM directly below<artifactId>.
Understanding the Module Dependency Graph
Rather than just reading about it, you can explore the dependency graph yourself. There are two ways:
Terminal — from the project root:
mvn dependency:treeThis prints the full dependency tree for each module, including transitive dependencies. It's the quickest way to verify exactly what team-tests pulls in from core.
IntelliJ — open the Maven tool window (View → Tool Windows → Maven) and expand any module. Under Dependencies, you'll see the direct dependencies declared for that module. Expand com.mobileframework:core to see everything it brings in transitively — Spring Boot, Appium, and Selenium are all there.
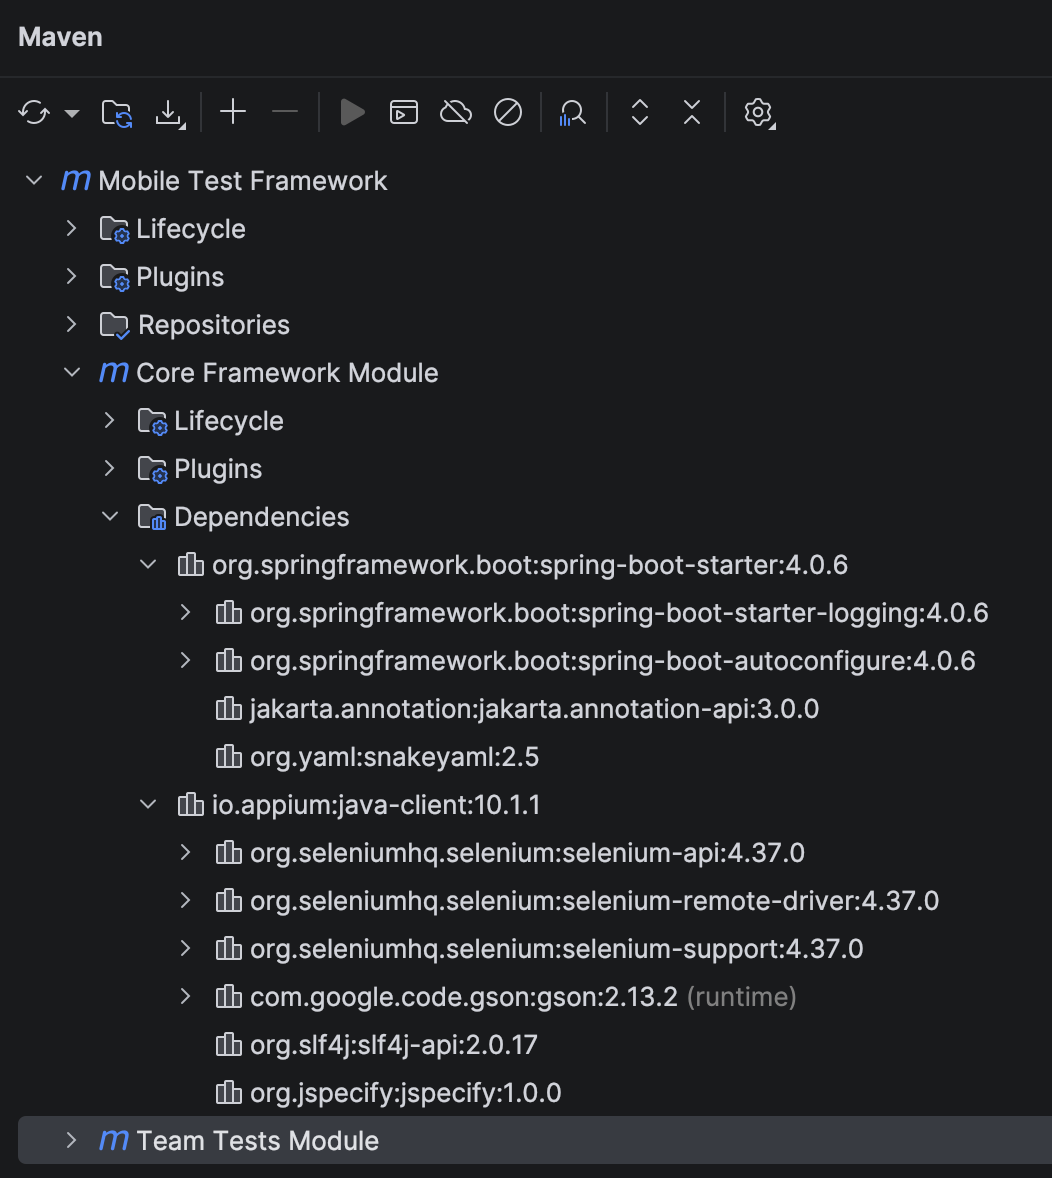
Here's how the modules relate to each other in Stage 1:

In Stage 2, the graph looks the same — only the packaging changes. core becomes an external artifact published to a Maven repository rather than a local module, but team-tests declares it identically:

The dependency arrow still flows in one direction. team-tests depends on core, never the reverse. core has no knowledge of any test project — in Stage 2, it literally cannot, since it's published independently.
💡 If you ever find yourself adding a test project dependency to core, stop. That's a sign the wrong module owns a responsibility. Restructure the code before adding the dependency.What You've Built
The project compiles, the modules resolve correctly, and the dependency graph flows in the right direction. Spring Boot is in place, the module boundary between core and team-tests is established, and the structure maps directly onto the Stage 2 separate-project architecture when the framework is ready to be shared more broadly.
💡 You can download the full working project from this article below:
What's Next?
The next article — Driver Setup and Screen Objects: Building the Working Core of Your Mobile Framework — covers DriverManager: how to initialise an Appium session for Android and iOS, configure capabilities, and wire the driver into your first screen objects using the Page Object Model.
From there, the series continues building layer by layer:
- BDD with Cucumber — Gherkin scenarios, step definitions,
cucumber-springwired to the context you've just built - Cross-platform testing — running the same test on Android and iOS without code changes
- Configuration management —
application.yml, Spring profiles for environments, device profiles, and runtime arguments - Parallel execution — thread-safe scenario isolation across multiple devices
- Device farm integration — the
cloudmodule and running against BrowserStack, Sauce Labs, and more - Visual testing and accessibility — catching UI regressions and validating accessibility as a natural part of your test runs
- AI-powered testing — self-healing selectors, AI-generated test scenarios, and intelligent tooling integrated directly into your framework
Each article picks up exactly where the last one left off. Stick with it, and by the end you won't just have a project structure sitting on your machine — you'll have a framework you can actually run tests with, scale across devices, and be proud to put in front of a team.


Discussion