
In the previous guides, we covered how Appium works, how to set it up on Mac, how to use Appium Inspector, which locator strategies to use, which capabilities to configure, and which execute methods are available to you. Those were all the individual pieces. This article is where they come together.
You're going to write a real end-to-end test suite — login, swipe, scroll, and drag-and-drop. We'll build the Android version first, walk through how it runs, then do the same for iOS — calling out exactly where the two platforms diverge and why.
By the end, you'll have working test code for both platforms and a clear picture of what it actually takes to run the same test suite across Android and iOS.
What We're Testing
The test target is the WebDriverIO Native Demo App, the same app we've used throughout this series. It's available for both Android and iOS and covers the kind of interactions you'll encounter in most real apps.
We're writing three tests:
- Login test — navigate to the login screen, enter credentials, assert the success alert
- Swipe and scroll test — swipe horizontally through a carousel, then scroll down to a hidden element
- Drag and drop test — drag nine puzzle pieces to their matching drop zones and assert the congratulations screen
Here's the overall structure — it's the same on both platforms:
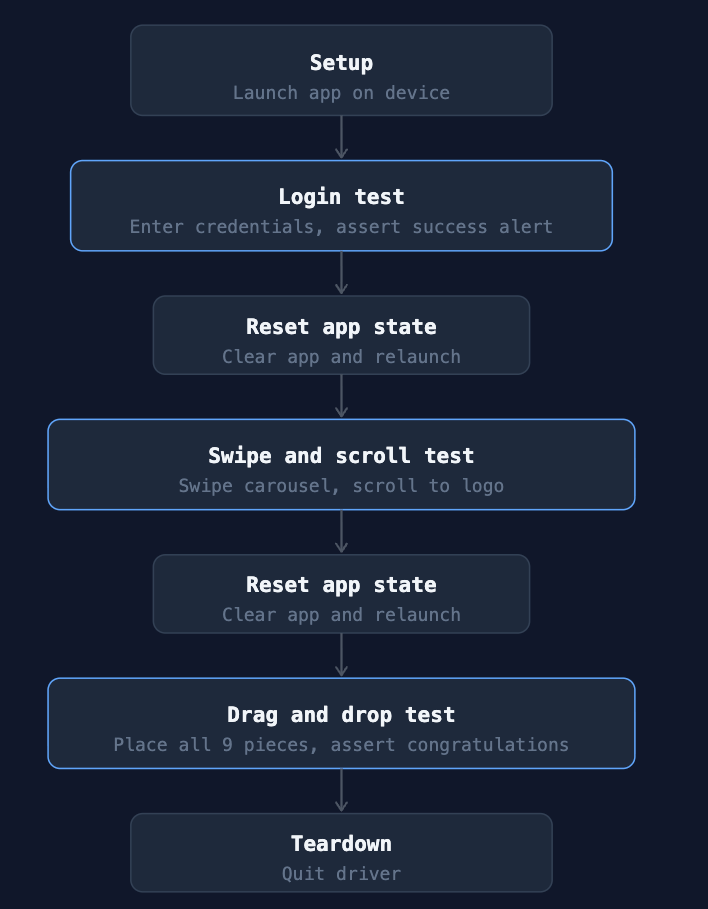
Tests run in priority order. After each one, we clear the app data and relaunch — wiping any state left behind — so the next test starts from a clean slate. The one exception is after drag and drop: we skip the reset so the congratulations screen stays visible long enough to assert it.
💡 Priority ordering only applies when tests run sequentially on a single thread. Once you introduce parallel execution (covered in the next series), you'll need a different approach to state management.
Project Setup
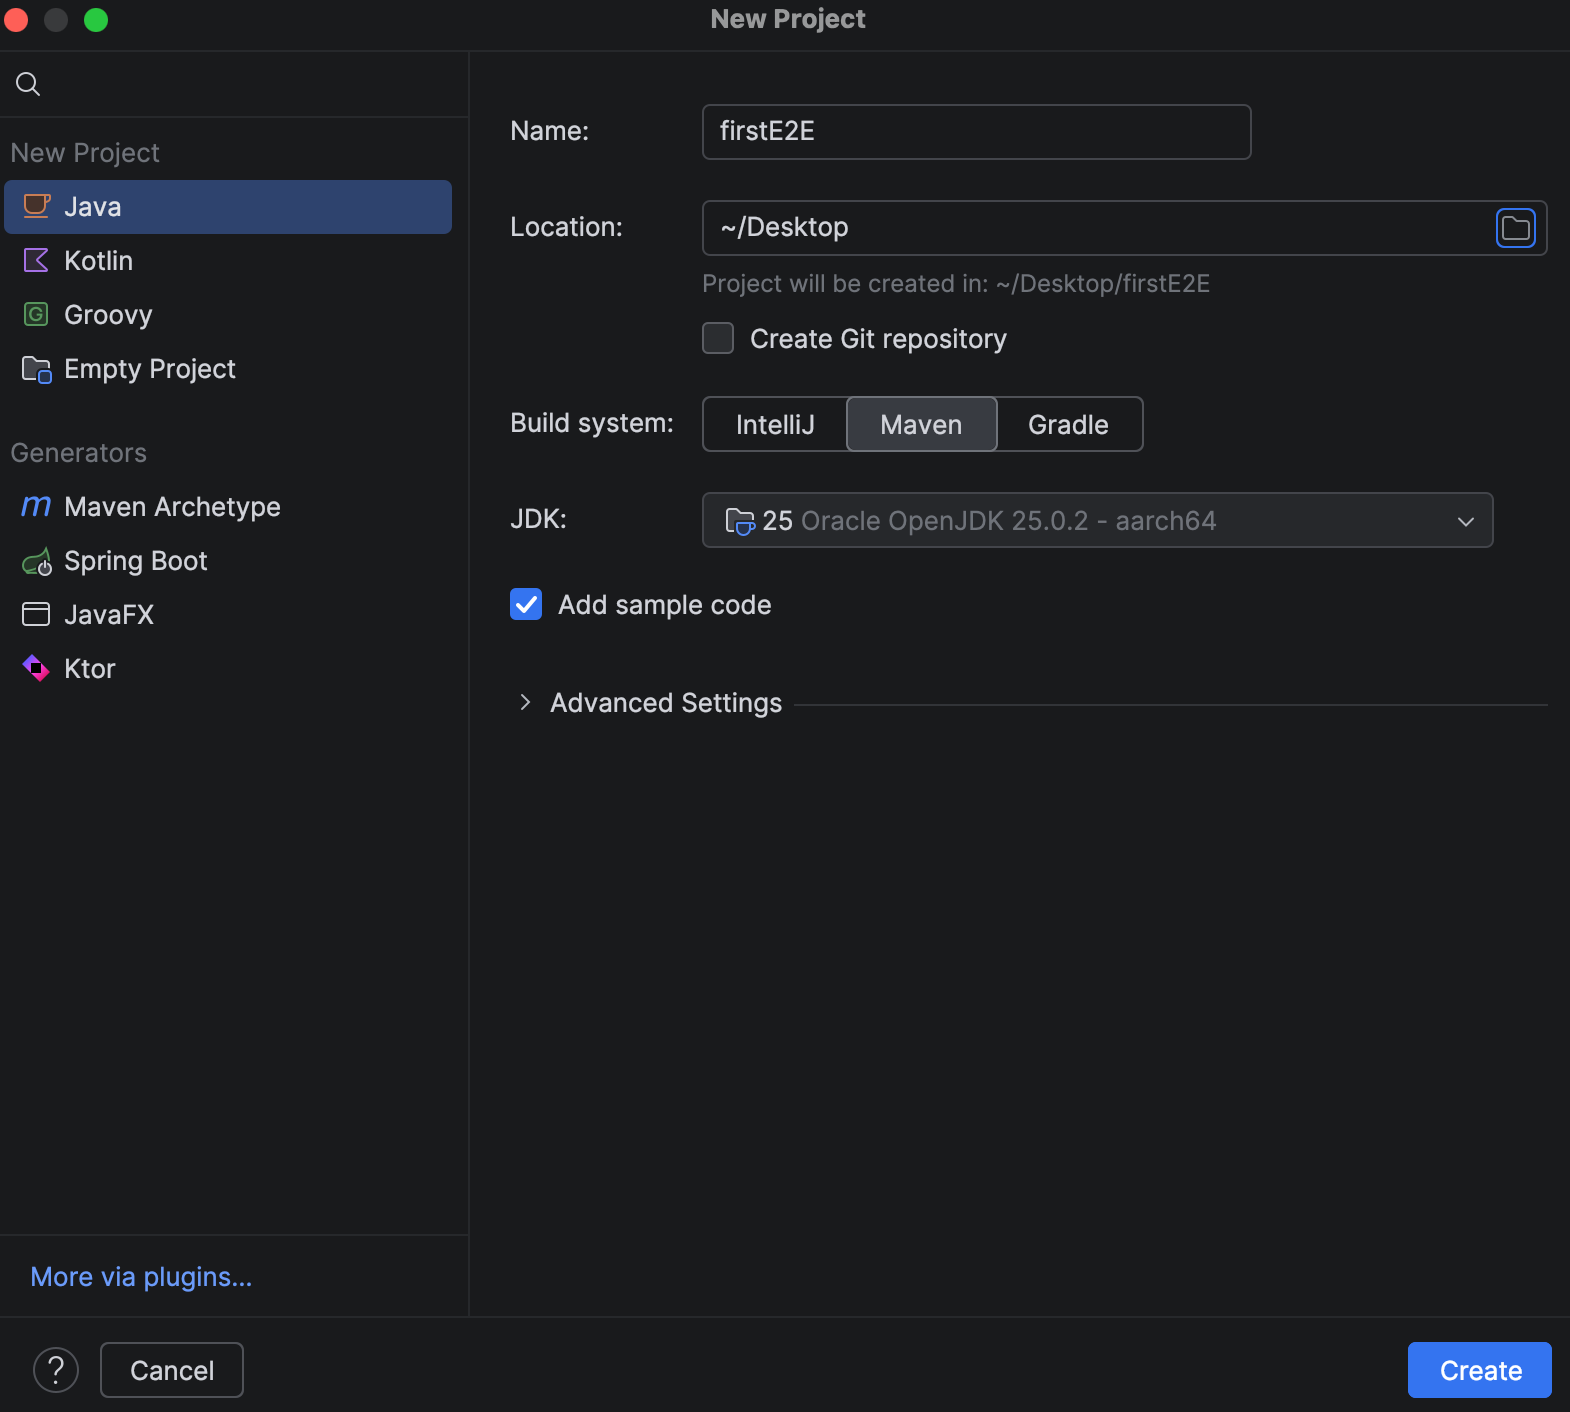
Before writing any tests, you need a Maven project with the right dependencies. If you haven't set one up yet, download IntelliJ IDEA from jetbrains.com/idea — the Community edition is free and has everything you need.
Once installed, open IntelliJ and go to File → New → Project. Select Maven Archetype, give your project a name, and click Create. IntelliJ will generate the project structure including a pom.xml — that's the file that manages your project's dependencies, and it's where you'll add Appium and TestNG.
Add these to your pom.xml:
<dependencies>

    <!-- Appium Java client -->
    <dependency>
        <groupId>io.appium</groupId>
        <artifactId>java-client</artifactId>
        <version>10.1.1</version>
    </dependency>

    <!-- TestNG -->
    <dependency>
        <groupId>org.testng</groupId>
        <artifactId>testng</artifactId>
        <version>7.12.0</version>
        <scope>test</scope>
    </dependency>
</dependencies>
🤖 Android
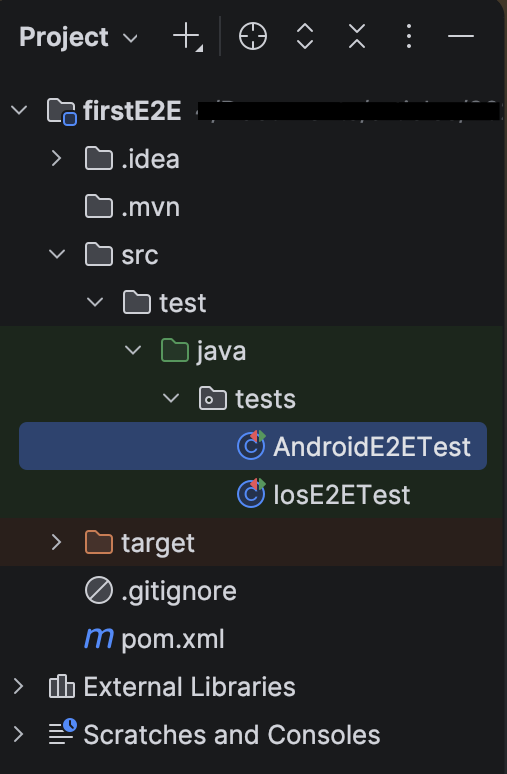
Create AndroidE2ETest.java under src/test/java/tests/. You'll add IosE2ETest.java in the same location once we get to the iOS section.
Make sure Appium is running locally before executing any tests. If you haven't set it up yet, the Appium setup guide covers it step by step.
Capabilities
Open AndroidE2ETest.java and start with the capabilities:
private UiAutomator2Options getAndroidCapabilities() {
    return new UiAutomator2Options()
            .setUdid("emulator-5554")
            .setAutomationName("UiAutomator2")
            .setApp("/path/to/nativeDemoApp/android.wdio.native.app.v2.0.0.apk")
            .setAppPackage("com.wdiodemoapp")
            .setAppActivity("com.wdiodemoapp.MainActivity");
    }
💡 If any of those fields look unfamiliar, the Appium Capabilities guide covers them in detail.
💡"emulator-5554"is the default UDID when you have one emulator running. If you have multiple devices connected, runadb devicesin the terminal to find the right one.
Creating the Driver
The driver is created once in @BeforeTest and quit in @AfterTest — one session for the entire test class. Between tests, we also clear the app data and relaunch to make sure each test starts from a clean state. We'll cover that in the reset section below.
@BeforeTest
    public void createDriver() throws MalformedURLException {
        driver = new AndroidDriver(URI.create("http://127.0.0.1:4723").toURL(), getAndroidCapabilities());
    }

@AfterTest
    public void quitDriver() {
        if (driver != null) {
            driver.quit();
        }
    }
A Helper for Waiting
Rather than writing WebDriverWait inline every time, we extract it into a helper method. For now it lives in both test classes — we'll clean that up in a later article when we introduce the Page Object Model.
private WebElement waitForElement(By locator) {
        return new WebDriverWait(driver, Duration.ofSeconds(10))
                .until(ExpectedConditions.visibilityOfElementLocated(locator));
    }
This is an explicit wait — it polls the app up to 10 seconds for the element to become visible, then moves on as soon as it's found. If the element appears after 1 second, the test proceeds after 1 second, not 10. If it never appears within the timeout, the test fails with a TimeoutException.
Test 1: Login
The login test is straightforward — navigate to the login screen, enter credentials, tap the button, and assert the success alert appears.
@Test(priority = 1)
    public void loginTest() {

        // check if home screen is displayed
        Assert.assertTrue(waitForElement(AppiumBy.accessibilityId("Home-screen")).isDisplayed(), "Home screen not displayed");

        // navigate to login tab
        driver.findElement(AppiumBy.accessibilityId("Login")).click();

        //check if login screen is displayed
        Assert.assertTrue(waitForElement(AppiumBy.accessibilityId("Login-screen")).isDisplayed(), "Login screen not displayed");

        //login
        driver.findElement(AppiumBy.accessibilityId("input-email")).sendKeys("test@email.com");
        driver.findElement(AppiumBy.accessibilityId("input-password")).sendKeys("password");
        driver.findElement(AppiumBy.accessibilityId("button-LOGIN")).click();

        WebElement alertTitle = waitForElement(AppiumBy.id("alert_title"));
        Assert.assertTrue(alertTitle.isDisplayed(), "Login success alert was not displayed");
        Assert.assertEquals(alertTitle.getText(), "Success", "Alert title text did not match");
    }
💡 The only platform-specific part here is how you locate the success alert. Android exposes it via a resource ID — on iOS, that's handled differently, which we'll cover in the iOS section.
Test 2: Swipe and Scroll
The swipe screen has two things to interact with: a horizontal carousel of cards, and a WebdriverIO logo buried below the fold. The test swipes through the carousel until it finds a specific card, then scrolls down to verify the logo is there.
Swiping the carousel
The carousel doesn't reveal all its items at once — swiping left loads the next ones into view. So instead of a single findElement call, we loop: check if the item is visible, swipe if it's not, and try again.
private void swipeHorizontalToFindCarouselItem() {
        boolean found = false;
        for (int i = 0; i < 5; i++) {
            try {
                WebElement item = driver.findElement(
                        AppiumBy.androidUIAutomator("new UiSelector().resourceId(\"__CAROUSEL_ITEM_4__\")")
                );
                if (item.isDisplayed()) {
                    found = true;
                    break;
                }
            } catch (org.openqa.selenium.NoSuchElementException e) {
                // item not found, fall through to swipe
            }

            // swipe if item not found or not visible
            WebElement carousel = driver.findElement(
                    AppiumBy.androidUIAutomator("new UiSelector().resourceId(\"Carousel\")")
            );
            driver.executeScript("mobile: swipeGesture", Map.of(
                    "elementId", ((RemoteWebElement) carousel).getId(),
                    "direction", "left",
                    "percent", 0.75
            ));
        }

        Assert.assertTrue(found, "Carousel item EXTENDABLE was not found");
    }
On each iteration, we try to find __CAROUSEL_ITEM_4__. If it's there and visible, we're done. If it's not found at all, we catch the NoSuchElementException, swipe left on the carousel by 75% of its width, and try again. After five failed attempts, the assertion at the bottom fails the test.
Scrolling to the hidden element
Once the carousel is done, we scroll down to the WebdriverIO logo. mobile: scroll searches for the target element by accessibility ID and scrolls until it finds it — no loop needed.
// scroll down to find the hidden element
        driver.executeScript("mobile: scroll", Map.of(
                "strategy", "accessibility id",
                "selector", "WebdriverIO logo",
                "maxSwipes", 5
        ));

// verify element is now visible
        WebElement logo = waitForElement(AppiumBy.accessibilityId("WebdriverIO logo"));
        Assert.assertTrue(logo.isDisplayed(), "WebdriverIO logo was not found");
💡 Always set maxSwipes explicitly. Without it, Appium uses the scrollable element's internal limit — a value you don't control and that can vary between elements and devices.Putting it together
Here's how the full test method ties both gestures together:
@Test(priority = 2)
    public void swipeScrollTest() {

        // check if home screen is displayed
        Assert.assertTrue(waitForElement(AppiumBy.accessibilityId("Home-screen")).isDisplayed(), "Home screen not displayed");

        //navigate to swipe screen
        driver.findElement(AppiumBy.accessibilityId("Swipe")).click();

        //check if swipe screen is displayed
        Assert.assertTrue(waitForElement(AppiumBy.accessibilityId("Swipe-screen")).isDisplayed(), "Swipe screen not displayed");

        // swipe horizontal to find carousel item EXTENDABLE
        swipeHorizontalToFindCarouselItem();

        // scroll down to find the hidden element
        driver.executeScript("mobile: scroll", Map.of(
                "strategy", "accessibility id",
                "selector", "WebdriverIO logo",
                "maxSwipes", 5
        ));

        // verify element is now visible
        WebElement logo = waitForElement(AppiumBy.accessibilityId("WebdriverIO logo"));
        Assert.assertTrue(logo.isDisplayed(), "WebdriverIO logo was not found");
    }
Test 3: Drag and Drop
The drag and drop screen has nine puzzle pieces, each with a matching drop zone. Every piece needs to be dragged to the right target — so instead of repeating the same gesture nine times, we extract the logic into a dragToTarget() helper.
The drag helper
mobile: dragGesture needs the destination as raw screen coordinates, not an element reference. The helper gets those coordinates by calling getRect() on the target element — which returns its position and size — then calculates the center point from there:
private void dragToTarget(String sourceId, String targetId) {
        WebElement source = waitForElement(AppiumBy.accessibilityId(sourceId));
        WebElement target = waitForElement(AppiumBy.accessibilityId(targetId));

        // get center coordinates of the target
        Rectangle targetRect = target.getRect();
        int endX = targetRect.x + (targetRect.width / 2);
        int endY = targetRect.y + (targetRect.height / 2);

        driver.executeScript("mobile: dragGesture", Map.of(
                "elementId", ((RemoteWebElement) source).getId(),
                "endX", endX,
                "endY", endY
        ));
    }
Running all nine drags
With the helper in place, the test method is straightforward — call dragToTarget() for each piece and assert the result:
@Test(priority = 3)
    public void dragAndDropTest() {
        Assert.assertTrue(waitForElement(AppiumBy.accessibilityId("Home-screen")).isDisplayed(), "Home screen not displayed");

        // navigate to drag screen
        driver.findElement(AppiumBy.accessibilityId("Drag")).click();

        //check if drag screen is displayed
        Assert.assertTrue(waitForElement(AppiumBy.accessibilityId("Drag-drop-screen")).isDisplayed(), "Drag and Drop screen not displayed");

        // drag each piece to its matching drop zone
        dragToTarget("drag-l1", "drop-l1");
        dragToTarget("drag-l2", "drop-l2");
        dragToTarget("drag-l3", "drop-l3");
        dragToTarget("drag-c1", "drop-c1");
        dragToTarget("drag-c2", "drop-c2");
        dragToTarget("drag-c3", "drop-c3");
        dragToTarget("drag-r1", "drop-r1");
        dragToTarget("drag-r2", "drop-r2");
        dragToTarget("drag-r3", "drop-r3");

        // verify congratulations screen is displayed
        WebElement congrats = waitForElement(AppiumBy.androidUIAutomator("new UiSelector().text(\"Congratulations\")"));
        Assert.assertTrue(congrats.isDisplayed(), "Congratulations screen was not displayed");
    }
Once all nine pieces are placed correctly, the app shows a congratulations screen.
💡 Android locates the congratulations element with a UiSelector text match — on iOS, that's handled differently, which we'll cover in the iOS section.Resetting App State Between Tests
Each test needs to start with the app in a known state — otherwise leftover data from a previous test could cause a false pass or a confusing failure. @AfterMethod handles this by clearing the app data and relaunching after each test. The one exception is dragAndDropTest — clearing the app there would destroy the congratulations screen before we've had a chance to assert it.
 @AfterMethod
    public void clearAppCache(ITestResult result) {
        if (result.getMethod().getMethodName().equals("dragAndDropTest")) {
            return;
        }
        driver.executeScript("mobile: clearApp", Map.of("appId", "com.wdiodemoapp"));
        driver.executeScript("mobile: activateApp", Map.of("appId", "com.wdiodemoapp"));
    }
mobile: clearApp wipes everything — preferences, cached files, login state. mobile: activateApp then brings the app back to the foreground fresh.
Seeing It Run
Enough code — here's the full Android suite running end to end:
🍎 iOS
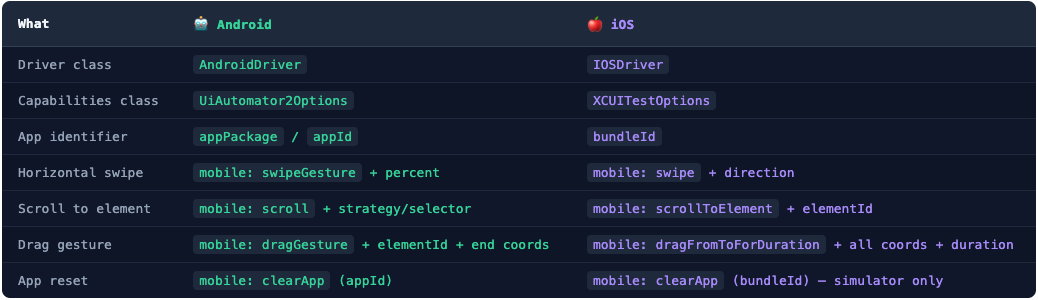
The iOS test suite runs the same three tests in the same order. Most of the code looks identical to Android — the differences are in the driver, the capabilities, and a few execute methods that XCUITest handles differently from UiAutomator2. Each one is called out as we go.
Capabilities
iOS uses XCUITestOptions instead of UiAutomator2Options. The app is identified by bundleId rather than appPackage and appActivity:
private XCUITestOptions getIosCapabilities() {
        return new XCUITestOptions()
                .setUdid("48B4E5C3-810E-46F6-A4F5-39B3C91FCFB6")
                .setAutomationName("XCUITest")
                .setApp("/path/to/nativeDemoApp/wdiodemoapp.app")
                .setBundleId("org.wdiodemoapp");
    }
💡 Runxcrun simctl list devicesin the terminal to find your simulator UDID. Find the simulator you want and copy the ID in parentheses next to it — it looks like48B4E5C3-810E-46F6-A4F5-39B3C91FCFB6. Make sure the simulator is booted before running your tests — you can launch it directly from Xcode or the Simulator app.
Creating the Driver
The driver setup follows the same pattern as Android. The only change is the driver class — IOSDriver instead of AndroidDriver.
@BeforeTest
    public void createDriver() throws MalformedURLException {
        driver = new IOSDriver(URI.create("http://127.0.0.1:4723").toURL(), getIosCapabilities());
    }
⚠️ A common mistake is copy-pasting the Android @BeforeTest and forgetting to swap the driver class. The capabilities will look correct but the session will fail straight away.Waiting Helpers
The iOS test class has one extra wait helper that Android doesn't need. waitForElement is identical to Android — it waits for an element to be visible on screen. But in the swipe/scroll test, the target element is already in the UI hierarchy before it's scrolled into view — so waiting for visibility would time out immediately. That's what waitForPresence is for:
private WebElement waitForElement(By locator) {
        return new WebDriverWait(driver, Duration.ofSeconds(10))
                .until(ExpectedConditions.visibilityOfElementLocated(locator));
    }

private WebElement waitForPresence(By locator) {
        return new WebDriverWait(driver, Duration.ofSeconds(10))
                .until(ExpectedConditions.presenceOfElementLocated(locator));
}💡presenceOfElementLocatedchecks that the element exists in the UI hierarchy — visible or not.visibilityOfElementLocatedchecks that it's actually on screen. In most tests you want visibility. In this one, presence is what you need.
Test 1: Login
The login flow is identical to Android up until the alert assertion. On Android, the alert title element has a resource ID (alert_title) that you can target directly. That resource ID doesn't exist on iOS — so instead, you match the alert element using an NSPredicate string:
@Test(priority = 1)
    public void loginTest() {

        // check if home screen is displayed
        Assert.assertTrue(waitForElement(AppiumBy.accessibilityId("Home-screen")).isDisplayed(), "Home screen not displayed");

        // navigate to login tab
        driver.findElement(AppiumBy.accessibilityId("Login")).click();

        //check if login screen is displayed
        Assert.assertTrue(waitForElement(AppiumBy.accessibilityId("Login-screen")).isDisplayed(), "Login screen not displayed");

        //login
        driver.findElement(AppiumBy.accessibilityId("input-email")).sendKeys("test@email.com");
        driver.findElement(AppiumBy.accessibilityId("input-password")).sendKeys("password");
        driver.findElement(AppiumBy.accessibilityId("button-LOGIN")).click();

        WebElement alertTitle = waitForElement(AppiumBy.iOSNsPredicateString("name == \"Success\" AND label == \"Success\" AND value == \"Success\""));
        Assert.assertTrue(alertTitle.isDisplayed(), "Login success alert was not displayed");
        Assert.assertEquals(alertTitle.getText(), "Success", "Alert title text did not match");
    }
💡 The triple match onname,label, andvaluemakes the locator more specific — useful when multiple elements on screen could match a single attribute. If the alert is the only element with the text "Success" on screen,label == "Success"would work on its own.
Test 2: Swipe and Scroll
The swipe and scroll test follows the same structure as Android. Two things change: the locator strategy and the scroll approach.
Swiping the carousel
Two things change from Android: the locator strategy and the swipe command. Both the carousel and its items are located by accessibilityId instead of androidUIAutomator. The swipe uses mobile: swipe with a direction argument instead of mobile: swipeGesture with a percent — XCUITest handles the swipe distance internally. The loop logic stays exactly the same:
private void swipeHorizontalToFindCarouselItem() {
        boolean found = false;
        for (int i = 0; i < 5; i++) {
            try {
                WebElement item = driver.findElement(
                        AppiumBy.accessibilityId("__CAROUSEL_ITEM_4__")
                );
                if (item.isDisplayed()) {
                    found = true;
                    break;
                }
            } catch (org.openqa.selenium.NoSuchElementException e) {
                // item not found, fall through to swipe
            }

            // swipe if item not found or not visible
            WebElement carousel = driver.findElement(
                    AppiumBy.accessibilityId("Carousel")
            );
            driver.executeScript("mobile: swipe", Map.of(
                    "elementId", ((RemoteWebElement) carousel).getId(),
                    "direction", "left"
            ));
        }

        Assert.assertTrue(found, "Carousel item EXTENDABLE was not found");
    }
Scrolling to the hidden element
iOS takes a different approach to scrolling. Rather than searching by strategy and selector like Android's mobile: scroll, you locate the element first with waitForPresence, then hand its reference directly to mobile: scrollToElement — no strategy, selector, or maxSwipes to configure:
// scroll to it
        driver.executeScript("mobile: scrollToElement", Map.of(
                "elementId", ((RemoteWebElement) logo).getId()
        ));

        // verify element is now visible
        Assert.assertTrue(logo.isDisplayed(), "WebdriverIO logo was not found");
Putting it together
Here's how the full test method ties both gestures together:
@Test(priority = 2)
    public void swipeScrollTest() {

        // check if home screen is displayed
        Assert.assertTrue(waitForElement(AppiumBy.accessibilityId("Home-screen")).isDisplayed(), "Home screen not displayed");

        // navigate to swipe tab
        driver.findElement(AppiumBy.accessibilityId("Swipe")).click();

        //check if swipe screen is displayed
        Assert.assertTrue(waitForElement(AppiumBy.accessibilityId("Swipe-screen")).isDisplayed(), "Swipe screen not displayed");

        // swipe horizontal to find carousel item EXTENDABLE
        swipeHorizontalToFindCarouselItem();

        // find the element first
        WebElement logo = waitForPresence(AppiumBy.accessibilityId("WebdriverIO logo"));

        // scroll to it
        driver.executeScript("mobile: scrollToElement", Map.of(
                "elementId", ((RemoteWebElement) logo).getId()
        ));

        // verify element is now visible
        Assert.assertTrue(logo.isDisplayed(), "WebdriverIO logo was not found");
    }
Test 3: Drag and Drop
The drag and drop test follows the same structure as Android. What changes is how XCUITest handles the drag gesture — unlike mobile: dragGesture, which accepts a source element reference, mobile: dragFromToForDuration works entirely with raw screen coordinates for both source and target.
The drag helper
Since both source and target need to be expressed as coordinates, the helper computes the center point of both elements using getRect():
private void dragToTarget(String sourceId, String targetId) {
        WebElement source = waitForElement(AppiumBy.accessibilityId(sourceId));
        WebElement target = waitForElement(AppiumBy.accessibilityId(targetId));

        // get center coordinates of both elements
        Rectangle sourceRect = source.getRect();
        int startX = sourceRect.x + (sourceRect.width / 2);
        int startY = sourceRect.y + (sourceRect.height / 2);

        Rectangle targetRect = target.getRect();
        int endX = targetRect.x + (targetRect.width / 2);
        int endY = targetRect.y + (targetRect.height / 2);

        driver.executeScript("mobile: dragFromToForDuration", Map.of(
                "fromX", startX,
                "fromY", startY,
                "toX", endX,
                "toY", endY,
                "duration", 1.0
        ));
    }
💡 Keepdurationaround1.0second. Any shorter and XCUITest may interpret the gesture as a tap rather than a drag — which means the piece won't move and the test will fail silently. The valid range is 0.5 to 60 seconds.
Putting it together
Here's the full test method — including how iOS locates the congratulations screen with an NSPredicate label match instead of Android's UiSelector text match:
@Test(priority = 3)
    public void dragAndDropTest() {
        Assert.assertTrue(waitForElement(AppiumBy.accessibilityId("Home-screen")).isDisplayed(), "Home screen not displayed");

        // navigate to drag screen
        driver.findElement(AppiumBy.accessibilityId("Drag")).click();

        //check if drag screen is displayed
        Assert.assertTrue(waitForElement(AppiumBy.accessibilityId("Drag-drop-screen")).isDisplayed(), "Drag and Drop screen not displayed");

        // drag each piece to its matching drop zone
        dragToTarget("drag-l1", "drop-l1");
        dragToTarget("drag-l2", "drop-l2");
        dragToTarget("drag-l3", "drop-l3");
        dragToTarget("drag-c1", "drop-c1");
        dragToTarget("drag-c2", "drop-c2");
        dragToTarget("drag-c3", "drop-c3");
        dragToTarget("drag-r1", "drop-r1");
        dragToTarget("drag-r2", "drop-r2");
        dragToTarget("drag-r3", "drop-r3");

        // verify congratulations screen is displayed
        WebElement congrats = waitForElement(AppiumBy.iOSNsPredicateString("label == 'Congratulations'"));
        Assert.assertTrue(congrats.isDisplayed(), "Congratulations screen was not displayed");
    }
Resetting App State Between Tests
The reset logic works the same way as Android — clear the app data and relaunch after each test, skip the reset after dragAndDropTest. The only change is the identifier: iOS uses bundleId instead of appId:
@AfterMethod
    public void clearAppCache(ITestResult result) {
        if (result.getMethod().getMethodName().equals("dragAndDropTest")) {
            return;
        }
        driver.executeScript("mobile: clearApp", Map.of("bundleId", "org.wdiodemoapp"));
        driver.executeScript("mobile: activateApp", Map.of("bundleId", "org.wdiodemoapp"));
    }
⚠️ mobile: clearApp is simulator-only on iOS. On a real device it may not clear app data reliably — if your tests depend on a clean state, uninstall and reinstall the app between runs instead.Seeing It Run
Same tests, different platform — here's the iOS suite running on a simulator:
💡 The full working project from this article — including the Android and iOS test classes, pom.xml, and configuration:
Android vs iOS: A Side-by-Side Summary
Here's a quick reference for every difference between the two platforms in this test suite:
What's Next
You've reached the end of the beginner series. Appium setup, Inspector, locator strategies, capabilities, execute methods, and now your first end-to-end test — that's the full foundation.
The next series goes deeper. It covers what it actually takes to build a production-ready mobile automation framework from scratch — design patterns, cross-platform architecture, parallel execution, device farms, AI-powered tooling, and more.


Discussion