
In the previous guide, we covered Appium Capabilities — the configuration layer that tells Appium what it's working with before a session even starts. Now it's time to look at the next concept worth understanding before we write our first real test: Execute Methods.
You may have already heard of driver.executeScript() in the context of web automation, where it's used to run raw JavaScript in a browser. In Appium, this same mechanism is repurposed for something different: it's how both the UiAutomator2 and XCUITest drivers expose mobile-specific commands that go beyond what the standard WebDriver protocol offers.
These commands all follow a consistent naming pattern — they start with the prefix mobile: — and you call them like this in Java:
driver.executeScript("mobile: commandName", Map.of(
    "arg1", "value1",
    "arg2", "value2"
));
The full list of execute methods is long — XCUITest alone exposes over 100, and UiAutomator2 isn't far behind. That number sounds intimidating, but in practice you'll reach for the same handful of methods in test after test. This guide covers the methods that come up in most test suites. The ones left out aren't less important — they're just more project-specific. If your app does biometric authentication, deep linking, or performance recording, those methods will matter just as much to you.
How Execute Methods Work
Standard WebDriver gives you the basics: find an element, tap it, type into it, read its text. That's enough for simple flows. But mobile apps regularly demand more — scrolling to off-screen elements, handling system permission dialogs, simulating biometric authentication, checking device lock state. None of that is part of the WebDriver spec.
Execute methods are how the drivers fill that gap. Rather than introducing new HTTP endpoints for every platform-specific action, both UiAutomator2 and XCUITest expose their extended functionality through a single executeScript call with a mobile: prefix. One call pattern, hundreds of possible actions.
Throughout this guide, each method is labelled so you know at a glance which platform it applies to:
- 🤝 Both — available on UiAutomator2 and XCUITest
- 🤖 Android only — UiAutomator2 only
- 🍎 iOS only — XCUITest only
Category 1: Gestures
This is the category you'll use most. You could automate gestures using raw W3C Actions — but both drivers offer dedicated execute methods as a simpler alternative for the most common ones. Instead of calculating touch coordinates and timing yourself, you describe what you want and let the driver figure out the details.
That said, W3C Actions aren't worse — they're designed for a different use case. When you need a complex or custom gesture that no execute method covers, W3C Actions is the right tool. For everything covered in this section, execute methods are the better choice.
1.1 Scroll
🤖 Android — mobile: scrollGesture
Use this when you need to scroll a list or any scrollable container by a fixed amount. You tell it which element to scroll, which direction, and how far — and it does the rest.
The direction argument accepts up, down, left, or right. The percent argument controls how far the scroll travels as a fraction of the scrollable area — 0.75 means 75% of its height (or width for horizontal scrolling). Both are required.
One useful detail: the method returns a boolean. If it returns true, there's still more content to scroll to in that direction. If it returns false, you've hit the end.
boolean canScrollMore = (Boolean) driver.executeScript("mobile: scrollGesture", Map.of(
    "elementId", ((RemoteWebElement) scrollableList).getId(),
    "direction", "down",
    "percent", 0.75  // scroll 75% of the element's height
));
💡 Tip: If you don't pass anelementId, you'll also need to provide the bounding area manually usingleft,top,width, andheightcoordinates. Passing the element directly is simpler and less error-prone when you already have a reference to the scrollable container.
🤖 Android — mobile: scroll
Use this when you know what you're looking for but don't know where it is on the screen. Rather than scrolling by a fixed amount, this method scrolls until it finds a specific element — you describe the target, and Appium keeps scrolling until it appears.
You describe the target using two arguments: strategy defines the locator type, and selector defines the value. For example, "strategy": "accessibility id" with "selector": "Add Note" is the equivalent of calling driver.findElement(AppiumBy.accessibilityId("Add Note")) — except instead of finding the element directly, Appium uses that combination to know when to stop scrolling. The optional maxSwipes argument caps how many scroll attempts are made before giving up.
driver.executeScript("mobile: scroll", Map.of(
    "strategy", "accessibility id",
    "selector", "Add Note",
    "maxSwipes", 10
));
💡 Tip: If you omit maxSwipes, Appium falls back to the scrollable element's own internal limit — a value you don't control and that can vary between elements and devices. Setting it explicitly keeps the behaviour predictable.mobile: scrollGesture vs mobile: scroll — which one to use?
The choice comes down to one question: do you know what you're looking for? If yes, use mobile: scroll and let Appium find it for you. If you just need to move the screen — to reveal content below the fold before interacting with it — use mobile: scrollGesture. If you find yourself writing a loop around mobile: scrollGesture to search for an element, stop — that's exactly what mobile: scroll is for.
🍎 iOS — mobile: scroll
On iOS, mobile: scroll is straightforward — tell it a direction (up, down, left, right) and it scrolls the screen, just like a finger swipe would. That's all you need for basic scrolling. When you need more control — scrolling a specific container, or scrolling until a particular element appears — you can pass additional arguments like element, name, or predicateString to be more precise.
// Scroll the screen downward
driver.executeScript("mobile: scroll", Map.of(
    "direction", "down"
));

// Scroll until an element with a specific name is visible
driver.executeScript("mobile: scroll", Map.of(
    "direction", "down",
    "name", "Add Note"
));
🍎 iOS — mobile: scrollToElement
Rather than simulating a finger gesture, this method tells XCUITest directly to bring a specific element into the visible viewport. It's useful when the element is already findable — for example sitting just at the edge of the screen — but needs to be fully in view before you can interact with it.
driver.executeScript("mobile: scrollToElement", Map.of(
    "elementId", ((RemoteWebElement) targetElement).getId()
));
⚠️ Important: On iOS,findElement()only searches what's currently visible on screen — unlike Android, it won't find elements that are off-screen. This means for most scrolling scenarios you'll usemobile: scrollwith adirectionto bring content into view first, then callfindElement()to locate the element and interact with it.mobile: scrollToElementis the simpler option when the element is already findable but just needs to be fully brought into view.
1.2 Swipe
You've seen this on your phone — when you swipe left through photos, the screen moves between distinct screens or cards. That's the kind of interaction mobile: swipeGesture and mobile: swipe are built for: carousels, onboarding screens, paged views, and swipe-to-delete actions.
🤖 Android — mobile: swipeGesture
You can target a specific element like a carousel, or swipe across a defined area of the screen. The percent argument controls how far the swipe travels — think of it as how much of the element you want the finger to cross. 0.75 means the swipe covers 75% of its width (or height, depending on the direction).
driver.executeScript("mobile: swipeGesture", Map.of(
    "elementId", ((RemoteWebElement) carousel).getId(),
    "direction", "left",
    "percent", 0.75
));
🍎 iOS — mobile: swipe
On iOS, mobile: swipe is simpler to call — the elementId argument is optional. If you omit it, the swipe is performed on the entire screen automatically. Pass an elementId to scope it to a specific container instead, such as a carousel or a tab bar.
// Swipe the whole screen
driver.executeScript("mobile: swipe", Map.of(
    "direction", "left"
));

// Swipe within a specific element
driver.executeScript("mobile: swipe", Map.of(
    "elementId", ((RemoteWebElement) carousel).getId(),
    "direction", "left"
));
💡 Swipe vs. Scroll: Think of it this way — flipping through photos in your camera roll is a swipe, scrolling through your messages is a scroll. Same idea in your tests: use swipe for content that moves in full pages or cards, and scroll for continuous lists you're moving through gradually.
1.3 Tap and Long Press
Most of the time, element.click() is all you need for a simple tap — it works reliably for the vast majority of cases and is what most people use in practice. The tap execute methods are there for when you need something more specific: a long press, a double tap, or as a fallback when click() lets you down.
🤖 Android — mobile: clickGesture, mobile: longClickGesture, mobile: doubleClickGesture
There are three tap variants on Android, each for a different interaction:
mobile: clickGesture— a standard single tap. Mainly useful as a fallback whenelement.click()fails unexpectedly.mobile: longClickGesture— press and hold for a specified duration in milliseconds. Used for triggering context menus, drag-and-drop mode, or any long-press action in your app. The default is 500ms.mobile: doubleClickGesture— two quick taps in succession. Used for interactions like zooming in on a map or any custom double-tap gesture your app implements.
// Single tap
driver.executeScript("mobile: clickGesture", Map.of(
    "elementId", ((RemoteWebElement) button).getId()
));

// Long press — 1500ms = 1.5 seconds
driver.executeScript("mobile: longClickGesture", Map.of(
    "elementId", ((RemoteWebElement) listItem).getId(),
    "duration", 1500  // milliseconds
));

// Double tap
driver.executeScript("mobile: doubleClickGesture", Map.of(
    "elementId", ((RemoteWebElement) mapView).getId()
));
🍎 iOS — mobile: tap, mobile: touchAndHold, mobile: doubleTap
The iOS methods map directly to their Android counterparts — the behaviour is the same, only the names differ:
mobile: tap— a standard single tap. Use it when you need to tap at precise coordinates, or as a fallback forelement.click().mobile: touchAndHold— press and hold. Used for triggering iOS action sheets, context menus, or drag-and-drop interactions.mobile: doubleTap— two quick taps in succession. Used for zooming in on maps, double-tap to like, or any custom double-tap interaction.
// Single tap
driver.executeScript("mobile: tap", Map.of(
    "elementId", ((RemoteWebElement) button).getId()
));

// Long press — 1.5 = 1.5 seconds
driver.executeScript("mobile: touchAndHold", Map.of(
    "elementId", ((RemoteWebElement) listItem).getId(),
    "duration", 1.5  // seconds
));

// Double tap
driver.executeScript("mobile: doubleTap", Map.of(
    "elementId", ((RemoteWebElement) zoomableImage).getId()
));
⚠️ Watch out: Thedurationargument means different things on each platform. On iOS it's in seconds, on Android it's in milliseconds. A 1.5 second long press is1.5on iOS and1500on Android. Mixing them up won't throw an error — it'll just produce unexpected behaviour that can be hard to debug.
💡 Tip: You might wonder why these tap execute methods exist whenelement.click()already works. On Android,element.click()uses a legacy UIAutomator mechanism whilemobile: clickGestureis built on the same W3C foundation as modern WebDriver. On iOS,mobile: tapcalls XCUITest's native tap API directly rather than going through the WebDriver layer. In both cases the difference rarely matters — but whenclick()fails silently on an element that looks perfectly tappable, switching to the equivalent tap execute method is the first thing worth trying.
1.4 Drag
Dragging is how you automate interactions where a user presses on something, holds, and moves it to a new position — reordering items in a list, moving a map pin, or sliding a range control from one point to another.
🤖 Android — mobile: dragGesture
You provide a start point and an end point using coordinates. Appium handles the press, hold, and move between them.
// Drag using screen coordinates
driver.executeScript("mobile: dragGesture", Map.of(
    "startX", 200, "startY", 400,
    "endX", 200, "endY", 100
));

// Drag a specific element — Appium uses the element's position as the start point
driver.executeScript("mobile: dragGesture", Map.of(
    "elementId", ((RemoteWebElement) draggableItem).getId(),
    "endX", 200, "endY", 100
));
💡 Tip: When you pass anelementId, theendXandendYcoordinates are still absolute screen coordinates — they define where the drag ends, not where it starts. The start point is taken from the element's position automatically.
🍎 iOS — mobile: dragFromToForDuration
On iOS, the method works the same way but adds a duration argument — this controls how long the finger is held at the starting point before the drag begins. Think of it as the "press and hold" time before the drag kicks in. Too short and iOS might not register it as a drag; 1.0 second works well for most cases.
// Drag using screen coordinates
driver.executeScript("mobile: dragFromToForDuration", Map.of(
    "fromX", 200, "fromY", 400,
    "toX", 200, "toY", 100,
    "duration", 1.0  // seconds — hold time before drag starts
));

// Drag a specific element — all coordinates are relative to the element when elementId is provided
driver.executeScript("mobile: dragFromToForDuration", Map.of(
    "elementId", ((RemoteWebElement) draggableItem).getId(),
    "duration", 1.0,
    "fromX", 10, "fromY", 10,  // relative to the element's top-left corner
    "toX", 200, "toY", 100     // also relative to the element's top-left corner
));
💡 Note: When you pass anelementIdon iOS, all four coordinates —fromX,fromY,toX, andtoY— become relative to that element's top-left corner. There is no mix of relative and absolute. If you needtoX/toYto point to an absolute screen position, omitelementIdentirely and use absolute coordinates for all four values instead. This is different from Android'smobile: dragGesture, where passing anelementIdsimply uses the element's centre as the start point with no need forfromX/fromYat all.
1.5 Pinch
Used for zoom interactions — maps, image viewers, document readers, or any component that responds to a two-finger pinch.
🤖 Android — mobile: pinchOpenGesture / mobile: pinchCloseGesture
Android has two separate methods — one for each direction:
mobile: pinchOpenGesture— two fingers move apart. Zooms in.mobile: pinchCloseGesture— two fingers move together. Zooms out.
The percent argument controls how dramatic the zoom is — it's the fraction of the element's size that the fingers travel during the gesture. 0.75 means the fingers move across 75% of the element. The closer to 1.0, the more dramatic the zoom; the closer to 0.0, the more subtle.
// Zoom in
driver.executeScript("mobile: pinchOpenGesture", Map.of(
    "elementId", ((RemoteWebElement) mapView).getId(),
    "percent", 0.75
));

// Zoom out
driver.executeScript("mobile: pinchCloseGesture", Map.of(
    "elementId", ((RemoteWebElement) mapView).getId(),
    "percent", 0.75
));
⚠️ Watch out: Thepercentvalue must be between0.01and0.99. Values below0.1may be too subtle to register as a pinch, and values above0.9risk overshooting the element's boundaries. A value between0.5and0.8works well for most cases.
🍎 iOS — mobile: pinch
On iOS, both zoom directions are handled by a single method — there's no separate open and close. The direction is controlled by the scale argument: above 1.0 zooms in, below 1.0 zooms out. The velocity argument controls the speed of the gesture.
// Zoom in (scale > 1.0)
driver.executeScript("mobile: pinch", Map.of(
    "elementId", ((RemoteWebElement) mapView).getId(),
    "scale", 2.0,
    "velocity", 1.1
));

// Zoom out (scale < 1.0)
driver.executeScript("mobile: pinch", Map.of(
    "elementId", ((RemoteWebElement) mapView).getId(),
    "scale", 0.5,
    "velocity", 1.1
));
💡 Android vs iOS: On Android you choose the zoom direction by picking the method. On iOS there's only one method — direction is controlled by the scale value. Same end result, different API design.
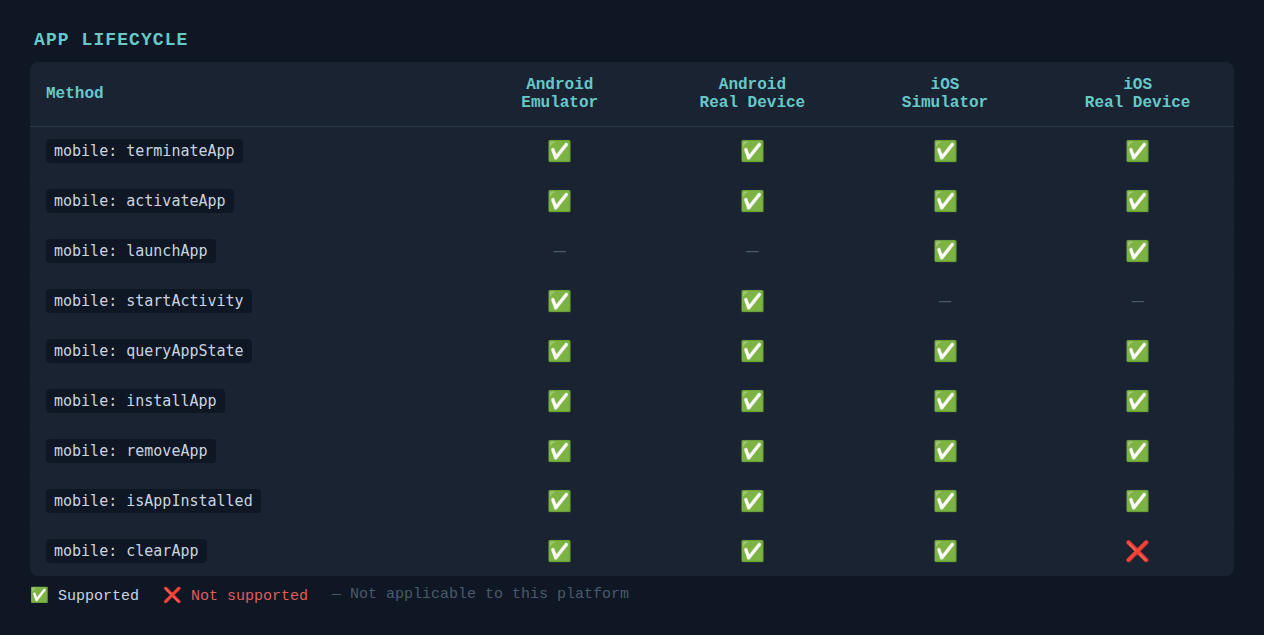
Category 2: App Lifecycle
Gestures get you around the app — but at some point you'll also need to control the app itself. Whether it's resetting state between tests, checking whether the app is running, or installing a fresh build on the device, these methods give you direct control over the app's lifecycle without having to tear down and rebuild the entire Appium session.
2.1 Terminate and Re-launch
One of the most practical things you can do mid-test is restart the app without ending the Appium session. This is useful when you need the app to go back to its initial screen — but it's important to understand what this actually does and doesn't do.
🤝 Both — mobile: terminateApp
Stops the running app process — like force-closing it from the app switcher. The app stops, but all its data, login state, and cached content remain completely intact.
// Android
driver.executeScript("mobile: terminateApp", Map.of(
    "appId", "com.wdiodemoapp"
));

// iOS
driver.executeScript("mobile: terminateApp", Map.of(
    "bundleId", "org.wdiodemoapp"
));
🤝 Both — mobile: activateApp
Brings the app back to the foreground. Pair it with terminateApp to restart the app process.
// Android
driver.executeScript("mobile: activateApp", Map.of(
    "appId", "com.wdiodemoapp"
));

// iOS
driver.executeScript("mobile: activateApp", Map.of(
    "bundleId", "org.wdiodemoapp"
));
⚠️ Important:terminateApp+activateApprestarts the app process — it does not clear data or cache. The user will still be logged in and all test data will be preserved.
💡 Note: If you need a clean state:
- Android (emulator & real device) — use
mobile: clearAppto wipe app data without uninstalling - iOS Simulator —
mobile: clearAppis supported and works as expected; real devices are not supported - iOS real device — there is no way to clear app data without a full reinstall
- All platforms — use
fullReset: trueto fully uninstall and reinstall the app
🍎 iOS — mobile: launchApp
Launches the app from scratch. If the app is already running, it terminates it first and relaunches it — so it always starts a fresh process regardless of the app's current state. This is different from activateApp, which simply brings an already-running app back to the foreground without restarting it.
driver.executeScript("mobile: launchApp", Map.of(
    "bundleId", "org.wdiodemoapp"
));
⚠️ Important: Despite terminating and relaunching the app process,mobile: launchAppdoes not clear data or cache. The user will still be logged in and any previously written data will still be there. If you need a clean data state, usemobile: clearAppon simulators or a full reinstall on real devices.
🤖 Android — mobile: startActivity
On Android, apps are made up of individual screens called Activities. Rather than launching the app from its home screen every time, mobile: startActivity lets you jump directly to any specific screen — useful for skipping repetitive navigation steps at the start of a test. You can also use it to open a screen in a completely different app.
driver.executeScript("mobile: startActivity", Map.of(
    "intent", "com.wdiodemoapp/.MainActivity"
));
⚠️ Warning: Some screens depend on data or state set up by a previous screen. Launching them directly with mobile: startActivity may cause them to show empty content or crash. This is most common with detail screens that expect data passed from a list. If a screen doesn't behave as expected when launched this way, you may need to navigate to it through the normal app flow instead.2.2 Query App State
Sometimes you need to know what state an app is currently in before deciding what to do next in your test — is it running? Is it in the background? Is it even installed? That's exactly what this method is for.
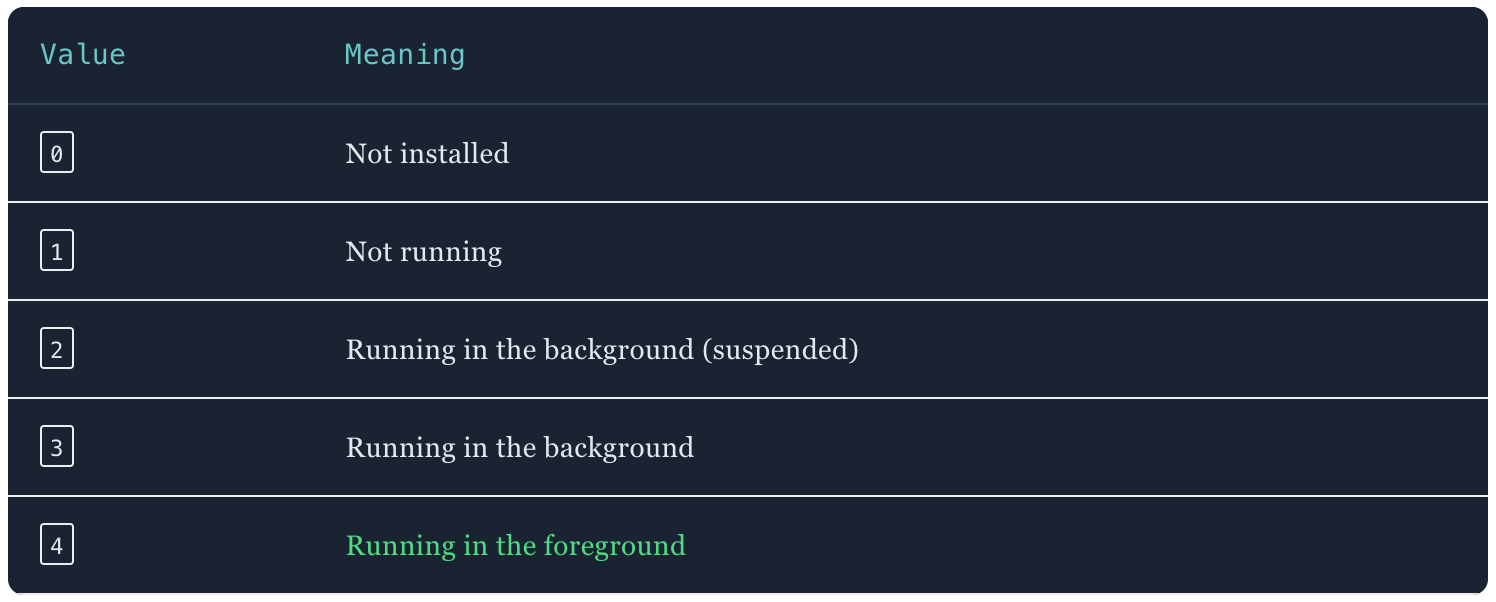
🤝 Both — mobile: queryAppState
Returns the current state of a specific app as a number. Each number maps to a specific state:
// Android
int state = (int) driver.executeScript("mobile: queryAppState", Map.of(
    "appId", "com.wdiodemoapp"
));

// iOS
int state = (int) driver.executeScript("mobile: queryAppState", Map.of(
    "bundleId", "org.wdiodemoapp"
));
💡 Tip: The most common use case is checking whether the app is in the foreground (4) before interacting with it, or verifying it was successfully terminated (1) after callingmobile: terminateApp. You can use the return value in a simpleifcheck or an assertion in your test.
2.3 Install and Remove
Most of the time your app will already be installed on the device before your tests run. But there are scenarios where you need more control — installing a specific build for a test suite, verifying an app is present before interacting with it, removing an app as part of cleanup, or wiping its data between tests. These methods cover all of those cases.
🤝 Both — mobile: installApp, mobile: removeApp, mobile: isAppInstalled
These three methods are the building blocks for managing app installation during your test runs. You'll reach for them most often in test setup and teardown — installing a fresh build before a suite runs, checking whether an app is already present before trying to install it, or cleaning up after a test that installed a third-party app.
The only difference between platforms is the argument name — appId on Android, bundleId on iOS.
// Check if the app is installed — Android
boolean installed = (boolean) driver.executeScript("mobile: isAppInstalled", Map.of(
    "appId", "com.wdiodemoapp"
));

// Check if the app is installed — iOS
boolean installed = (boolean) driver.executeScript("mobile: isAppInstalled", Map.of(
    "bundleId", "org.wdiodemoapp"
));

// Install the app — Android
driver.executeScript("mobile: installApp", Map.of(
    "app", "/path/to/app.apk"
));

// Install the app — iOS
driver.executeScript("mobile: installApp", Map.of(
    "app", "/path/to/app.app"
));

// Remove the app — Android
driver.executeScript("mobile: removeApp", Map.of(
    "appId", "com.wdiodemoapp"
));

// Remove the app — iOS
driver.executeScript("mobile: removeApp", Map.of(
    "bundleId", "org.wdiodemoapp"
));
🤖 Android — mobile: clearApp
Wipes all app data — login state, cached content, stored preferences — without uninstalling the app. Under the hood this uses Android's adb shell pm clear command.
driver.executeScript("mobile: clearApp", Map.of(
    "appId", "com.wdiodemoapp"
));
💡 Note:mobile: clearAppworks on both emulators and real devices on Android. Under the hood it usesadb shell pm clear, which works the same way regardless of whether the device is physical or emulated.
🍎 iOS — mobile: clearApp
Works the same way on iOS, but simulator only. There is no API available to clear app data on a real iOS device — the only workaround is to fully uninstall and reinstall the app using mobile: removeApp followed by mobile: installApp.
driver.executeScript("mobile: clearApp", Map.of(
    "bundleId", "org.wdiodemoapp"
));
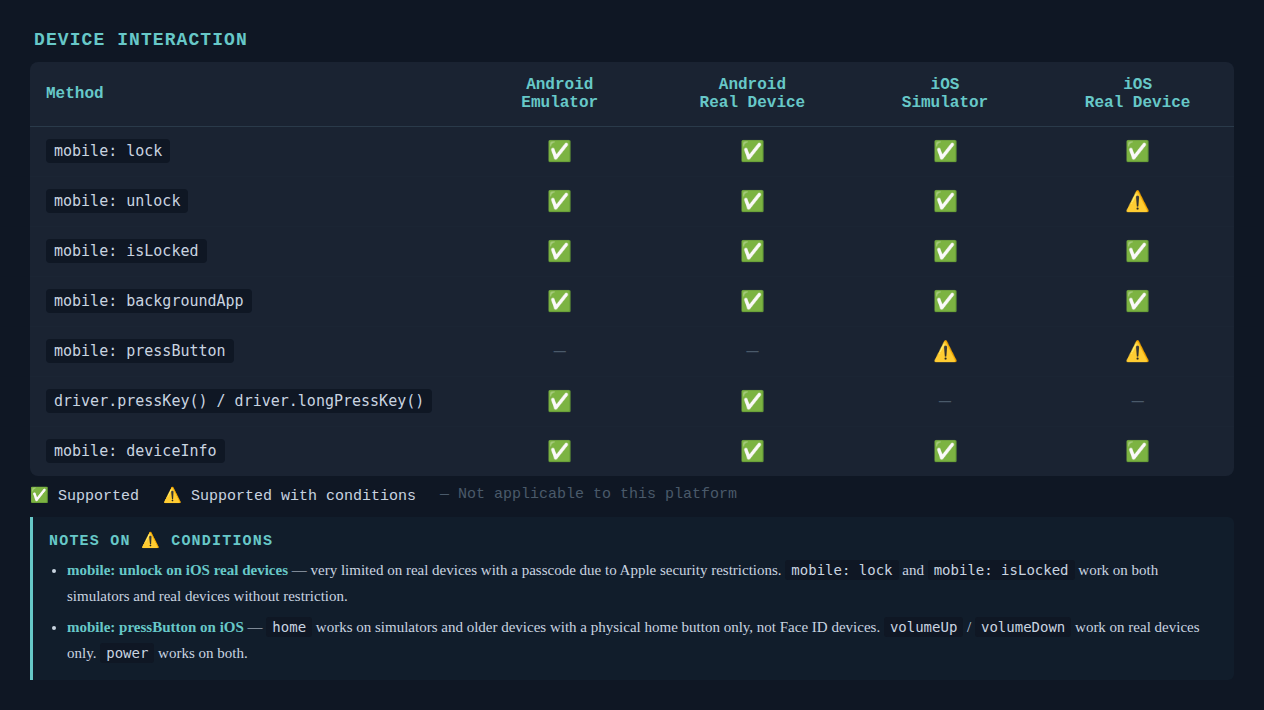
Category 3: Device Interaction
So far we've covered gestures and app lifecycle management. But sometimes you need to go a level deeper and interact with the device itself — locking the screen, pressing hardware buttons, sending the app to the background, or retrieving device information. These methods give you direct control over the device, independent of the app running on it.
3.1 Lock and Unlock
Mobile apps often behave differently depending on whether the device is locked. A banking app might log the user out, a media player might pause playback, or a notification might display sensitive information on the lock screen. These methods let you automate those scenarios.
🤝 Both — mobile: lock, mobile: unlock, mobile: isLocked
// Lock the device — Android
driver.executeScript("mobile: lock", Map.of());

// Lock the device — iOS
driver.executeScript("mobile: lock", Map.of());

// Check whether the device is currently locked — Android
boolean locked = (boolean) driver.executeScript("mobile: isLocked", Map.of());

// Check whether the device is currently locked — iOS
boolean locked = (boolean) driver.executeScript("mobile: isLocked", Map.of());

// Unlock — Android (specify lock type and key if the device has a PIN, pattern or password)
driver.executeScript("mobile: unlock", Map.of(
    "key", "1234",
    "type", "pin"
));

// Unlock — iOS (no arguments needed for simulator)
driver.executeScript("mobile: unlock", Map.of());
⚠️ Real device limitations:
Android —mobile: lockandmobile: isLockedwork reliably on both emulators and real devices.mobile: unlockalso works on real devices, but behaviour depends on the Android version and lock type. On Android 8+, the default strategy works well for most lock types. On older versions, or with certain configurations, it may not fully bypass the lock screen.
iOS —mobile: lockandmobile: isLockedwork on both simulators and real devices.mobile: unlockworks on simulators but is significantly limited on real devices — Apple's security restrictions mean Appium cannot programmatically bypass a passcode on a real device. If your tests rely on unlocking, run them on a simulator or use a device with no passcode set.
3.2 Background the App
Every mobile app eventually has to handle interruptions — a phone call coming in, a push notification appearing, or the user quickly switching to another app and coming back. This method lets you simulate exactly that, so you can verify your app behaves correctly when it's briefly pushed to the background.
🤝 Both — mobile: backgroundApp
Sends the app to the background for a specified number of seconds, then automatically brings it back to the foreground. Works on both emulators/simulators and real devices.
// Android
driver.executeScript("mobile: backgroundApp", Map.of(
    "seconds", 3
));

// iOS
driver.executeScript("mobile: backgroundApp", Map.of(
    "seconds", 3
));
💡 Tip: Thesecondsargument controls how long the app stays in the background. A value of3is enough to simulate most interruptions. If you pass-1, the app is sent to the background and deactivated entirely — it won't return on its own. You'll need to callmobile: activateAppmanually to bring it back to the foreground when you're ready.
3.3 Press Hardware Buttons
Sometimes a test needs to interact with the physical buttons on a device — navigating home, adjusting volume, or pressing power. The two platforms handle this quite differently, both in terms of the API and how it works under the hood.
🍎 iOS only — mobile: pressButton
On iOS, XCUITest provides a native pressButton() API which the XCUITest driver exposes as mobile: pressButton. Supported values are home, volumeUp, volumeDown, and power.
// Press the home button
driver.executeScript("mobile: pressButton", Map.of(
    "name", "home"
));

// Press volume up
driver.executeScript("mobile: pressButton", Map.of(
    "name", "volumeUp"
));

// Press the power button
driver.executeScript("mobile: pressButton", Map.of(
    "name", "power"
));
⚠️ Important: Not all buttons work in all environments:
home— works on simulators and older devices with a physical home button. Does not work on Face ID devices.volumeUp/volumeDown— work on real devices only. Despite simulators having virtual volume buttons, these cannot be automated via this method on a simulator.power— works on both simulators and real devices.
🤖 Android — driver.pressKey()
Android doesn't have a mobile: pressButton equivalent because hardware buttons work completely differently at the OS level. Instead of a native button press API like XCUITest, Android uses a KeyEvent system — every hardware button maps to a keycode. Appium exposes this through driver.pressKey() on the AndroidDriver.
// Volume up
((AndroidDriver) driver).pressKey(new KeyEvent(AndroidKey.VOLUME_UP));

// Volume down
((AndroidDriver) driver).pressKey(new KeyEvent(AndroidKey.VOLUME_DOWN));

// Home
((AndroidDriver) driver).pressKey(new KeyEvent(AndroidKey.HOME));

// Power — requires a long press rather than a simple tap
((AndroidDriver) driver).longPressKey(new KeyEvent(AndroidKey.POWER));
💡 Tip: The full list of available keycodes is in the Android KeyEvent documentation — there are hundreds of them, covering everything from media controls to keyboard keys.
3.4 Device Info
Sometimes you need to know more about the device your test is running on — its name, OS version, screen dimensions, or locale. This is useful for conditional logic in your tests, or simply for logging device details alongside test results.
🤝 Both — mobile: deviceInfo
Returns a map of device properties. The method takes no arguments on either platform.
// Android
Map<String, Object> info = (Map<String, Object>) driver.executeScript("mobile: deviceInfo", Map.of());

// iOS
Map<String, Object> info = (Map<String, Object>) driver.executeScript("mobile: deviceInfo", Map.of());
The properties returned differ between platforms. On iOS, the map includes entries such as:
name— the device nameosVersion— the iOS versionosBuildId— the OS build identifierlocale— the current device localetimeZone— the device timezonescreenSize— the screen dimensionsisSimulator— whether the session is running on a simulator
On Android, the map contains a different set of device properties covering things like API level, manufacturer, model, screen details, and network state. The full list of keys is defined in the UiAutomator2 server source code.
💡 Tip: The easiest way to explore what's available on your specific device is to call the method and log the full map during a test run — the keys and values will be printed directly in your test output.
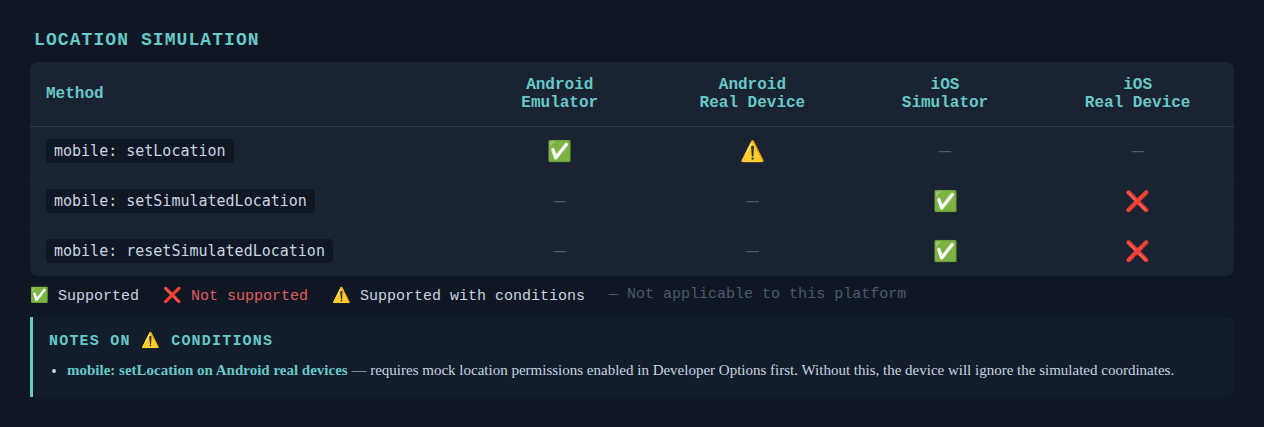
Category 4: Location Simulation
Many mobile apps behave differently depending on where the user is — showing nearby restaurants, tracking a delivery in real time, or triggering actions when a user enters or leaves a specific area. Testing these features properly means being able to place the device at any GPS coordinate without physically going there. That's exactly what these methods are for.
4.1 Set Location
Both drivers let you override the device's GPS position with any coordinates you choose — from that point on, the device behaves as if the user is physically at that location, and any location-aware features in your app will respond accordingly.
🤖 Android — mobile: setLocation
Sets a simulated GPS location on the device. You pass in a latitude and longitude — and optionally an altitude — and Android treats that as the device's current position. Appium immediately overrides the real GPS signal with the coordinates you provide.
driver.executeScript("mobile: setLocation", Map.of(
    "latitude", 48.8566,
    "longitude", 2.3522,
    "altitude", 35.0  // optional
));
🍎 iOS — mobile: setSimulatedLocation
Works the same way on iOS — you provide coordinates and the simulator treats them as the device's current position. Latitude and longitude are required; altitude is not supported on iOS.
driver.executeScript("mobile: setSimulatedLocation", Map.of(
    "latitude", 48.8566,
    "longitude", 2.3522
));
💡 Tip: Not sure which coordinates to use? Open Google Maps, right-click anywhere on the map, and the latitude and longitude will appear at the top of the context menu — ready to copy straight into your test.
4.2 Reset Location
Resetting the location after a test is important — a simulated position that persists into the next test can cause subtle, hard-to-diagnose failures. On iOS you need to handle this explicitly in teardown; on Android the session cleanup takes care of it for you.
🍎 iOS — mobile: resetSimulatedLocation
Clears the simulated location and restores the simulator to its default location behaviour.
driver.executeScript("mobile: resetSimulatedLocation", Map.of());🤖 Android — no reset method needed
Android doesn't have a dedicated reset location execute method. The simulated location is automatically cleared when the Appium session ends — so unlike iOS, you don't need to worry about it persisting across test runs.
⚠️ Platform differences:
- iOS —
mobile: setSimulatedLocationuses a simulator-level API that doesn't exist on real devices. If you need to simulate a location on a real iOS device, it has to be done through a GPX file loaded via Xcode — Appium cannot do this directly. - Android — location simulation works on both emulators and real devices via ADB. On real devices, you first need to enable mock location permissions in Developer Options, otherwise the device will ignore the simulated coordinates.
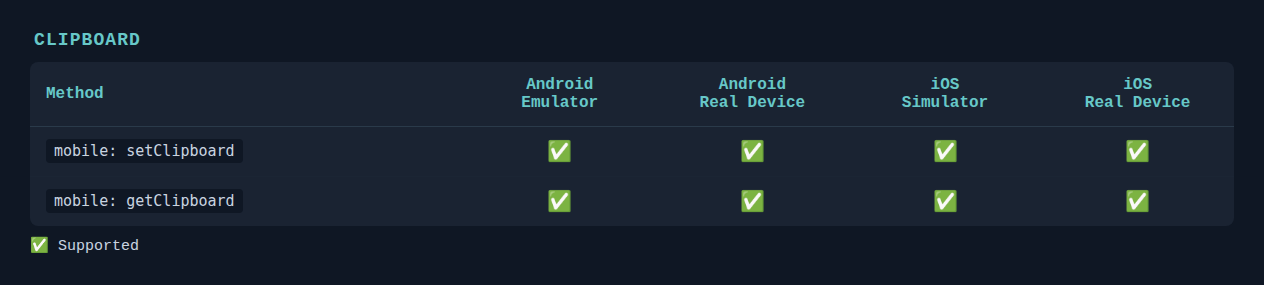
Category 5: Clipboard
Many apps let users copy things — account numbers, confirmation codes, referral links, invite tokens. Testing that the right content ends up on the clipboard, or that your app correctly reads from it, is more common than it might seem.
5.1 Set and Read Clipboard
These two methods let you write content to the device clipboard and read it back. Use them to verify that your app correctly copies content, or to pre-populate the clipboard before testing a paste interaction.
🤝 Both — mobile: setClipboard / mobile: getClipboard
The method names and arguments are the same on both platforms — but there's one important difference in how iOS handles the content.
Android works with plain strings directly:
// Write to clipboard
driver.executeScript("mobile: setClipboard", Map.of(
    "content", "test-promo-code",
    "contentType", "plaintext"
));

// Read from clipboard
String content = (String) driver.executeScript("mobile: getClipboard", Map.of(
    "contentType", "plaintext"
));
iOS requires content to be base64 encoded before setting, and returns base64 encoded content when reading — so you need to encode before writing and decode after reading:
// Write to clipboard — encode first
driver.executeScript("mobile: setClipboard", Map.of(
    "content", Base64.getEncoder().encodeToString("test-promo-code".getBytes()),
    "contentType", "plaintext"
));

// Read from clipboard — decode after
String encoded = (String) driver.executeScript("mobile: getClipboard", Map.of(
    "contentType", "plaintext"
));
String content = new String(Base64.getDecoder().decode(encoded));
⚠️ Important: The base64 requirement on iOS is easy to miss. Thecontentfield inmobile: setClipboardon iOS expects a base64-encoded string — if you pass plain text instead, the content will be stored incorrectly and you won't get back what you expect when reading it. Similarly, if you forget to decode after reading, you'll get back a raw base64 string likedGVzdC1wcm9tby1jb2Rlinstead of the actual valuetest-promo-code— your assertion will fail even though the clipboard content is technically correct. Android has no such requirement and works with plain strings directly.
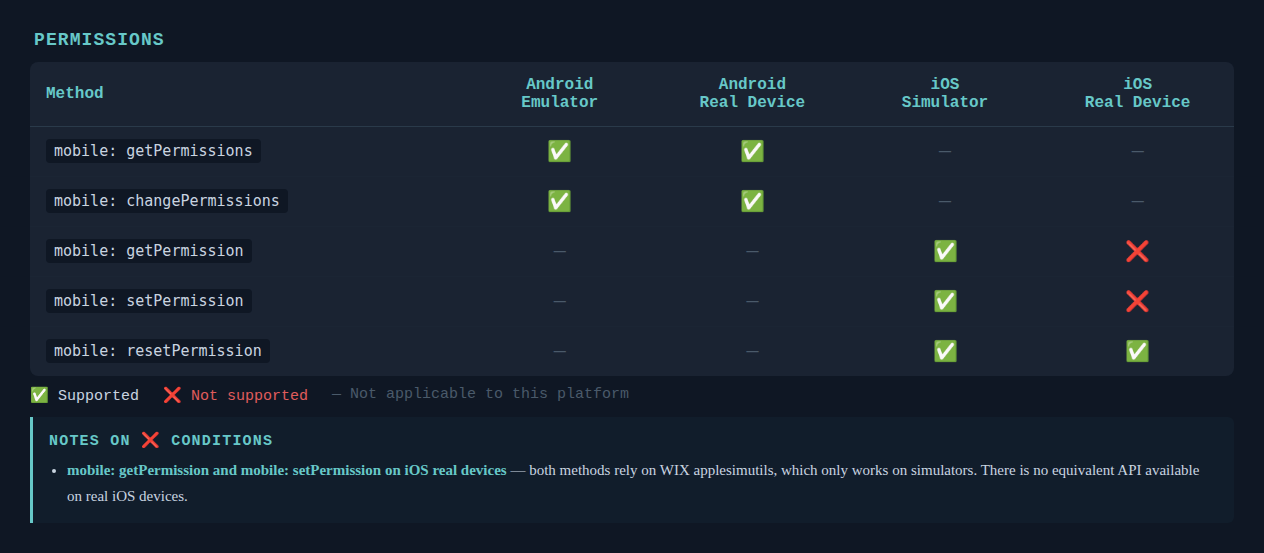
Category 6: Permissions
Handling permissions is one of the most common challenges in mobile test automation. Apps request access to the camera, location, microphone, contacts, and more — and your tests need to control exactly what's granted, denied, or reset. The two platforms approach this quite differently.
6.1 Get, Set and Reset Permissions
Rather than granting everything at session start, these methods let you control permissions one at a time — useful when you need to test how your app behaves when a specific permission is denied, or when you want the system permission dialog to appear during a test.
🤖 Android — mobile: getPermissions, mobile: changePermissions
Both methods work on emulators and real devices. On Android, the autoGrantPermissions capability covered in the previous article handles the most common case — granting all permissions automatically at session start. When you need more control during a test, UiAutomator2 exposes two execute methods: mobile: getPermissions to check permission state, and mobile: changePermissions to grant or revoke permissions.
mobile: getPermissions returns the list of permissions for a specific app, filtered by type. The type argument accepts three values — and the difference between them is easy to confuse:
"granted"— permissions the user has already approved. The app can use these features right now."denied"— permissions the user has explicitly refused. The app cannot use these features."requested"— every permission declared in the app's manifest, regardless of whether it has been granted or denied yet. Think of it as the full list of permissions the app could ever ask for — it includes granted, denied, and not-yet-asked ones.
// Get all currently granted permissions
Map<String, Object> permissions = (Map<String, Object>) driver.executeScript(
    "mobile: getPermissions", Map.of(
        "appPackage", "com.wdiodemoapp",
        "type", "granted"
));

// Grant a permission
driver.executeScript("mobile: changePermissions", Map.of(
    "appPackage", "com.wdiodemoapp",
    "permissions", List.of("android.permission.CAMERA"),
    "action", "grant"
));

// Revoke a permission
driver.executeScript("mobile: changePermissions", Map.of(
    "appPackage", "com.wdiodemoapp",
    "permissions", List.of("android.permission.CAMERA"),
    "action", "revoke"
));
🍎 iOS — mobile: getPermission, mobile: setPermission, mobile: resetPermission
iOS gives you three dedicated execute methods — but their real device support varies, so it's worth knowing the difference up front.
mobile: getPermission checks the current authorization status for a specific permission. Returns one of four values: "yes" (granted), "no" (denied), "unset" (never asked), or "limited" (partial access, such as selected photos only). Simulator only.
String status = (String) driver.executeScript("mobile: getPermission", Map.of(
    "bundleId", "org.wdiodemoapp",
    "service", "camera"
));
// Returns: "yes", "no", "unset", "limited"
mobile: setPermission sets a specific permission to any state you choose — pass "yes" to grant it, "no" to deny it, or "unset" to clear it back to its initial state. Simulator only. Both mobile: getPermission and mobile: setPermission require WIX applesimutils — a third-party command-line tool that fills a gap Apple's own APIs don't cover. Without it, both methods will fail. Install it once on the Mac running Appium:
brew tap wix/brew && brew install wix/brew/applesimutilsdriver.executeScript("mobile: setPermission", Map.of(
"bundleId", "org.wdiodemoapp",
"access", Map.of("camera", "yes")
));mobile: resetPermission resets a permission back to its unset state — as if the app had never requested it. The next time the app tries to use that feature, the system permission dialog will appear again. Works on both simulators and real devices (Xcode SDK 11.4+).
driver.executeScript("mobile: resetPermission", Map.of(
    "bundleId", "org.wdiodemoapp",
    "service", "camera"
));
💡 Tip:mobile: setPermissionon iOS andmobile: changePermissionson Android are much more surgical thanautoGrantPermissions— which grants all permissions at session start. Use them when you need to test the permission request dialog itself, verify your app handles a denied permission gracefully, or reset a permission so the dialog appears again on the next app launch.
What's Not Covered Here
This article focuses on the execute methods you'll reach for most often in real test suites. Both drivers expose many more for specialized scenarios — and they're worth knowing exist, even if you don't need them today.
On iOS, the XCUITest driver covers things like biometric simulation (mobile: enrollBiometric, mobile: sendBiometricMatch), deep link navigation (mobile: deepLink), system alert handling (mobile: alert), and performance recording. The complete list is in the XCUITest execute methods reference.
On Android, the UiAutomator2 driver has additional gesture methods beyond what's covered here, plus emulator-specific commands like console interaction and sensor simulation. The complete list is in the UiAutomator2 execute methods reference.
💡 Tip: When you hit a scenario that feels like it should be automatable but you're not sure how, the official docs are the first place to look — both drivers are actively maintained and the lists grow with each release.
💡 Note: Each section includes its own support table inline. If you'd prefer a single reference you can print or keep open while working, a combined PDF of all tables is attached at the bottom of this article.
What's Next
You now have a solid grounding in the two foundational concepts that underpin real Appium test work: capabilities and execute methods. Together, they give you the vocabulary and the tools to talk to a device, control an app, and simulate the kind of interactions real users have.
That's enough groundwork. It's time to write actual tests.
In the next article, we'll build our first Appium test from scratch — setting up the project structure, configuring the session with UiAutomator2Options and XCUITestOptions, and writing a real test against the WebDriverIO demo app on both Android and iOS. By the end, you'll have a working test you actually understand, not just one that runs.


Discussion