
In the previous guide, we explored every panel and feature of Appium Inspector in detail. At one point, we briefly encountered the Search for Element feature — which asks you to pick a locator strategy and provide a selector string before it can find an element. If you weren't sure what to pick at that point, this article is for you.
If you haven’t read the previous article yet, I highly recommend starting there:

Choosing the right locator strategy is one of the most important decisions you'll make in mobile test automation. A poor choice leads to tests that are slow, brittle, and break every time the UI changes. A good choice leads to tests that are fast, reliable, and easy to maintain over time.
In this guide, we'll cover the most important locator strategies available for the UiAutomator2 driver (Android) and the XCUITest driver (iOS). We’ll break down the strengths and trade-offs of each approach, and give you clear, practical guidance on when to use each one.
What Is a Locator Strategy?
A locator strategy is the method Appium uses to find a UI element in your app. When you write an automation script, you tell Appium two things:
- How to search –> the locator strategy (e.g. Accessibility ID, XPath, ID)
- What to search for —> the selector value (e.g.
"login_button","//android.widget.Button[@text='Login']")
Together, these two pieces of information allow Appium to locate the exact element you want to interact with.
Different strategies work differently under the hood — some are fast and direct, others are flexible but slow. Understanding the trade-offs helps you write tests that are both reliable and performant.
✅ Tip: In Appium Inspector, you can use the Search for Element feature to test any locator strategy and selector value before writing a single line of code. Always verify your locators in Inspector first – it will save you lot of debugging time later.
Locator Strategies for UiAutomator2 (Android)
The UiAutomator2 driver is the automation engine used by Appium for Android. It supports several locator strategies.
Let's start with one of the most important:
1.Accessibility ID
Accessibility ID maps to the content-desc attribute of an Android element. This value comes from the contentDescription property in the Android codebase and is primarily designed to support accessibility tools like screen readers (e.g. TalkBack).
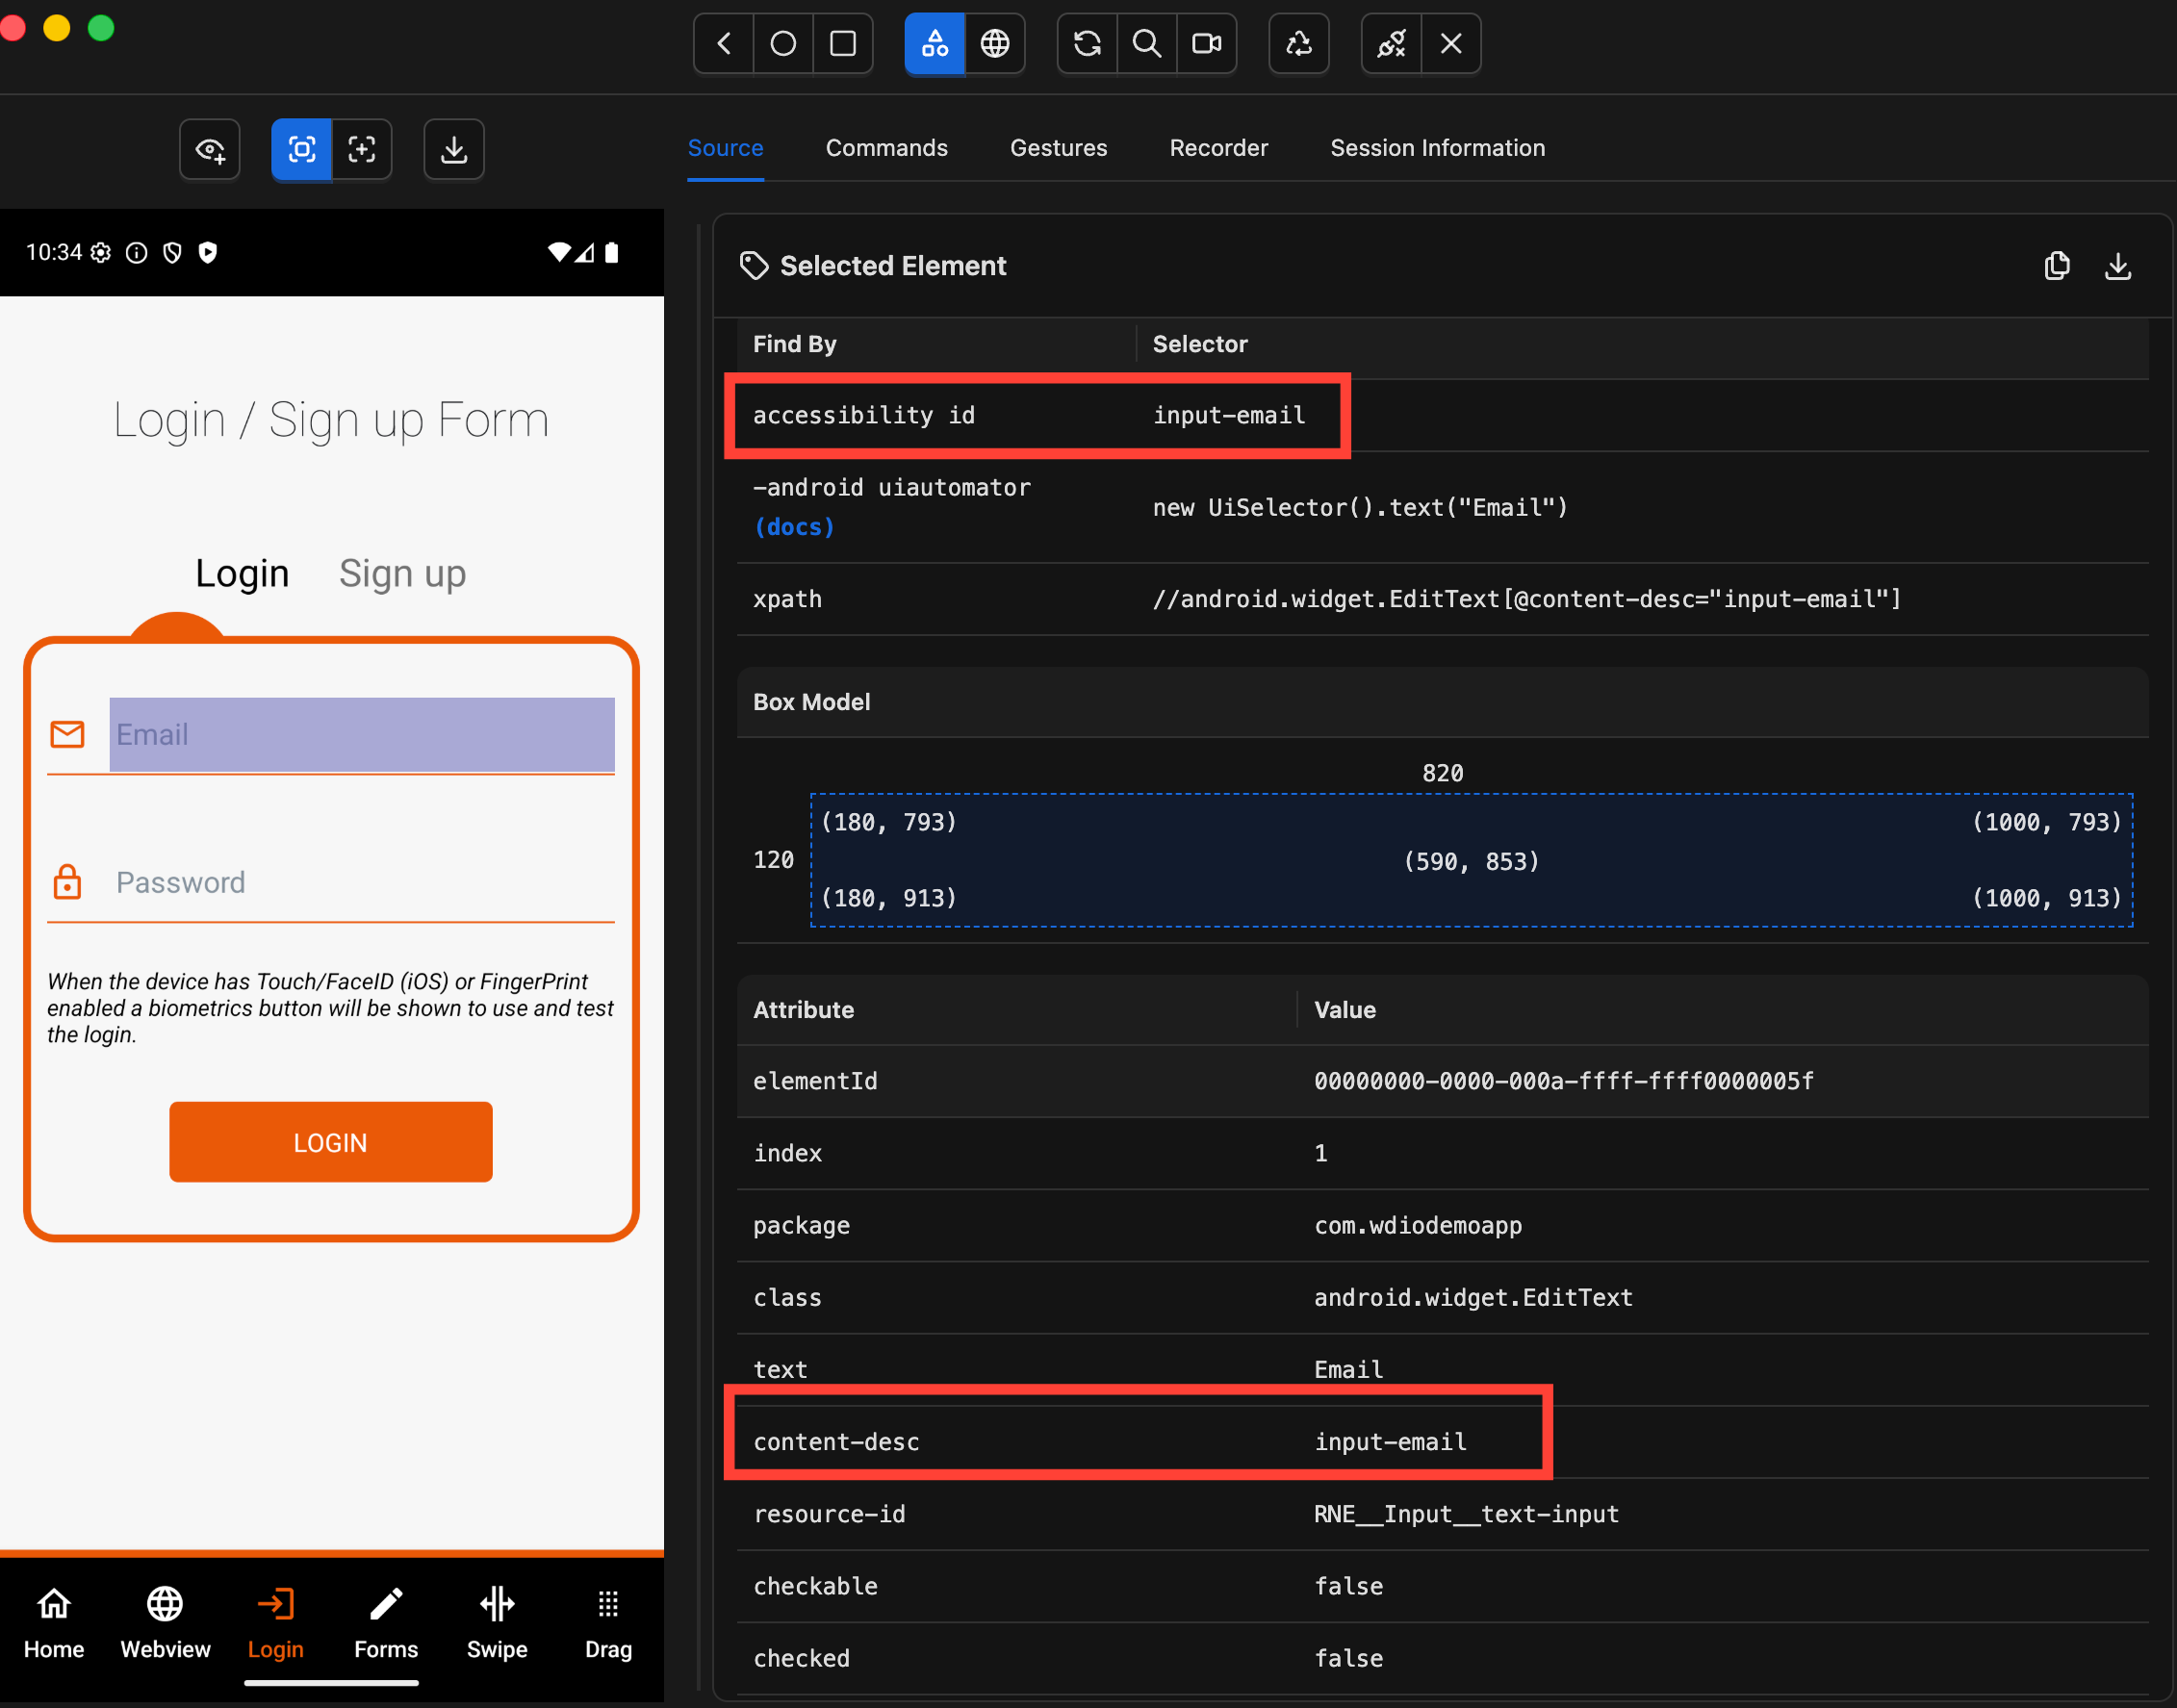
✅ Benefits:
- Fast — resolved through a direct attribute lookup (no XML parsing required)
- Stable across Android versions
- Human-readable — easy to understand and maintain
- Cross-platform — the same strategy works on iOS (mapped to the
accessibilityLabelattribute), making it ideal for shared test logic between Android and iOS
👍 When to use it?
Use Accessibility ID when:
- The element has a
content-descvalue defined - You’re aiming for cross-platform tests (Android + iOS)
⚠️ When to avoid it?
Be careful when relying on Accessibility ID for long-term stability.
On Android, content-desc is user-facing text read aloud by accessibility services like TalkBack. Because of this, it’s often owned by product, UX, or localization teams — not just developers.
That means it can change:
- During copy updates
- Localization (translations)
- A/B testing or UX experiments
👉 And importantly, these changes can happen without any code refactor, which can break your tests unexpectedly.
2.ID (Resource ID)
The ID strategy uses the resource-id attribute of an Android element. This value is generated from the android:id="@+id/..." defined in the app’s layout XML.
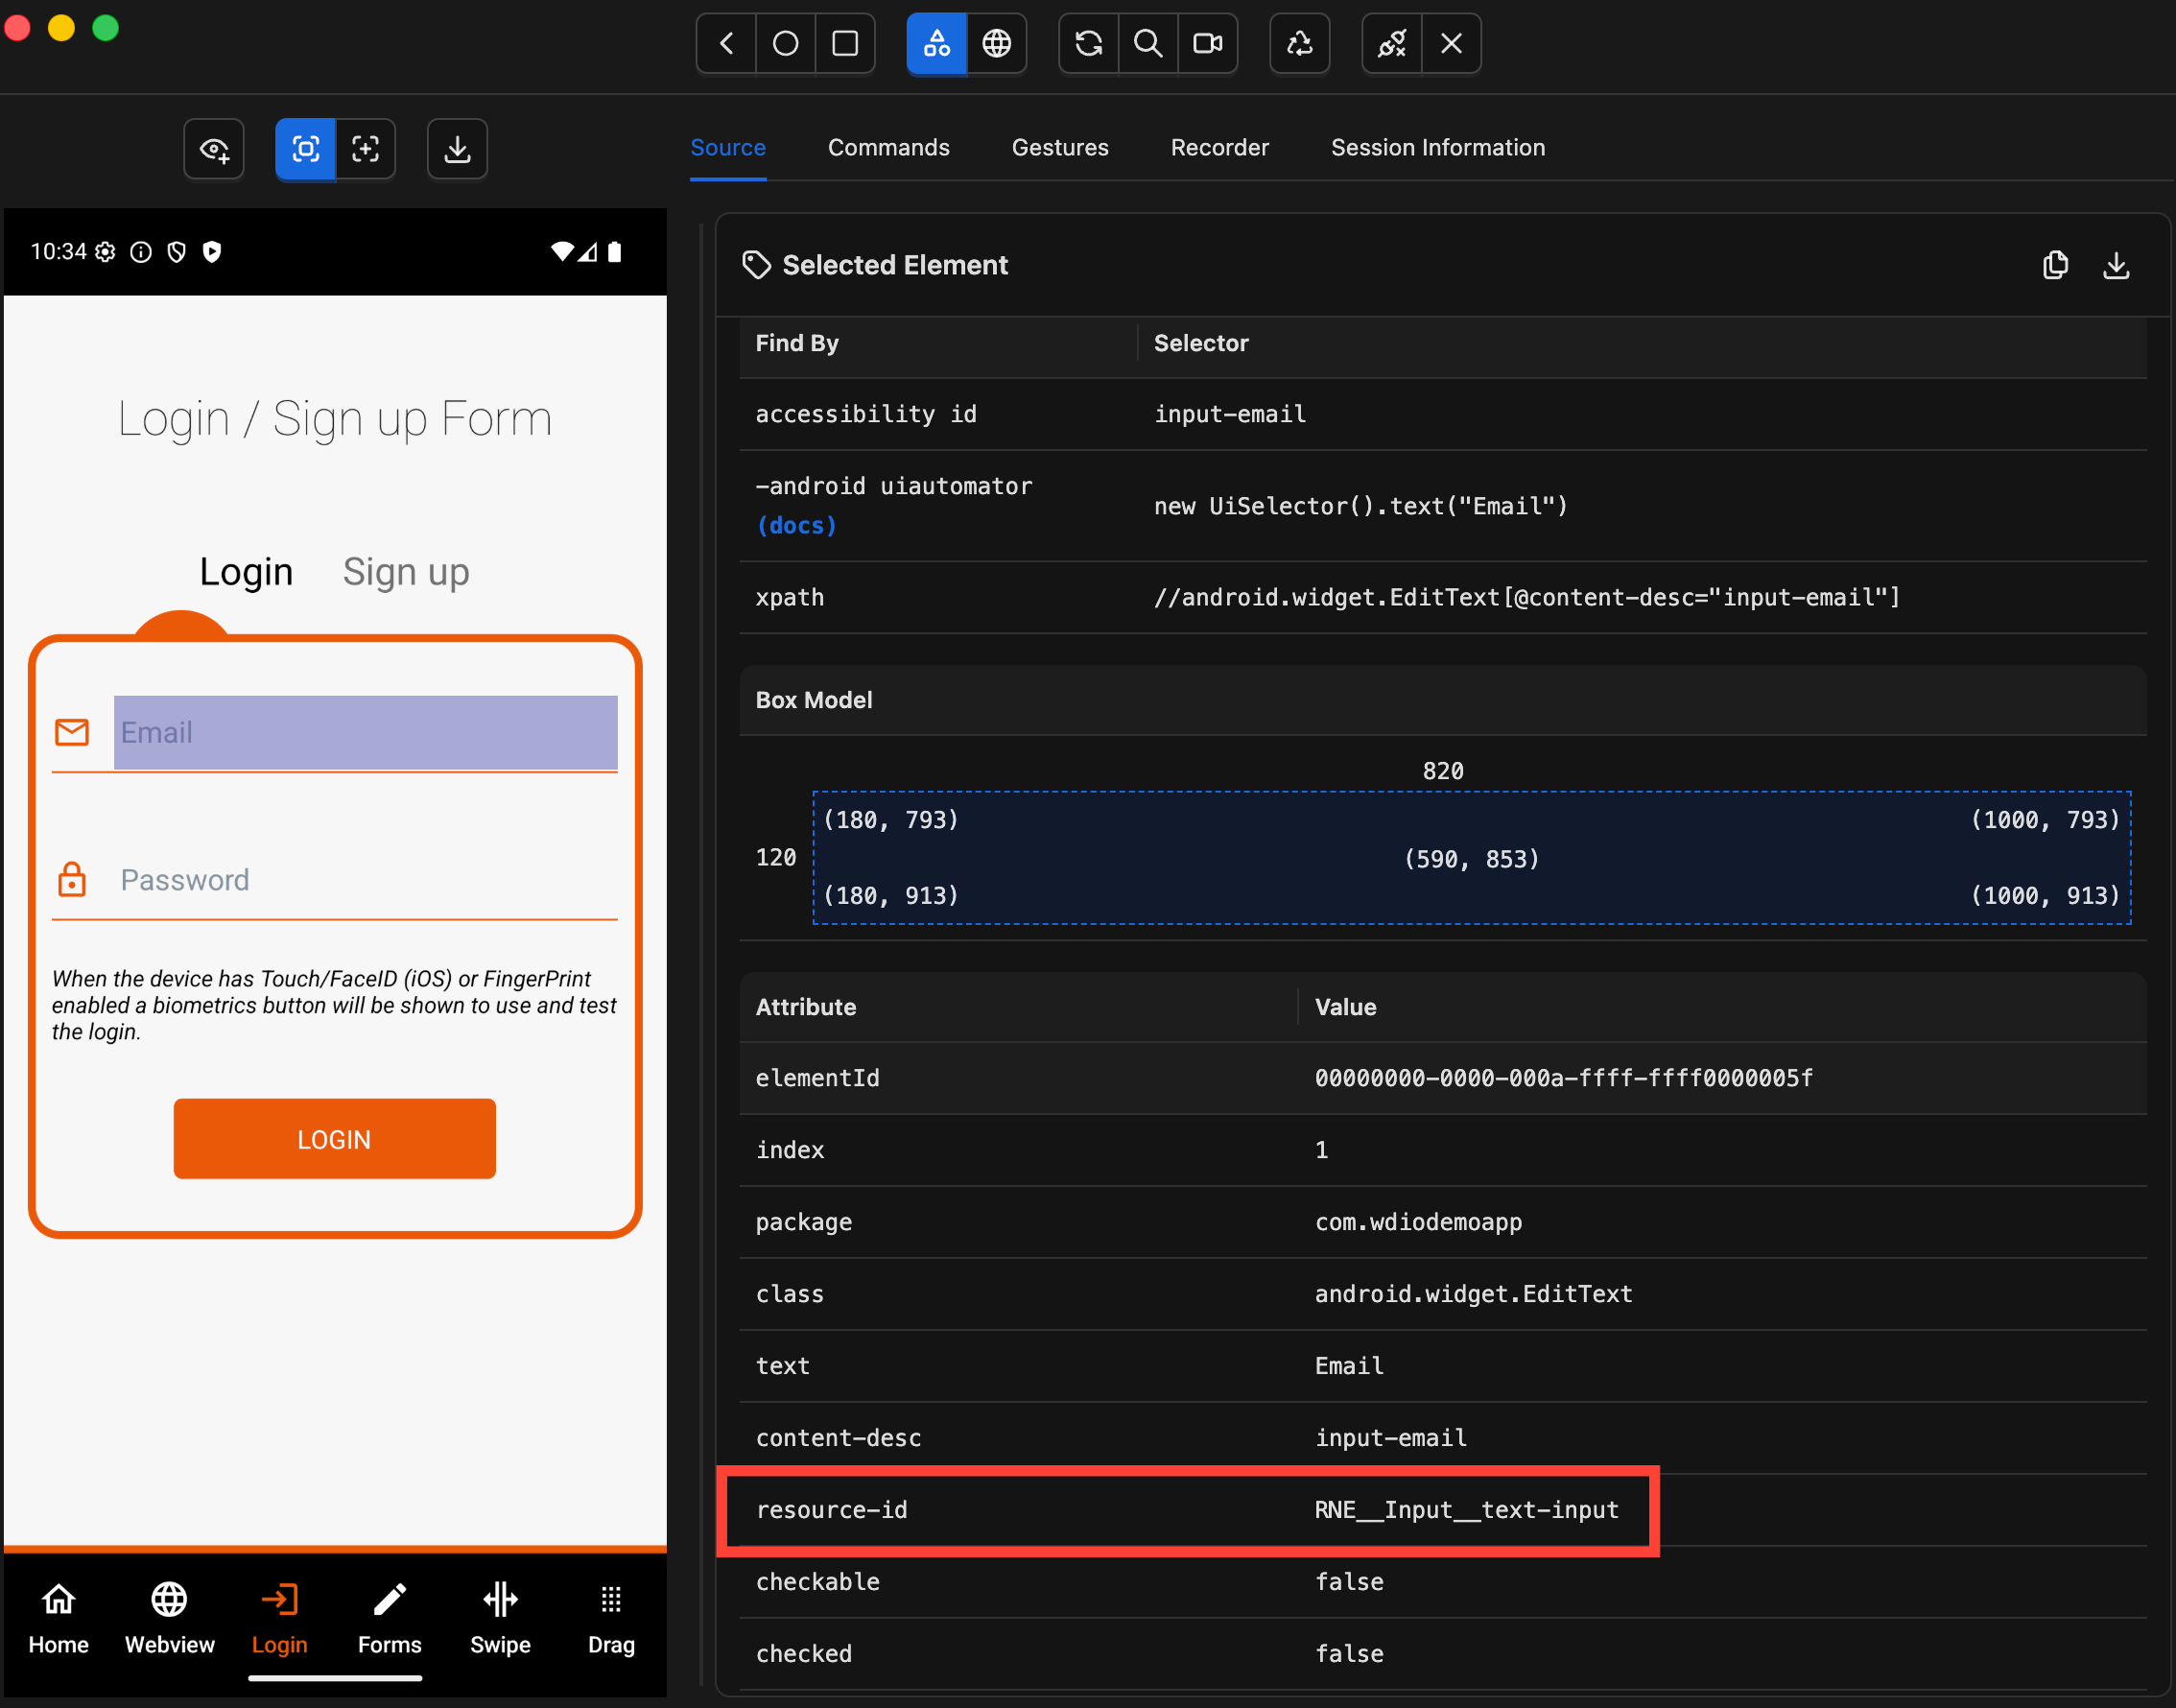
✅ Benefits:
- Fast — resolved through a direct attribute lookup (no XML parsing required)
- Highly stable — the
resource-idis defined by developers in code and is not visible to users - Predictable changes — it only changes when a developer explicitly renames or removes it during a refactor
👍 When to use it?
Use the ID strategy as your first choice for Android-only tests.
It is typically the most stable and reliable locator available on Android, especially for long-term test suites.
⚠️ When to avoid it?
The ID strategy is Android-only — it does not work with the XCUITest driver on iOS. If you need a single locator that works across both platforms, prefer Accessibility ID.
Note: However, this doesn’t mean you can’t use ID in a cross-platform test suite.
👉 Platform-specific annotations such as@AndroidFindByand@iOSXCUITFindByallow you to use different locator strategies for each platform while maintaining a shared test architecture. This pattern will be covered in detail in a dedicated article later in the series.
3.UIAutomator (Android Only)
The UIAutomator strategy lets you write locators using Android’s native UIAutomator API — primarily through the UiSelector and UiScrollable classes.
It’s exclusive to the UiAutomator2 driver and is not available on iOS.
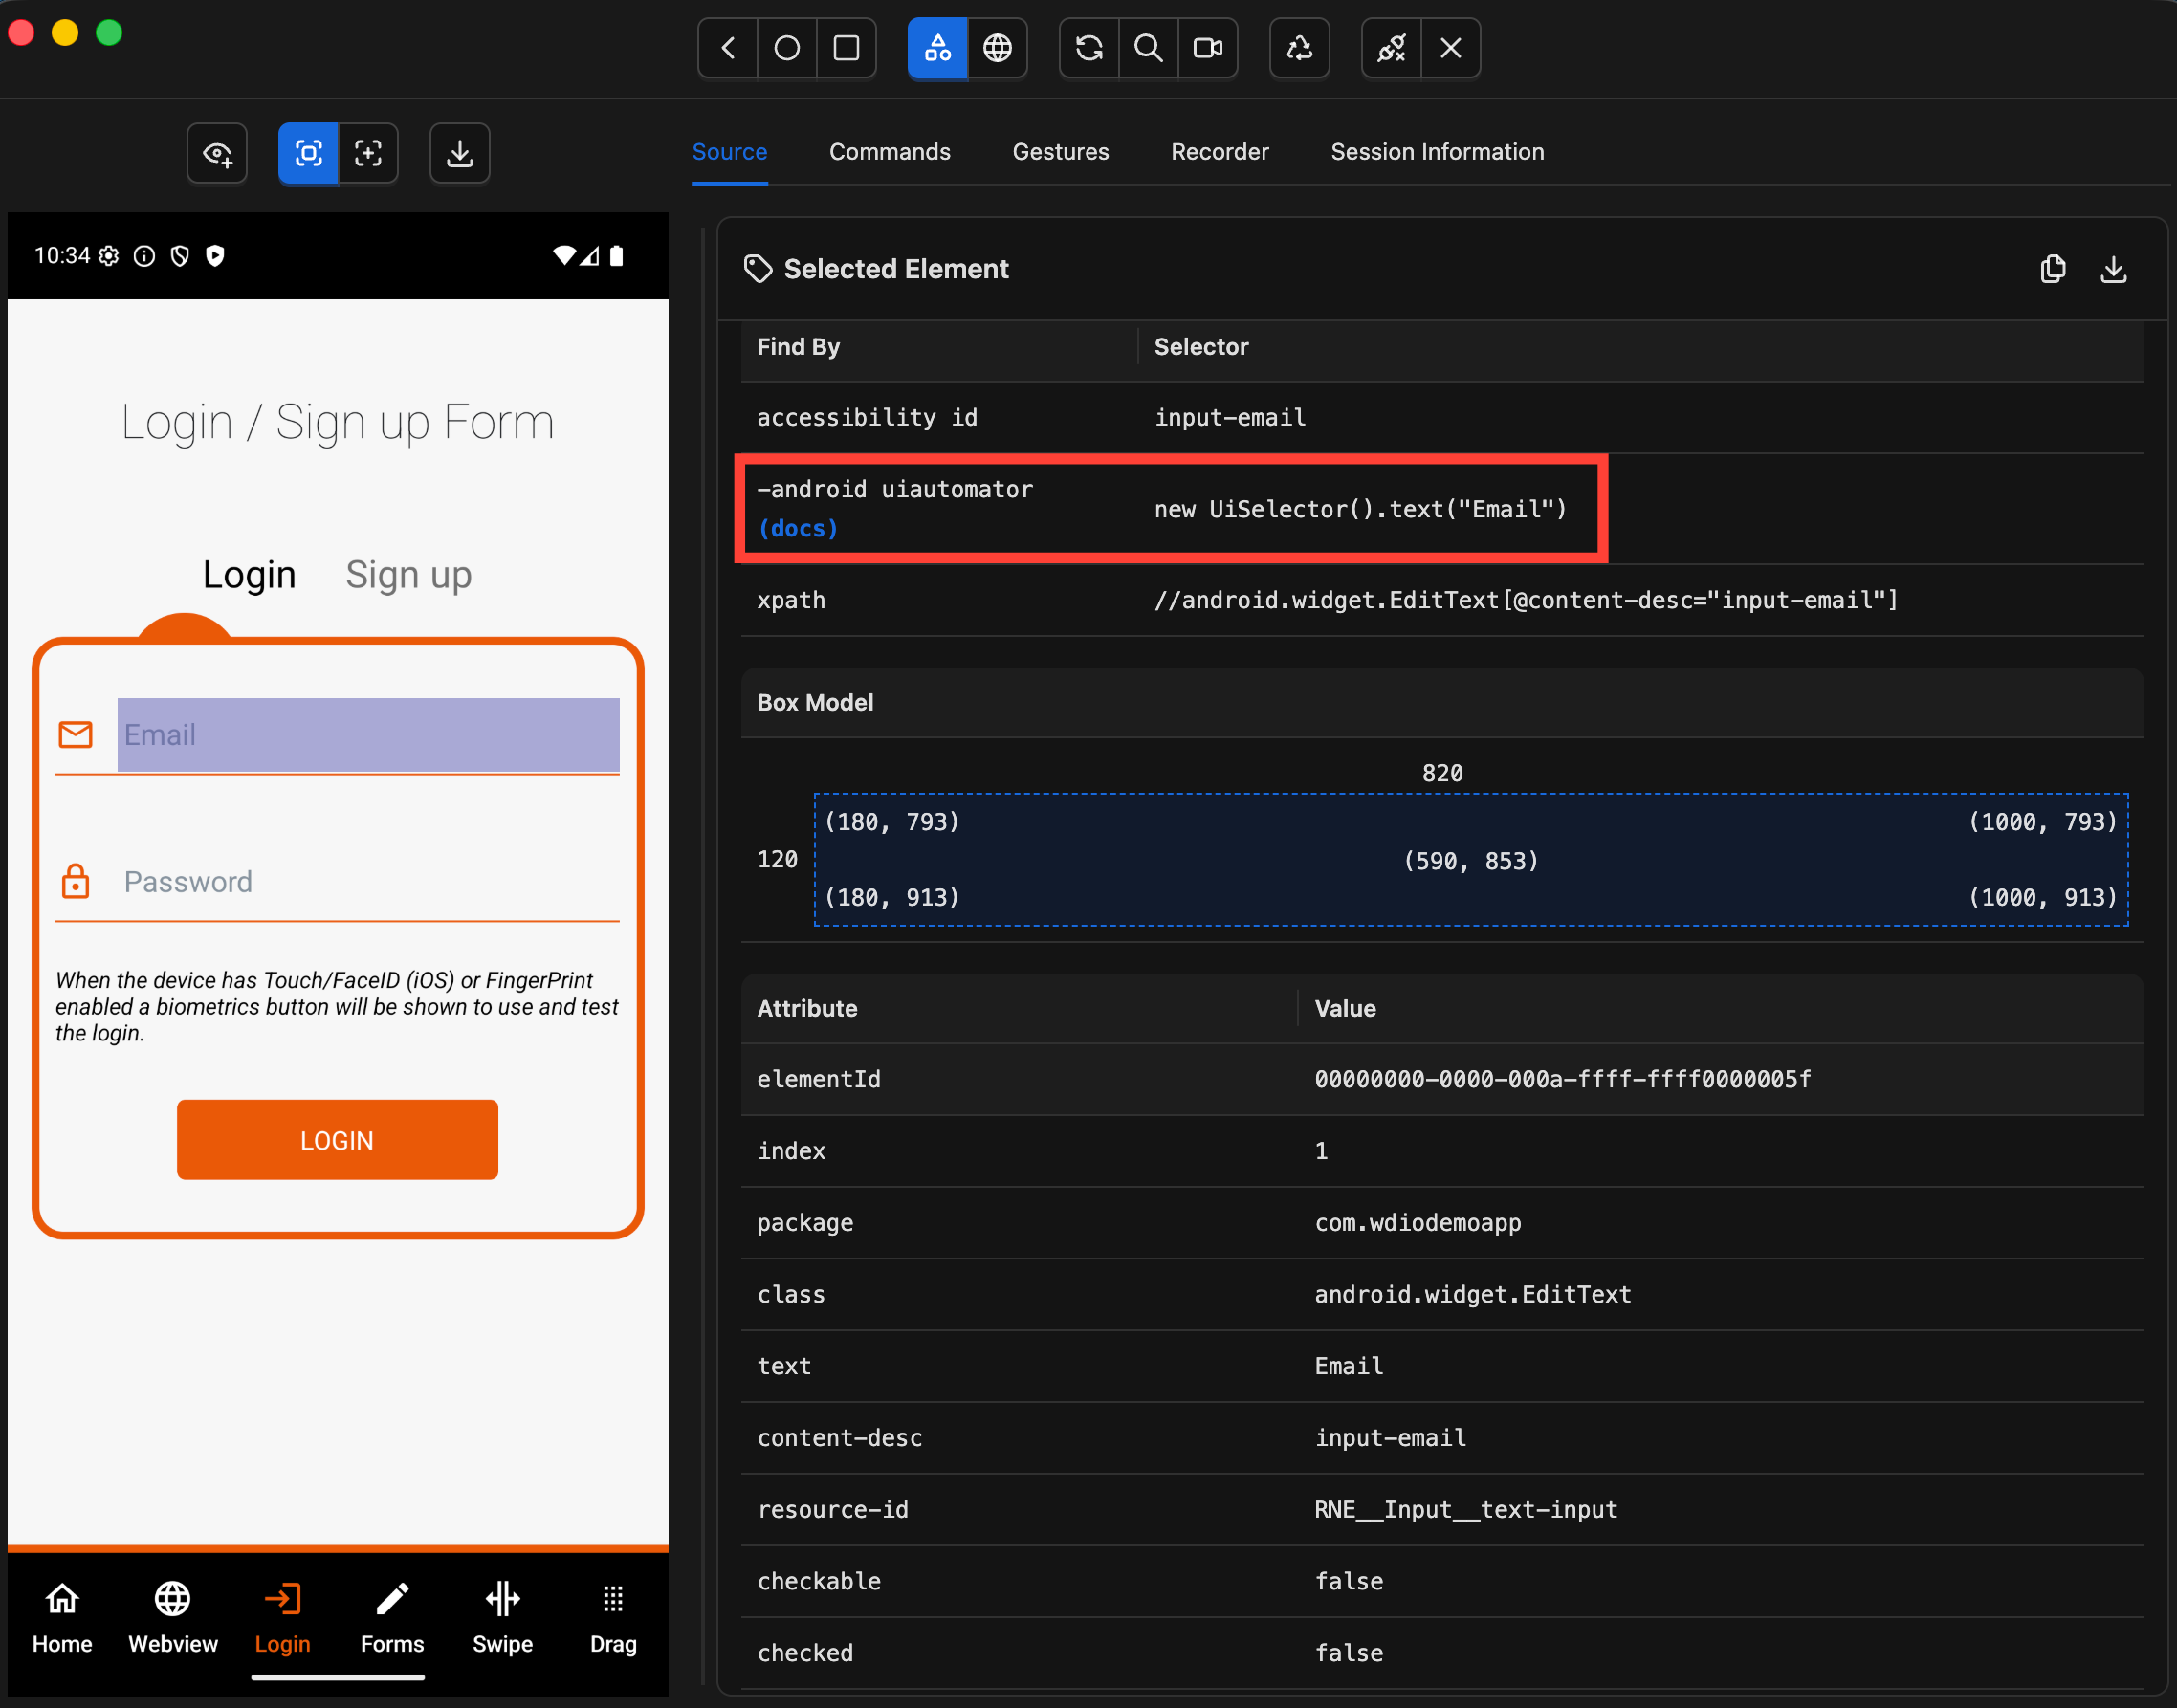
✅ Benefits:
- Very powerful — gives you direct access to the full UIAutomator API
- Built-in scrolling — can locate off-screen elements in a single native call
- Flexible matching — combine conditions like text, content description, class name, and more
- High performance in complex cases — the entire query is executed natively on the device, avoiding multiple Appium round-trips. In advanced scenarios, this can even outperform simpler strategies like ID or Accessibility ID.
👍 When to use it?
Use UIAutomator when you need to:
- Scroll to an element that isn’t visible on screen
- Match elements using partial text or multiple conditions
- Build complex parent/child relationships
- Replace XPath with a more performant, native alternative
⚠️ When to avoid it?
This strategy is Android-only. If your test suite runs on both platforms, you will need platform-specific logic. UIAutomator selectors can also be verbose — use it where it adds real value, not as a default.
4.XPath
XPath is a query language used to navigate the XML representation of your app’s UI. It allows you to locate elements based on their attributes, position in the hierarchy, or relationships to other elements.
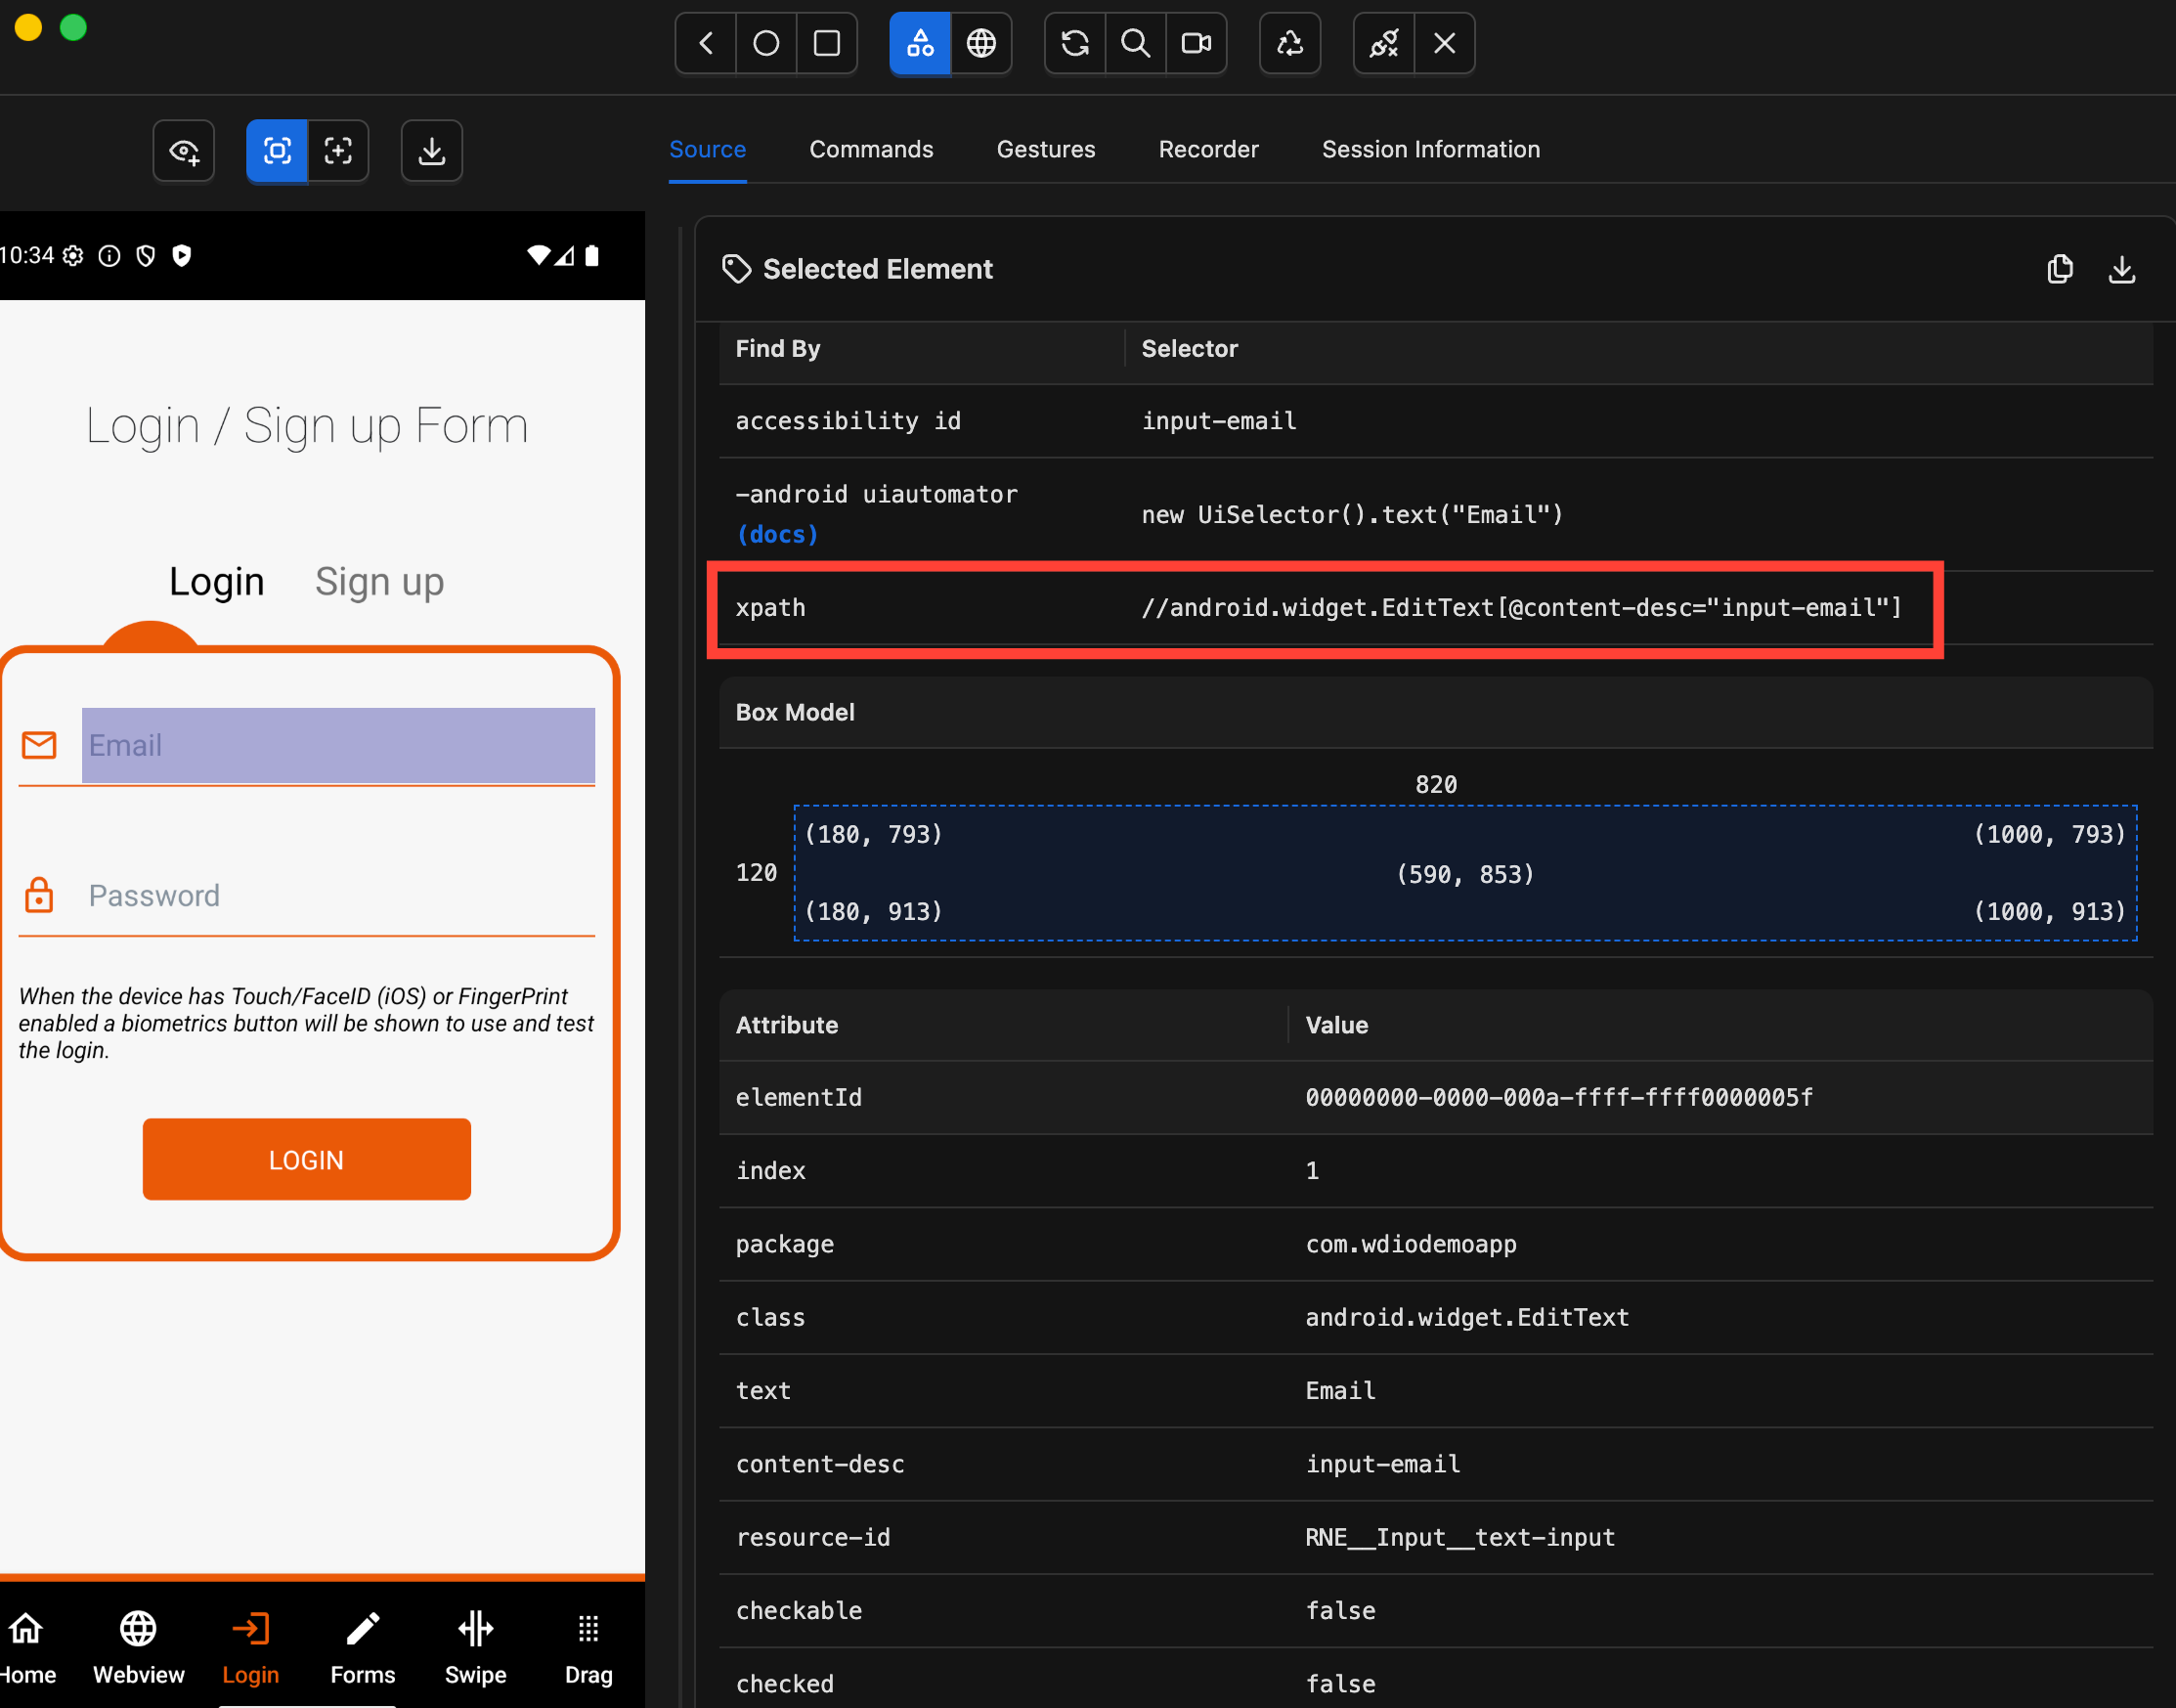
👍 When to use it?
Use XPath only as a last resort — when no other locator strategy (like ID or Accessibility ID) is available.
⚠️ When to avoid it?
XPath is the slowest and most fragile locator strategy.
- Performance cost
Every time you callfindElement(), Appium must:- 1. Serialize the entire UI hierarchy into XML
- 2. Send it to the Appium server
- 3. Parse it into a DOM
- 4. Traverse it to find your element
And this happens on every single call, with no caching.
On a screen with ~200 elements, that’s a full XML build and traversal each time.
In a test suite with dozens of lookups, XPath can easily add 30–60+ seconds compared to faster strategies like ID or Accessibility ID.
- High fragility
XPath is tightly coupled to the UI structure. Even small layout changes can break your locators.
Avoid XPath expressions that rely on:
- Element indexes →
//button[1] - Deep hierarchy paths → long chains like
/hierarchy/android.widget.FrameLayout/...
These are extremely brittle and will break as soon as the UI changes.
🚨 Warning: If you find yourself relying heavily on XPath, it’s usually a sign that your app is missing: Stable resource IDs, or Proper accessibility labels – In that case, raise it with your development team. Fixing the app’s testability will save far more time than working around it with XPath.
Performance Comparison
The key distinction between fast and slow strategies on Android is whether the lookup happens natively inside the Android process or requires XML serialization.
- Fast strategies (
ID,Accessibility ID) ask Android directly for the element
→ no XML, no full hierarchy traversal - UIAutomator is slightly slower than ID/Accessibility ID for simple visible-element lookups, but becomes the fastest strategy when scrolling is involved — it can scroll and search in a single native call without any round trips. It's also the best choice for complex multi-attribute queries.
- XPath does the opposite — it forces a full UI dump and traversal on every single lookup
| Strategy | Serialization? | Speed | Reliability |
|---|---|---|---|
| Accessibility ID | ❌ No | ⚡ Fast | ✅ High |
| ID (Resource ID) | ❌ No | ⚡ Fast | ✅ Highest |
| UiAutomator | ❌ No | ⚡ Fast* | ✅ High |
| XPath | ✅ Every call | 🐢 Slowest | ⚠️ Fragile |
*Why UIAutomator can be faster in some cases?
For simple lookups of visible elements, ID and Accessibility ID are actually faster than UIAutomator — they resolve with a direct single-attribute match against the in-memory tree, with minimal overhead.
UIAutomator works differently — the entire expression is compiled and executed on-device with no intermediate round-trips. This makes it faster in two specific scenarios:
Complex queries — where ID or Accessibility ID would require multiple round-trips to chain conditions, UIAutomator evaluates the whole expression natively in one call.
Scrolling — this is where the difference is most visible. With id or accessibility id, Appium has to scroll a little, re-query the screen, check if the element is visible, and repeat — one round-trip per scroll step. With UiScrollable.scrollIntoView(), the entire scroll-and-find loop runs on-device in a single call, making it significantly faster for these scenarios.
Locator Strategies for XCUITest (IOS)
The XCUITest driver is the automation engine Appium uses for iOS applications. It supports several locator strategies and the most important ones are:
1.Accessibility ID
On iOS, Accessibility ID maps to the element’s accessibilityLabel — the text read aloud by VoiceOver. It is primarily designed for accessibility support and is either set explicitly by developers or derived from UI text.
✅ Benefits:
- Fast — direct attribute lookup with no XML or UI serialization
- Cross-platform — can be reused on Android (mapped to
content-desc), making it ideal for shared test logic
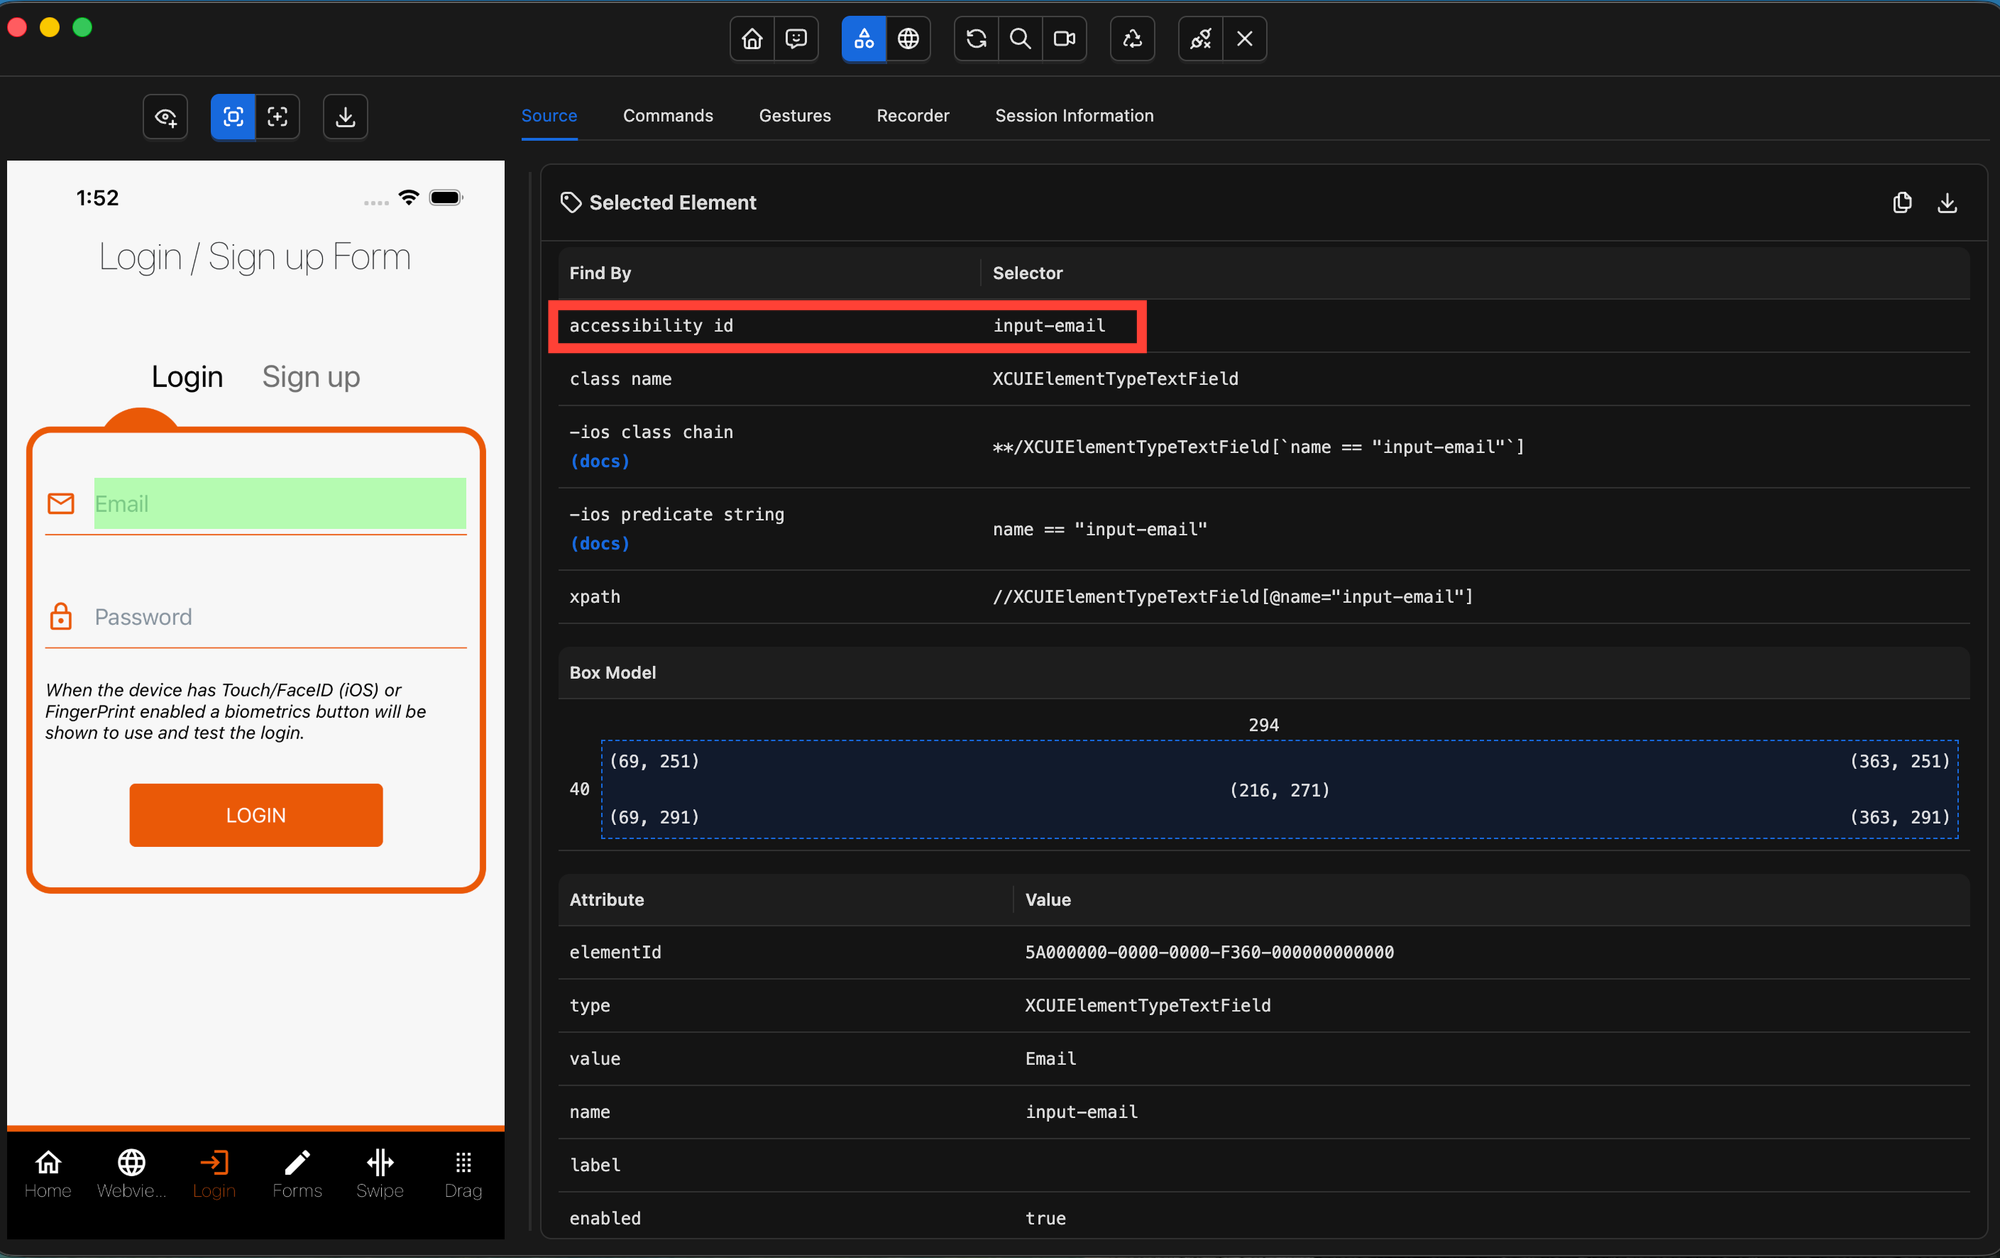
💡 Appium Inspector note: When you inspect an iOS element in Appium Inspector, this value appears under the accessibility id attribute in the Element Attributes panel.👍 When to use it?
Use Accessibility ID on iOS when:
- A stable identifier is not available via
accessibilityIdentifier - You need a cross-platform locator shared between iOS and Android
⚠️ When to avoid it?
Be careful when the Accessibility ID reflects natural language UI text, such as:
- “Skip”
- “Log in”
- “Continue to next step”
These values are often:
- Owned by UX or product teams
- Subject to copy changes, A/B tests, or localization updates
- Not intended as stable automation hooks
This means your tests can break without any code changes
When possible, prefer accessibilityIdentifier (used via the ID strategy) instead.
- It is explicitly designed for automation
- It is not user-facing
- It is not changed by copy or UX updates
In practice, this makes it significantly more stable than Accessibility ID for long-term test suites.
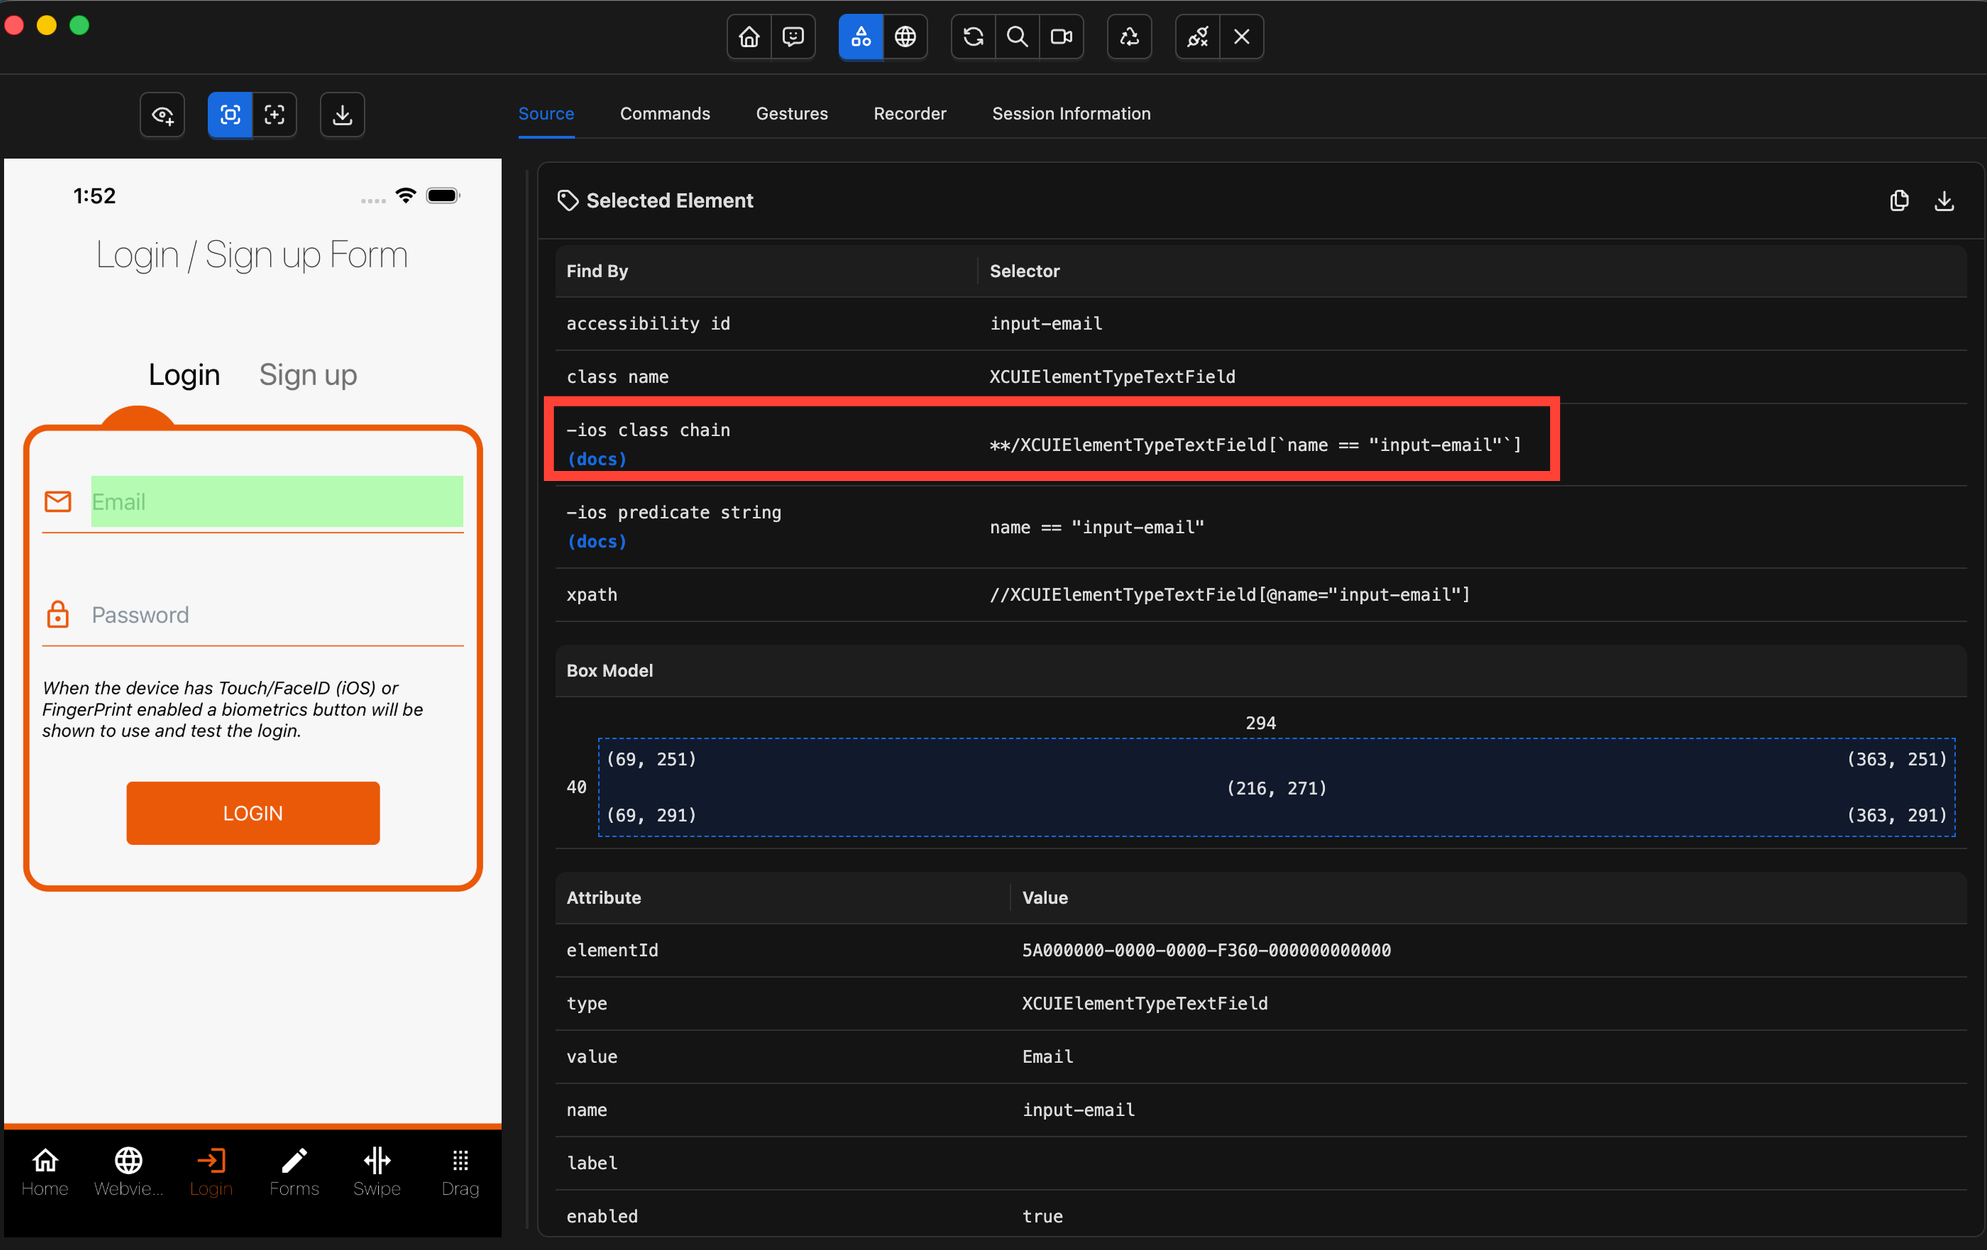
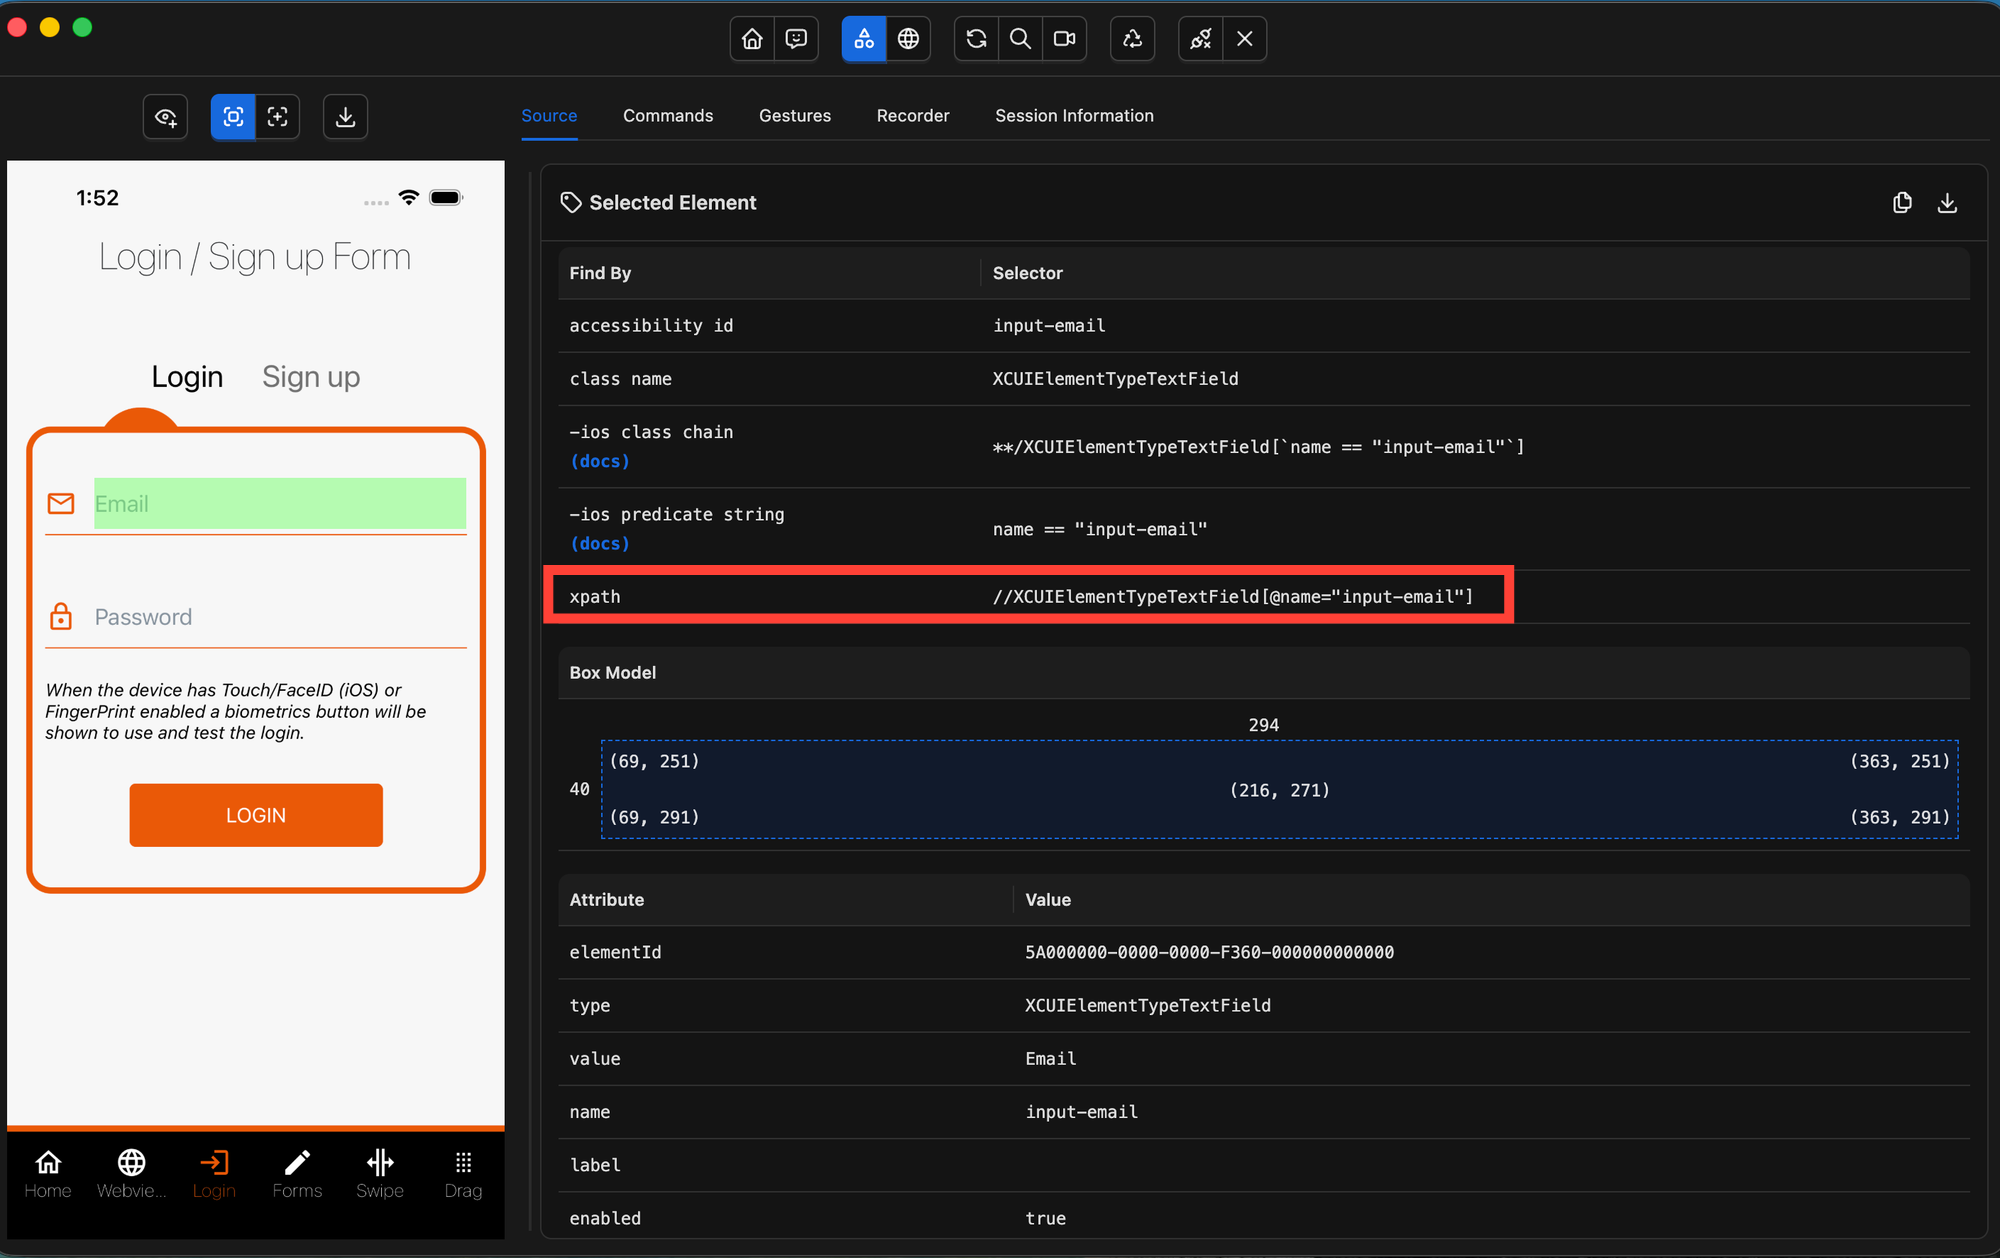
2.Id (accessibilityIdentifier)
On iOS, the ID strategy maps to the accessibilityIdentifier property — a value set by the developer purely for automation purposes. It is never shown to users and is never read by VoiceOver.
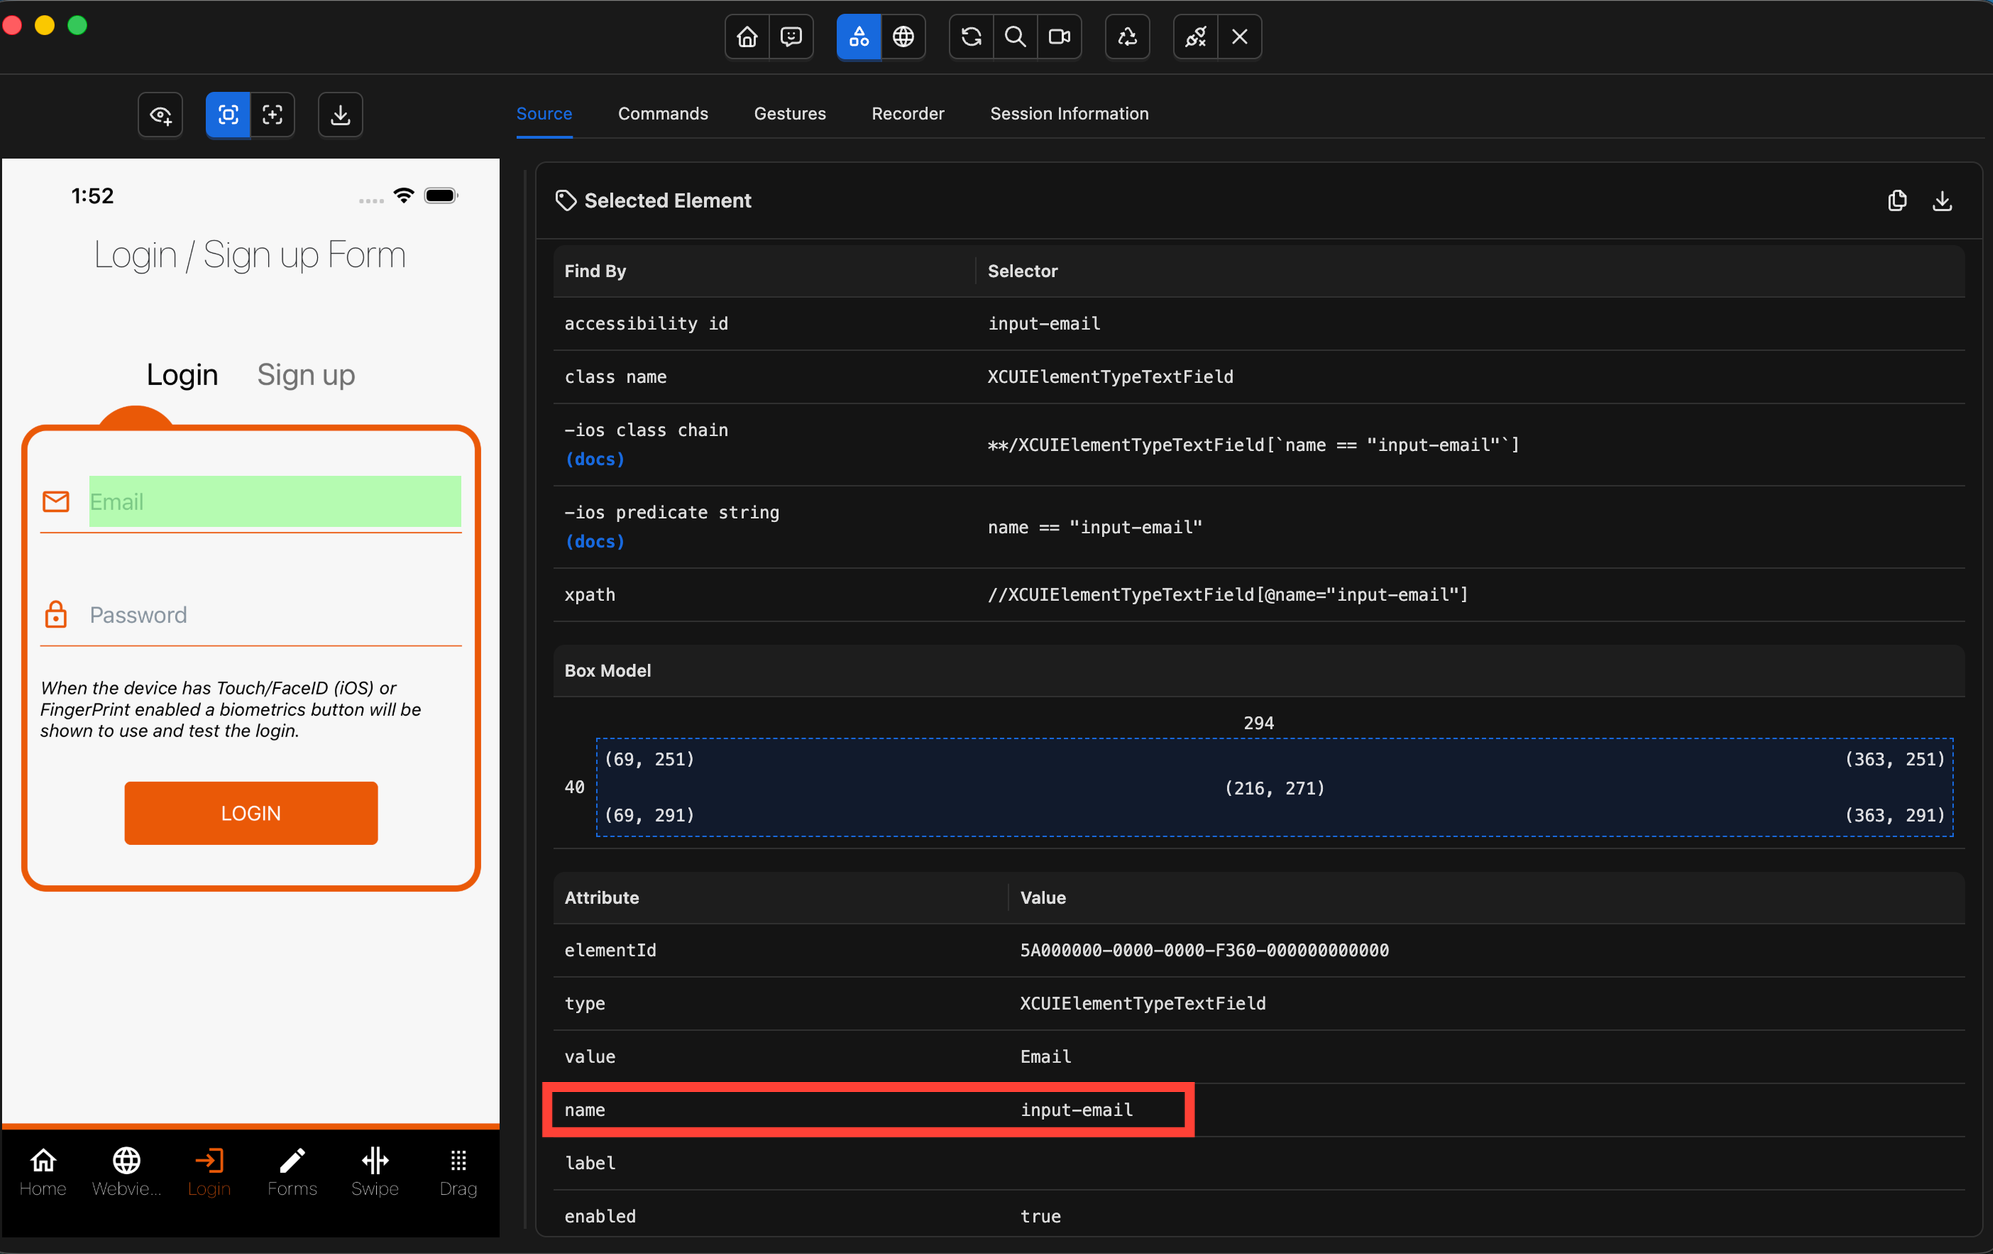
💡 Appium Inspector note: In Appium Inspector, this value appears under thenameattribute in the Element Attributes panel — notid. So when you see anamevalue on an iOS element, that is theaccessibilityIdentifier
✅ Benefits:
- Fast — resolved through a direct XCUITest lookup (no snapshot or XML serialization)
- The most stable iOS locator —
accessibilityIdentifieris set once by a developer purely for automation and never appears in the UI. A copywriter, UX designer, or product manager will never touch it - Completely decoupled from any content or design decisions
👍 When to use it?
Use ID as your first choice for iOS-only tests. It is the most stable and maintainable locator strategy available on iOS.
⚠️ When to avoid it?
Avoid Ids on iOS when you need your tests to run on both Android and iOS. accessibilityIdentifier is an iOS-only property — Android has no equivalent. Use accessibility id instead, which works across both platforms.
Note: If you open an element in Appium Inspector and bothnameandaccessibility idshow the same technical-looking value — for example"input-email","btn-login", or"home-tab"— then both strategies are equally stable. A value like"input-email"reads like code, not like a label. No UX team, copywriter, or product manager would ever change it.
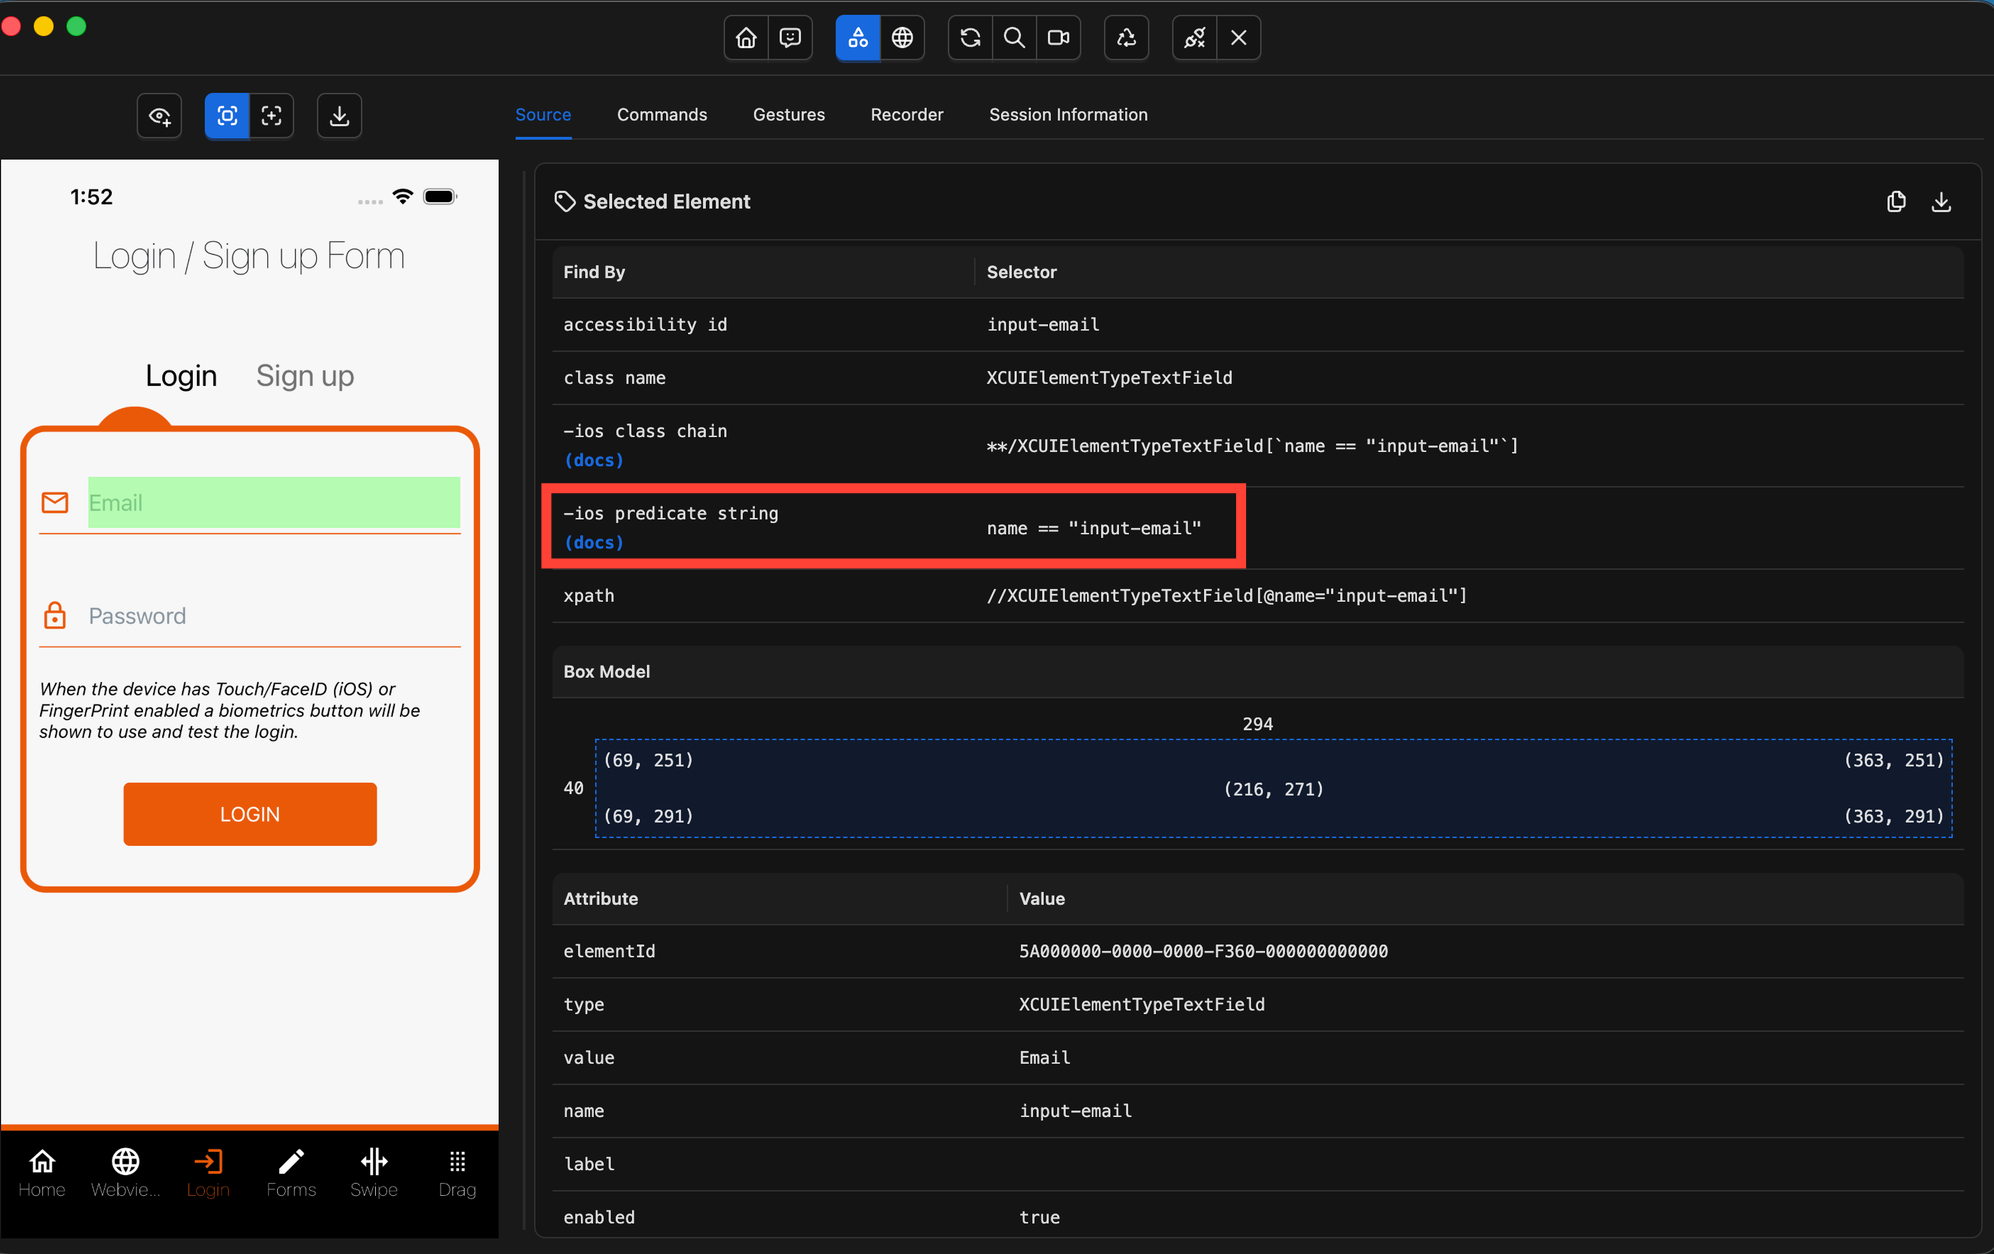
3.Predicate String (iOS Only)
Predicate String is a native iOS locator strategy based on NSPredicate — Apple’s own query language used internally by XCUITest.
It allows you to locate elements by filtering their attributes, and runs directly on the device against an in-memory list of UI elements — with no XML serialization.
You can think of Predicate String like a SQL WHERE clause applied to all elements currently on screen:
-- Conceptual equivalent of what NSPredicate does
SELECT * FROM elements
WHERE type = 'XCUIElementTypeButton'
AND label = 'Skip';
Predicate Operators:
| Operator | Meaning | Example |
|---|---|---|
== | Exact match | label == 'Login' |
!= | Not equal | label != 'Cancel' |
CONTAINS | Substring match | label CONTAINS 'Error' |
BEGINSWITH | Starts with | name BEGINSWITH 'skip' |
ENDSWITH | Ends with | value ENDSWITH '@gmail.com' |
AND / OR | Combine conditions | type == '...Button' AND enabled == true |
✅ Benefits:
- Significantly faster than XPath — executed natively using Apple’s NSPredicate engine (no XML involved)
- Efficient filtering — can match multiple attributes in a single query
- Handles dynamic content well — supports partial and flexible text matching
👍 When to use it?
Use Predicate String when:
ID(accessibilityIdentifier) is not availableAccessibility IDis not unique or too generic- You need to combine multiple attributes to narrow down a match
- You’re looking for a fast, flexible alternative to XPath
⚠️ When to avoid it?
Predicate String has no concept of hierarchy — it searches a flat list of all elements on screen. If multiple elements match the same attributes and you need to distinguish them by their position in the hierarchy, use Class Chain instead.
4.Class Chain (iOS only)
Class Chain is an Appium-specific iOS locator strategy that combines class-based navigation with predicate filtering.
It allows you to write hierarchical queries (like XPath), but instead of parsing XML, it runs natively on the device using XCUITest’s tree traversal.
How It’s Different from XPath?
The key advantage of Class Chain is pruning.
- XPath → evaluates every node in the entire UI hierarchy
- Class Chain → follows your defined path and skips entire branches that don’t match
This makes Class Chain much faster, especially on complex or deeply nested screens.
Note: The**wildcard means "at any depth" — but Class Chain still prunes non-matching branches along the way. An explicit full path is faster than**because more branches can be eliminated early.
✅ Benefits:
- Much faster than XPath — native traversal with no XML serialization
- Supports hierarchy — unlike Predicate String, it understands parent/child relationships
- Efficient on complex UIs — skips entire sections of the tree that don’t match
- Flexible — supports inline predicate filtering at each level, combining structural precision with flexible attribute matching
👍 When to use it?
Use Class Chain when:
- You need to locate elements based on hierarchy or position
- Multiple elements share the same attributes and you need to narrow them down by their position in the hierarchy
- You want a faster alternative to XPath for complex queries
⚠️ When to avoid it?
Class Chain is iOS-only. For simple attribute-based lookups where hierarchy doesn't matter, Predicate String is usually more readable and sufficient.
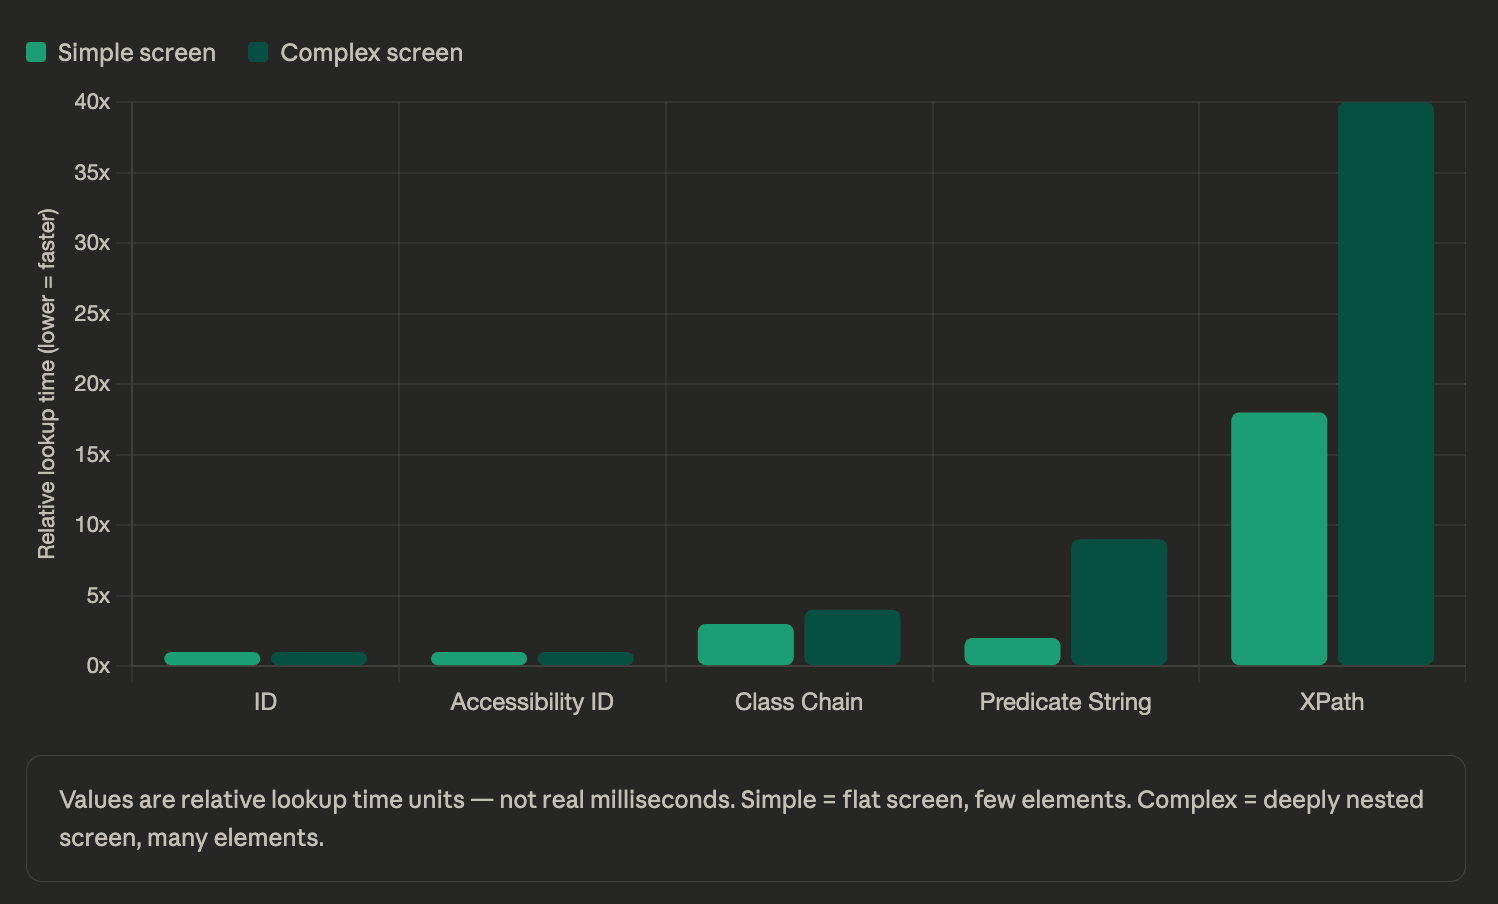
Predicate String vs Class Chain — Which Should You Use?
There’s no single “faster” option — they solve different problems.
Predicate String → “Find any element that matches these attributes.”
- Flat search (no hierarchy awareness)
- Best when the element is uniquely identifiable by its own properties
Class Chain → “Find an element at this specific place in the UI tree.”
- Hierarchy-aware (understands structure)
- Best when you need positional or parent/child context
| Scenario | Winner |
|---|---|
| Element has unique attributes | Predicate String ✅ |
| Multiple elements share the same label | Class Chain ✅ |
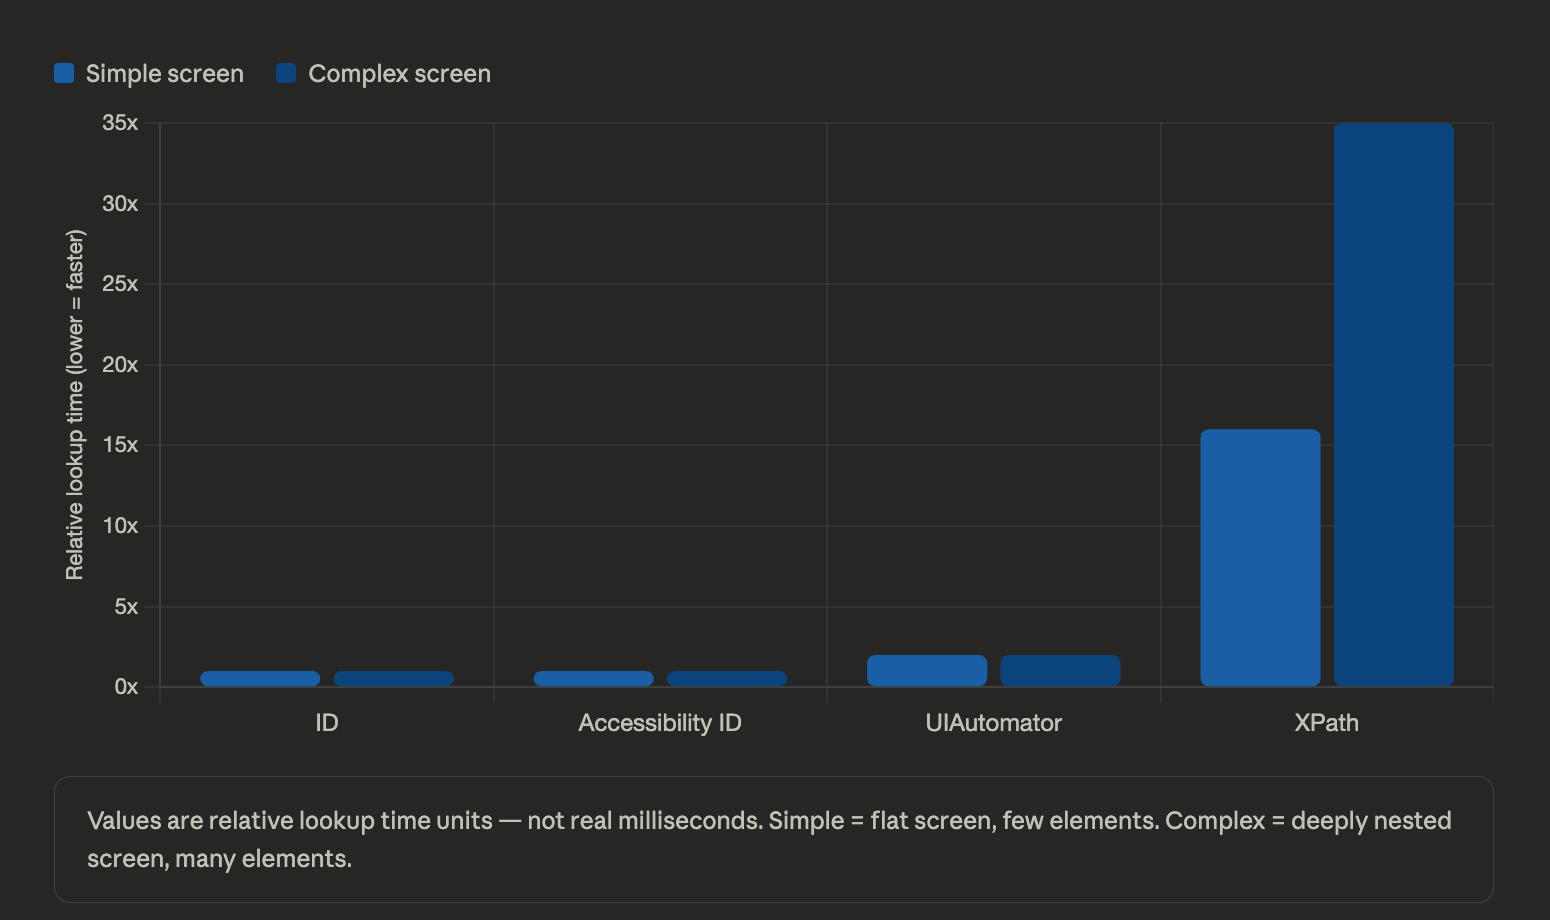
| Simple screen, few elements | Predicate String ✅ |
| Large screen, many elements | Class Chain ✅ |
| Screen structure changes often | Predicate String ✅ |
| Element always in same structural position | Class Chain ✅ |
| Need parent → child relationship | Class Chain ✅ |
| Maximum precision (attributes + structure) | Class Chain with embedded predicates ✅ |
5.XPath
XPath works on iOS the same way it does on Android — but with an important detail under the hood.
On iOS, every XPath query triggers a full XCUIApplication.snapshot():
- XCUITest freezes the UI
- Captures the entire element tree
- Converts it to XML
- Then evaluates your query
And this happens on every findElement() call, with no caching.
👍 When to use it?
Use XPath only as a last resort — when no other locator strategy (ID, Accessibility ID, Predicate, or Class Chain) can solve your problem.
⚠️ When to avoid it?
XPath is the slowest and most fragile strategy on iOS — even more than on Android.
- High performance cost: Every XPath call triggers a full snapshot, XML serialization, HTTP transfer, DOM parsing, and traversal — repeated every single call.
- Higher flakiness: Because XPath relies on a static snapshot, the UI can change immediately after it’s captured. This often leads to more
StaleElementReferenceExceptionsthan native strategies because the snapshot is already stale by the time any action is performed.
Performance Comparison
The key distinction between fast and slow locator strategies on iOS is how elements are resolved:
- Fast strategies (
ID,Accessibility ID,Predicate String,Class Chain) query elements directly through XCUITest’s native APIs
→ no full snapshot, no XML serialization - XPath, on the other hand, forces XCUITest to freeze the app --> capture a full UI snapshot --> serialize it to XML --> traverse it from scratch (and this happens on every single
findElement()call, with no caching
| Strategy | Serialization? | Speed | Reliability |
|---|---|---|---|
| Accessibility ID | ❌ No | ⚡ Fast | ✅ High |
| ID (accessibilityIdentifier) | ❌ No | ⚡ Fast | ✅ Highest |
| Predicate String | ❌ No | ⚡ Fast | ✅ High |
| Class Chain | ❌ No | ⚡ Fast* | ✅ High |
| XPath | ✅ Every call | 🐢 Slowest | ⚠️ Fragile |
*Why Class Chain Performance Varies?
Class Chain performance depends on how much of the UI tree it needs to traverse.
- On simple queries → slightly slower than Predicate
- On large or deeply nested screens → can be faster due to branch pruning
Since instead of scanning the entire tree, it:
- Follows your defined path
- Skips entire branches that don’t match
Off-Screen Elements — Android vs iOS
This is one of the biggest behavioral differences between Android and iOS — and it directly impacts how you write scrolling logic in your tests.
Android — Built-in Scroll Support
On Android, the -android uiautomator strategy provides native scrolling capabilities through UiScrollable.scrollIntoView()
This means:
- Scrolling and element lookup happen in a single native call
- Everything runs on-device
- No intermediate Appium round-trips
✅ Result: fast, efficient, and reliable
iOS — Manual Scrolling Required
On iOS, things work very differently.
XCUITest only exposes elements that are currently visible on screen.
If an element is off-screen, it does not exist in the element tree yet.
This is an OS-level constraint, not an Appium limitation. Since you cannot locate an off-screen element directly on iOS, you must:
- Scroll
- Check if the element is now visible
- Repeat until found
Best Practices for Selecting Reliable Locators
Choosing the right locator isn’t just about making tests pass — it’s about making them stable, fast, and maintainable over time.
🎯 Prefer Developer-Defined Identifiers
- Android → Prefer
resource-idovercontent-descresource-idis developer-defined and not user-facing- Changes only during intentional refactors
contentDescriptionis user-facing text → can change anytime (copy updates, localization, A/B tests)
- iOS → Prefer
accessibilityIdentifieroveraccessibilityLabelaccessibilityIdentifieris built for automation only- Completely decoupled from UI text and design changes
accessibilityLabelis spoken text → frequently updated by UX/product teams
🚫 Avoid Fragile Locators
- Position / index-based locators
- Examples:
[1],[2],following-sibling- break as soon as the UI order changes
- Examples:
- Deep XPath hierarchies
- Example:
//android.view.ViewGroup[3]/android.widget.LinearLayout[1]/android.widget.Button- This is extremely brittle since it's tightly coupled to the layout structure. A small UI refactor can break the entire locator
- Example:
🔍 Always Validate Before You Code
Use Appium Inspector → Search for Element to:
- Confirm your locator finds the correct element
- Ensure it returns only one match
This simple step can prevent hours of debugging later.
⚡ Compare Performance When Multiple Options Exist
When several locators work for the same element, use the Run Timing Comparison feature in Appium Inspector to:
- Measure how long each locator takes to resolve
- Helps you pick the fastest and most efficient option
🤝 Collaborate with Your Development Team
The most reliable tests come from testable apps.
Ask your developers to provide:
- Android →
resource-id+contentDescription(when needed) - iOS →
accessibilityIdentifier+accessibilityLabel
This gives you:
- Stable locators for automation
- Proper accessibility support for users
What's Coming Up?
Up next, we'll explore the most important capabilities for the UiAutomator2 and XCUITest drivers — covering what each one does, when you actually need it, and how to configure your sessions for the most common testing scenarios. We won't cover every capability (since there are a lot of them), but by the end you'll know exactly which ones matter and why.
We'll also tackle execute methods — Appium's way of going beyond what the standard WebDriver protocol supports. Things like scrolling to an element, manipulating the clipboard, adjusting location settings, or interacting with the device at a deeper level. These come up constantly in real test suites and are worth understanding early.


Discussion