
What is Appium?
Appium is a popular, open-source automation framework for mobile app testing on iOS and Android. It supports native, hybrid and mobile web apps, making it a flexible cross-platform choice. Mature and well-established, Appium benefits from strong community and vendor support and it’s well suited for building robust, scalable test suites.
Appium uses a client-server model, as illustrated in the above image. You write test scripts in your preferred language (Java, Python, JS, etc.), which the Appium Server receives and forwards to platform-specific drivers —like UiAutomator2 for Android or XCUITest for iOS to execute on the device
Why is Appium useful?
- Write Once, Run Anywhere: The same test script can work for both Android and iOS saving you double the work.
- Test the Real App: You don’t have to change or "break" your app to test it. You test the exact version users will see.
- Use your Favorite Language: You don't have to learn something new; it works with Java, Python, JS, and more.
- Tests any Mobile App: It handles all app types – regular apps, mobile websites, or a mix of both.
- Total Control: It can do anything a human user can, like take photos, change locations, or check alerts.
- Seamless Integration: It easily integrates with standard testing frameworks (like JUnit or TestNG) and CI/CD pipelines (like Jenkins), helping teams automate their release cycles.
Getting started with Appium 3.2
As stated on the official Appium documentation, Appium 3 requires Node.js 20 or later to run properly. Before installing Appium, we’ll make sure our system is ready.
Install Homebrew
To simplify the setup process, we’ll first install Homebrew (brew), the most popular package manager for macOS. Homebrew makes it easy to install and manage tools like Node.js directly from the Terminal.
You can install Homebrew by running the following command:
/bin/bash -c "$(curl -fsSL https://raw.githubusercontent.com/Homebrew/install/HEAD/install.sh)”
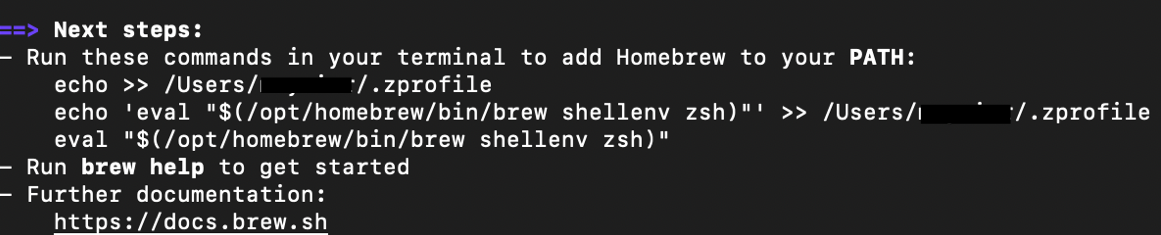
After installing Homebrew, you may be prompted to run a few commands in your Terminal to add Homebrew to your PATH. This step ensures that the brew command is recognized globally on your system.
If you don’t already have a .zprofile file on your Mac, you can create one easily:
- Open a new Terminal window.
- Navigate to your home directory (for example:
cd /Users/{user}). - Run the following command:
nano ~/.zprofile
This will create (or open) the .zprofile file in the Nano editor.
To save and exit Nano:
- Press
CTRL + O, then pressENTERto save. - Press
CTRL + Xto exit the editor.
Before proceeding, verify that Homebrew was installed correctly by checking its version:
brew --version
If the installation was successful, the current Homebrew version number should be displayed.

Install NodeJS
Next, install the latest version of Node.js using the following command:
brew install node
Once the installation is complete, verify that Node.js was installed correctly by checking its version:
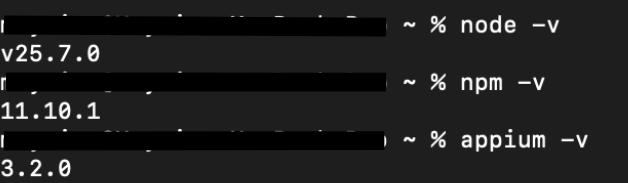
node -v
If the installation was successful, the Terminal will display the currently installed Node.js version.

Install Appium 3.2
To install Appium globally, run the following command:
npm install -g appium
This will install the latest available version of Appium (at the time of writing, version 3.2).
If you need to install a specific version of Appium, you can specify it in the command like this:
npm install --location=global appium@<version_number>
Once the installation is complete, you can verify the installed version by running:
appium -v
If everything was installed correctly, the Terminal will display the current Appium version.
Starting the Appium Server
To start the Appium server, simply run the following command in your Terminal:
appium
Once the server starts successfully, it will begin listening for incoming test sessions at: http://127.0.0.1:4723
This is the default host and port where your automated tests will connect to create new sessions.

Stopping the Appium Server
To stop the Appium server, press:
CTRL + C
This will gracefully terminate the running Appium process.

Install JAVA for Appium
In the upcoming guides, we’ll use Java for our Appium examples, as it remains one of the most popular and well-supported languages in mobile test automation. Let’s go ahead and install it.
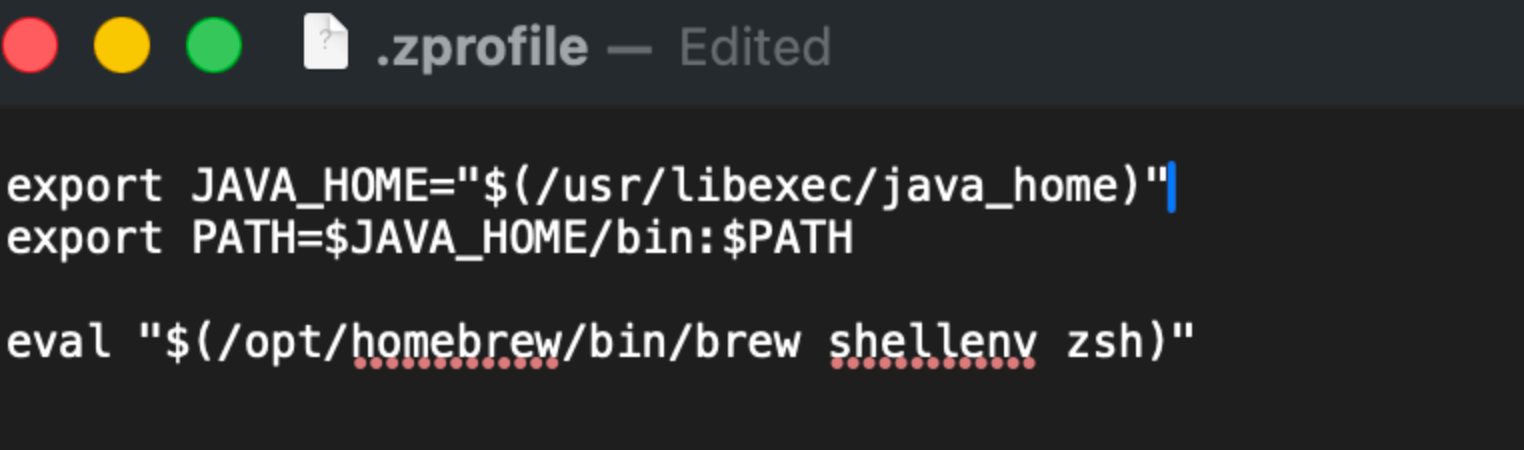
Visit the official Oracle download page and download the JDK version you want to use. Once the Java JDK installation is complete, you’ll need to configure your environment variables.
Open your .zprofile file and add the JAVA_HOME variable so your system can properly locate the Java installation. This ensures that Java and related tools (such as Maven or Gradle) work correctly from the command line.
After updating the file, reload your Terminal session or run:
source ~/.zprofile
You can then verify the installation by running:
java -version
If everything is configured correctly, the installed Java version will be displayed.

What’s Next?
Now that the Appium Server and Java are installed and configured, the next step is setting up the platform drivers. In my next post, we’ll walk through installing and configuring UIAutomator2 (Android) and XCUITest (iOS) on macOS.


Discussion